Table of Contents
File Path Handling
This section explains how to specify file paths in Gravio Action Components.
Absolute Paths
Specify the complete path to the file.
- Windows:
C:\Users\username\Documents\file.txt - macOS/Linux:
/Users/username/Documents/file.txt
Relative Paths
Specify paths relative to the Gravio execution directory.
data/file.txt- file.txt in the data folder../file.txt- file.txt in the parent directory
Using Environment Variables
You can use environment variables to specify paths.
- Windows:
%USERPROFILE%\Documents\file.txt - macOS/Linux:
$HOME/Documents/file.txt
Important Notes
- On Windows, you can use either
\or/as path separators - For filenames containing multibyte characters like Japanese, use UTF-8 encoding
- Paths containing spaces should be enclosed in quotes
OpenAI API Key Setup
This section explains how to obtain the API Key required for using OpenAI components.
1. Create an OpenAI Account
Access OpenAI Platform and create an account.
2. Generate API Key
- Log in to OpenAI Platform
- Select "View API keys" from the account menu in the top right
- Click the "Create new secret key" button
- Give it an appropriate name and create the API Key
- Copy the displayed API Key and store it in a secure location
3. Set Usage Limits
We strongly recommend setting usage limits to avoid unexpected high charges.
- Navigate to the "Billing" section
- Set monthly limits in "Usage limits"
- Set up alerts as needed
4. Configuration in Gravio
Use the obtained API Key in Gravio's OpenAI components.
You have now obtained the API Keys for OpenAI.
Text2SQL Usage Guide
The Text2SQL function provided in database-related components is a feature that can generate SQL statements from Japanese input into the prompt to get the data you want using the ChatGPT function of OpenAI. In order to use the Text2SQL function, you need to obtain the API Key and OrganizationId from OpenAI in advance. Please check OpenAI API Key Setup on how to get them.
1. Preparation
Please get the API Key and OrganizationId from OpenAI. Then, set the properties in each database-related component so that you can correctly connect to the database.
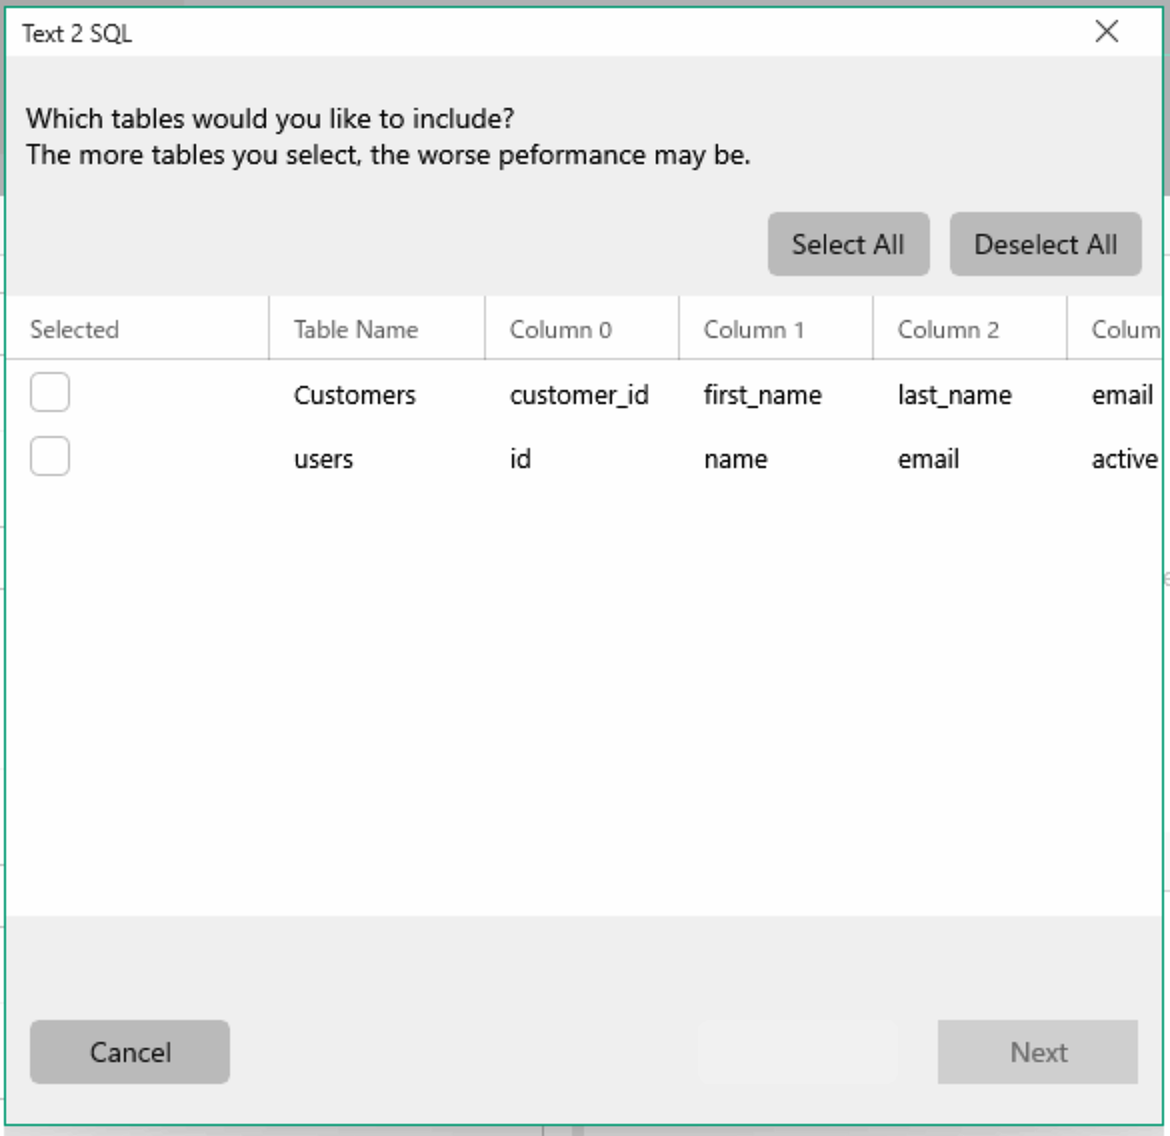
2. Selecting a Table in Text2SQL
When you press the Text2SQL button, the Text2SQL panel will open.
3. Generating SQL Statements from Prompts
When the Text2SQL panel opens, if you can connect to the database correctly, the tables will be displayed in a list, so select the table you want to use.
When you press the Next button, the prompt input panel will be displayed.
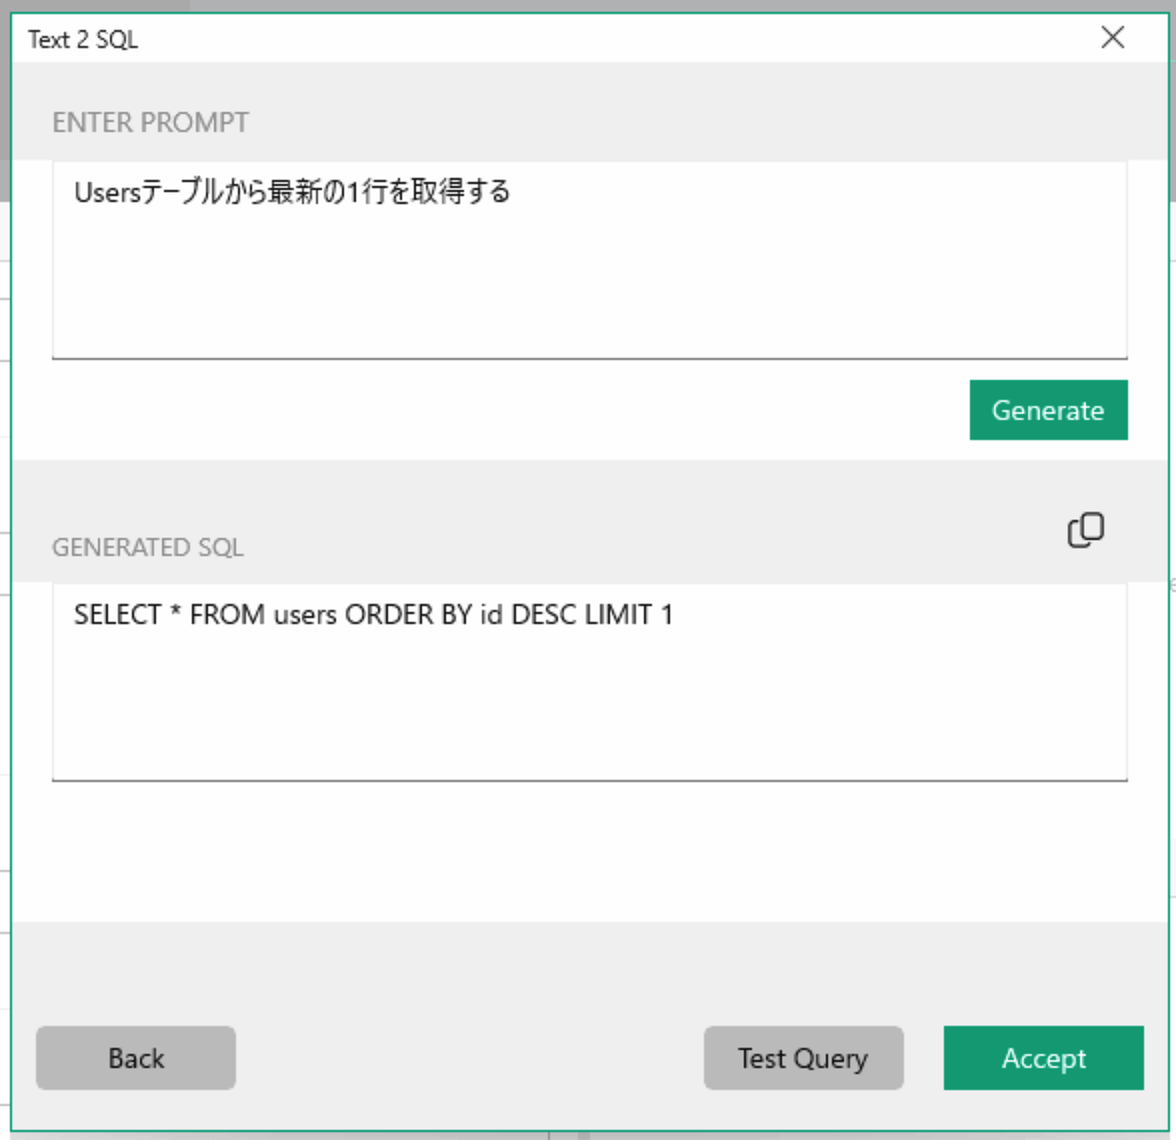
Enter the data you want to get in Japanese in the prompt. When you press the Generate button, the generated SQL statement will be displayed in GENERATED SQL.
When you press the Test Query button, a panel for executing SQL and getting data will be displayed.
When you press the Accept button, the generated SQL statement will be copied to the SQL property of the component.
Important Notes
- Requires OpenAI API key for ChatGPT access
- Works best with clear, specific Japanese prompts
- Always verify generated SQL before execution
- Database connection must be properly configured
How to register a bot for LINE WORKS
To use the LINE WORKS component, the LINE WORKS administrator must perform initial Bot settings.
LINE WORKS Developers
1. Creating a LINE WORKS Developers Account
Create an account from here and set up a Bot for LINE WORKS.
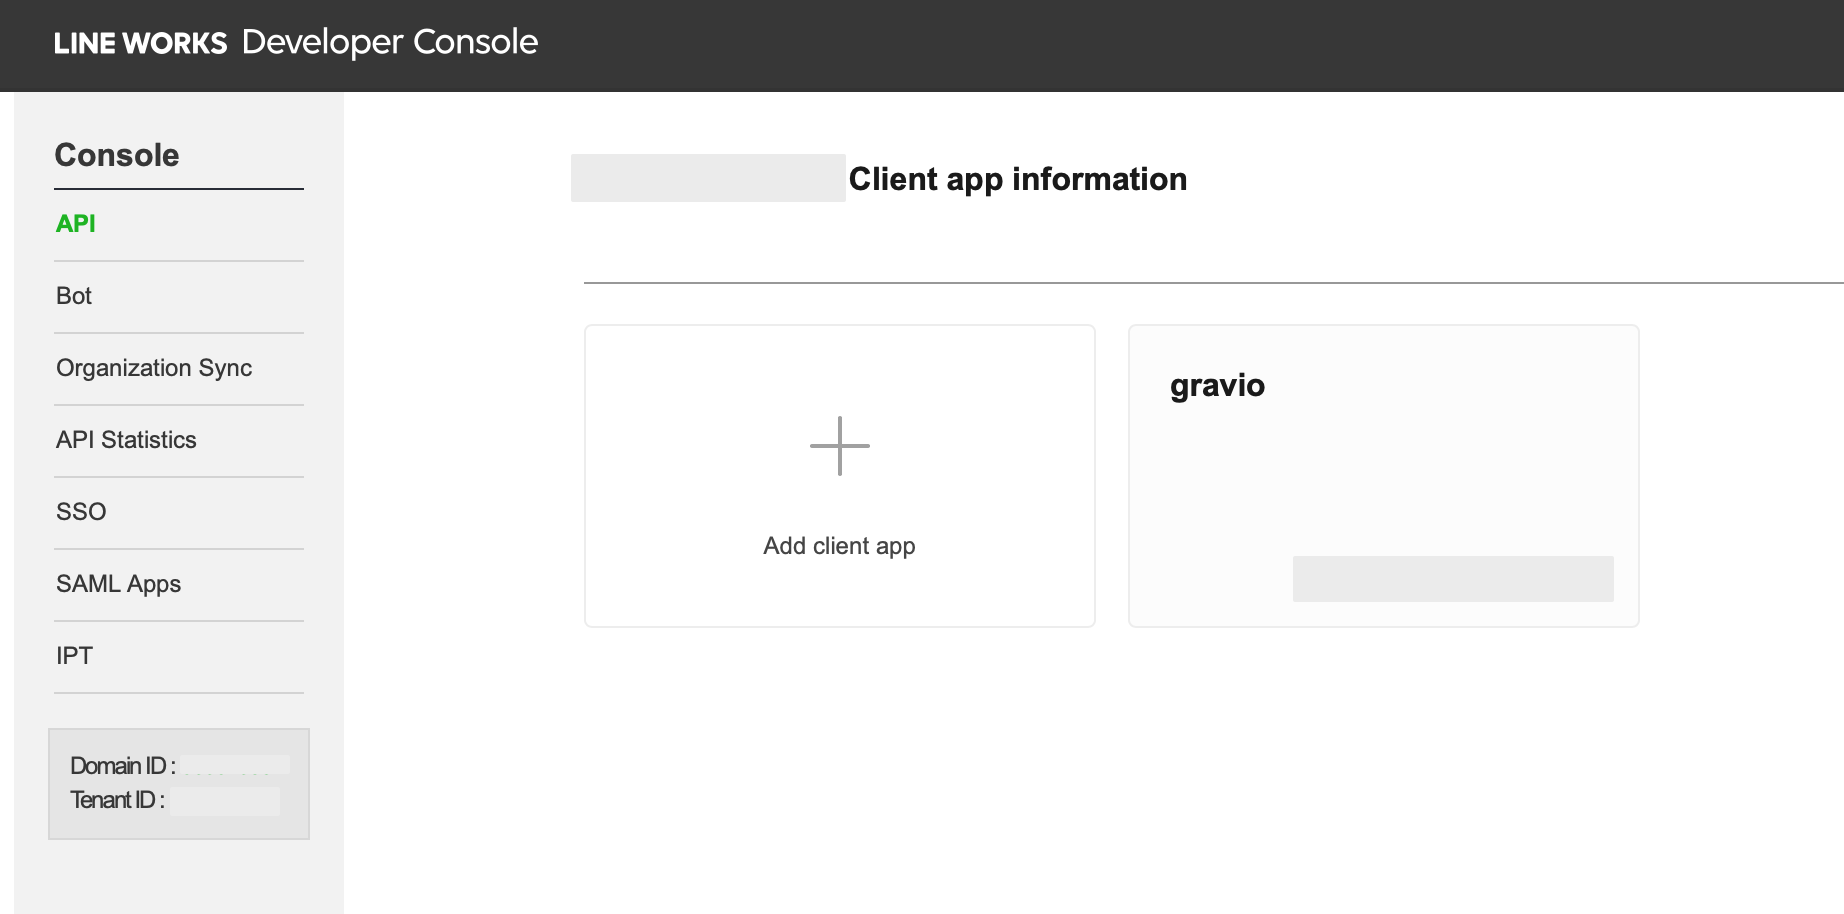
2. Creating an App
The LINE WORKS2 component uses API 2.0, so create a new app from the API 2.0 menu.
When you create an app, Client ID and Client Secret will be generated. Use these in the LINE WORKS2 component properties. For the Redirect URL, please specify "http://127.0.0.1:48888/callback". This will also be used in the LINE WORKS2 component properties.
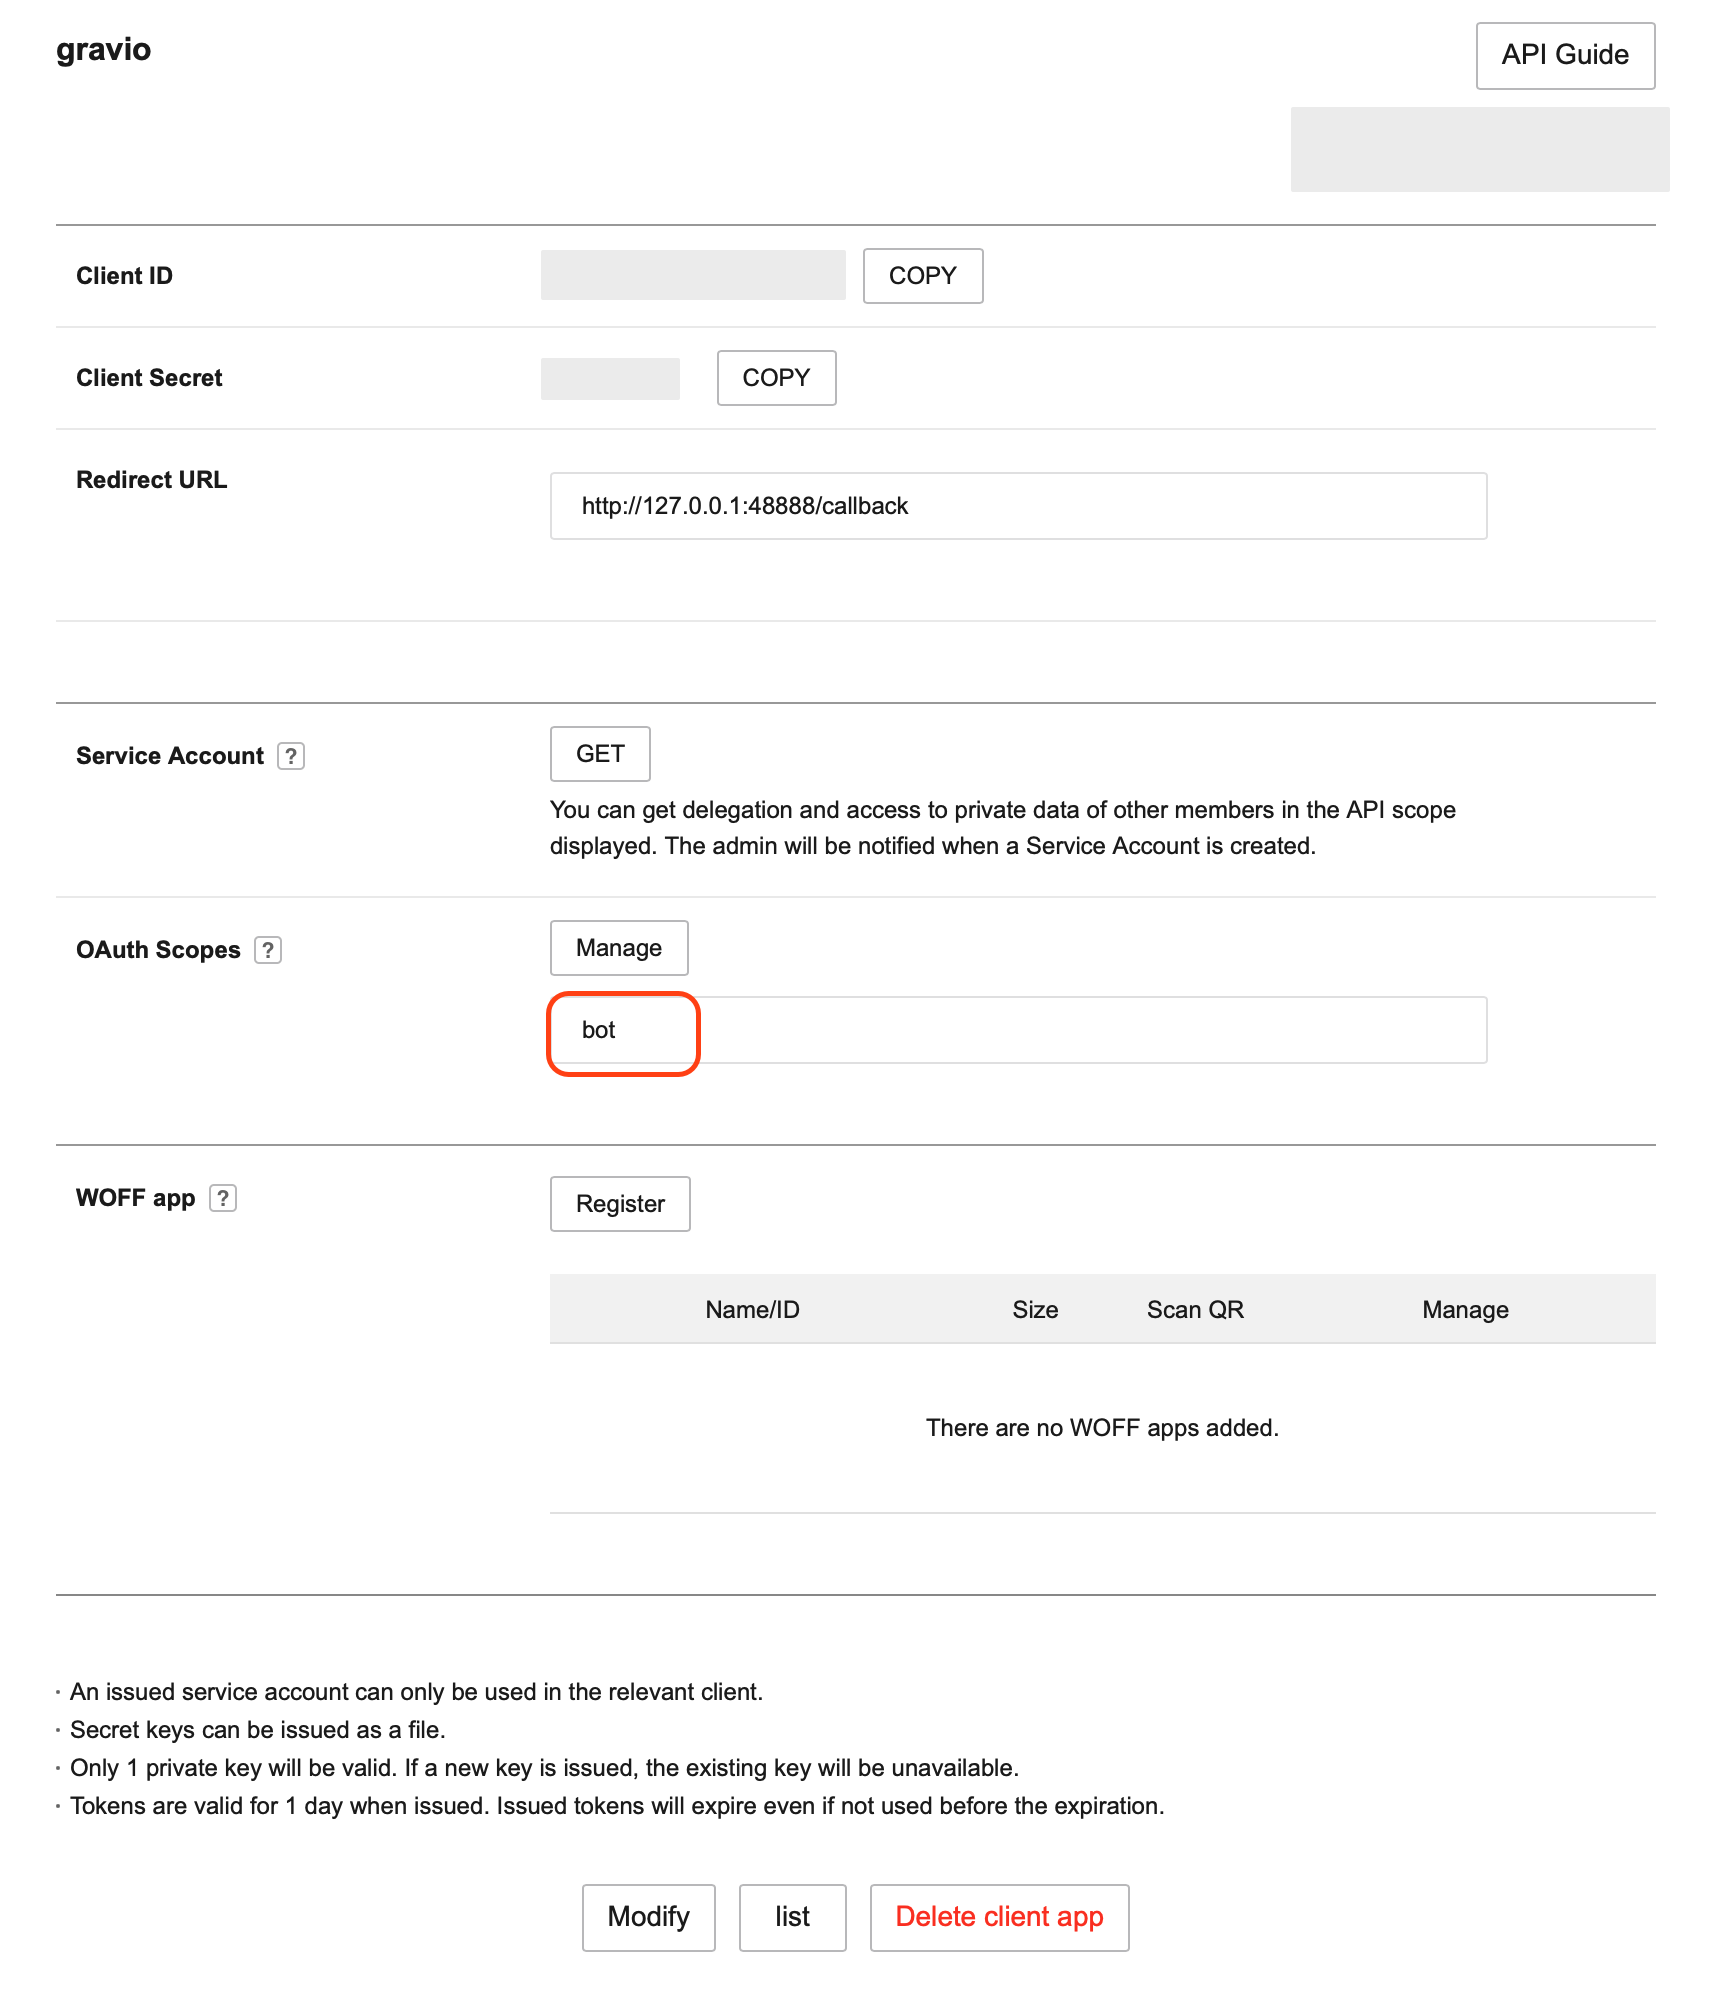
For OAuth Scopes, press the manage button and select 'bot' from the list.
3. Creating a Bot
Press the Bot registration button from the Bot menu.
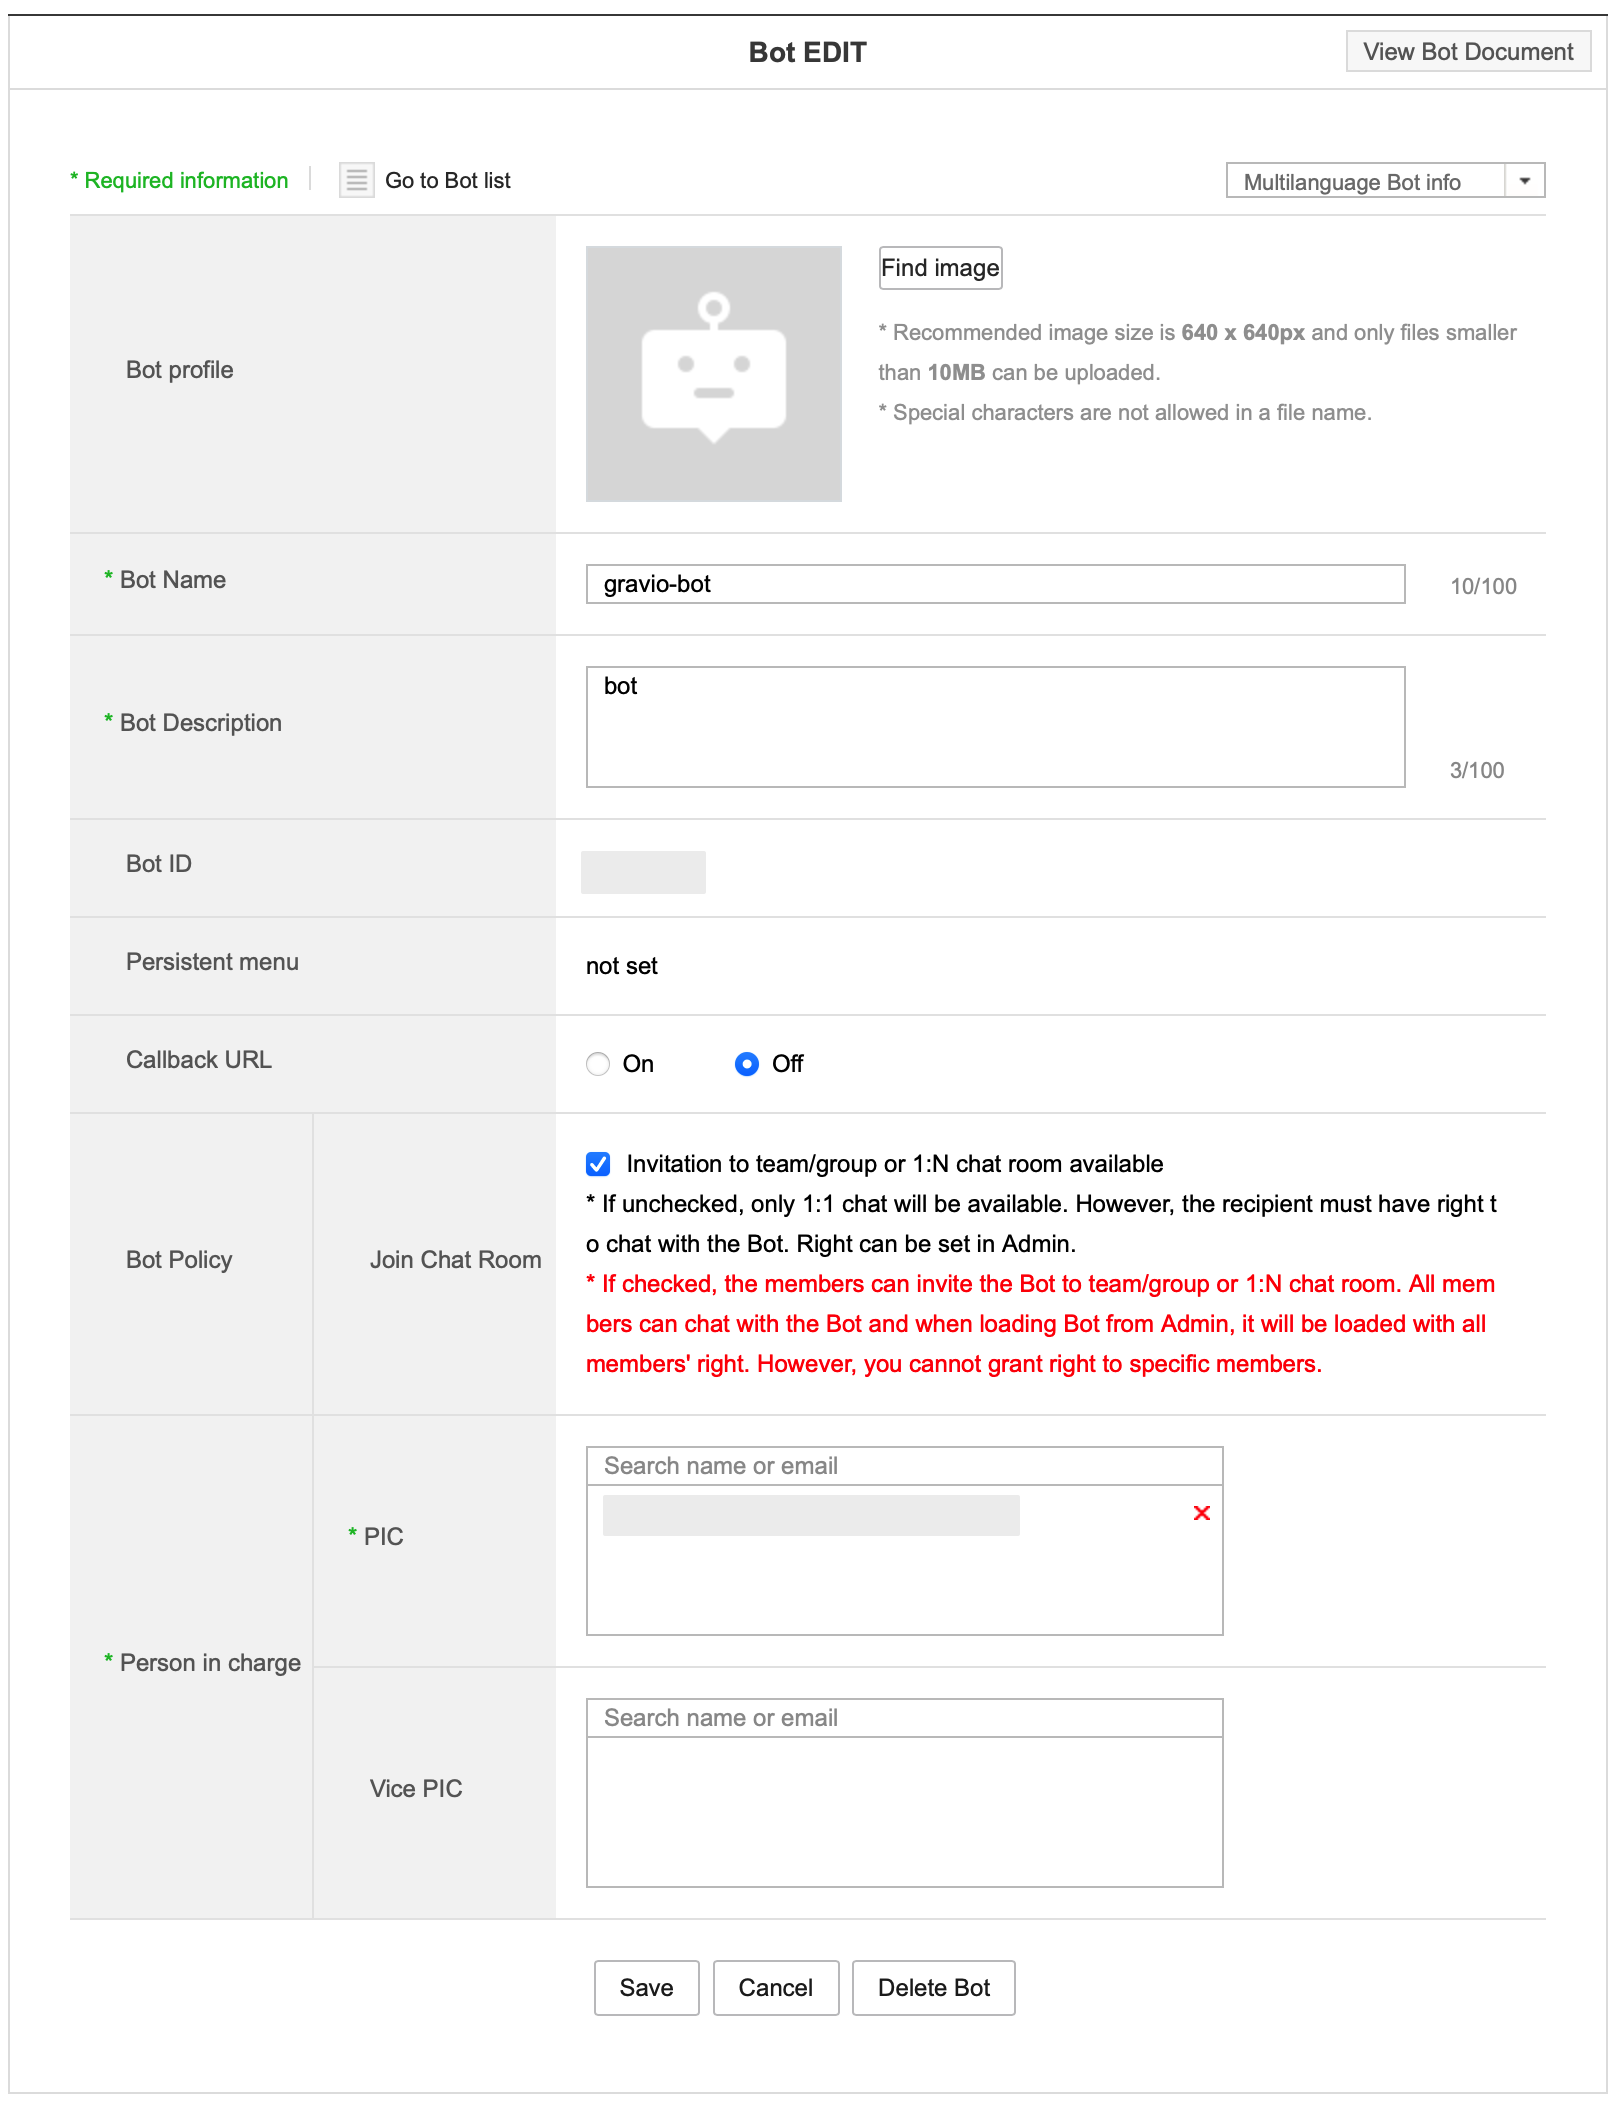
Enter the Bot name and description. Select API 2.0 for the API Interface. For the Bot policy, check 'Can be invited to multi-user chat rooms' and set the main administrator. After registration is complete, the Bot No: will be displayed. Use this in the LINE WORKS2 component properties.
LINE WORKS Admin
1. Logging in to the LINE WORKS Management Screen
Administrators log in from here to display the LINE WORKS management screen.
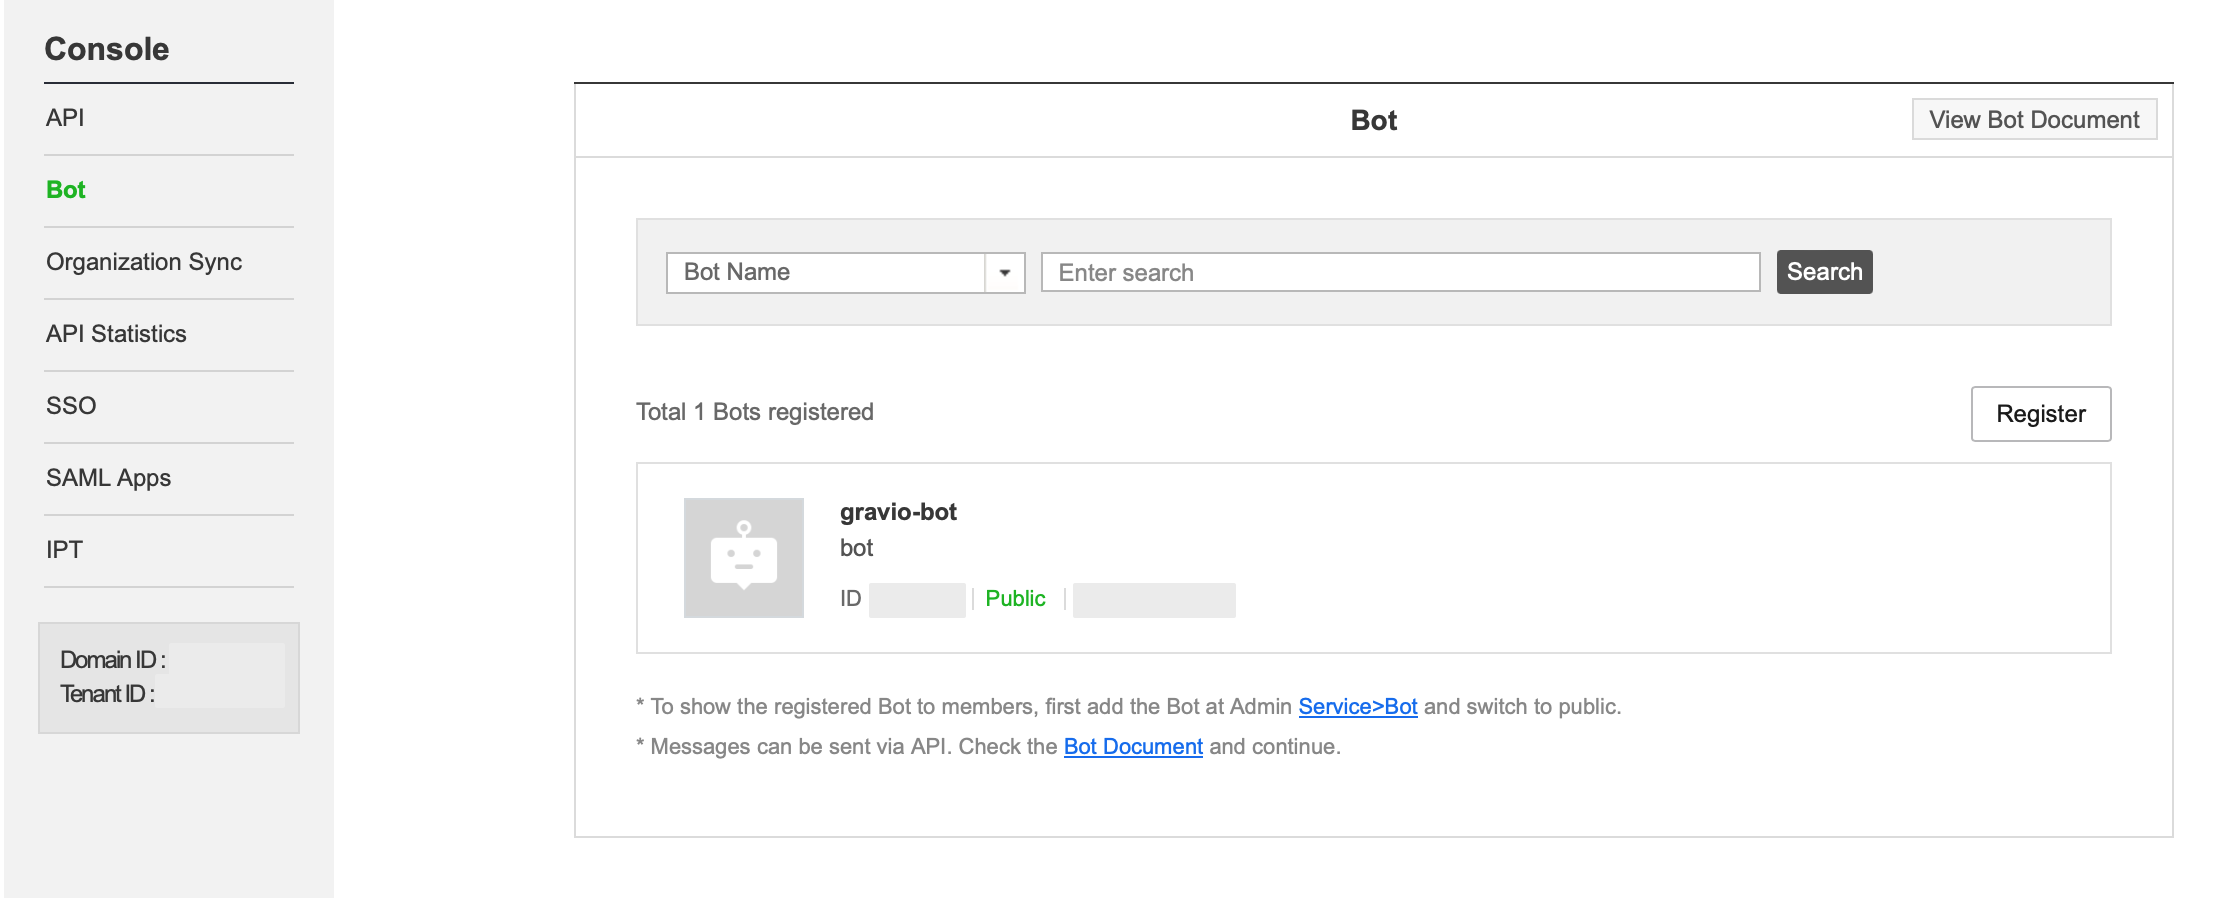
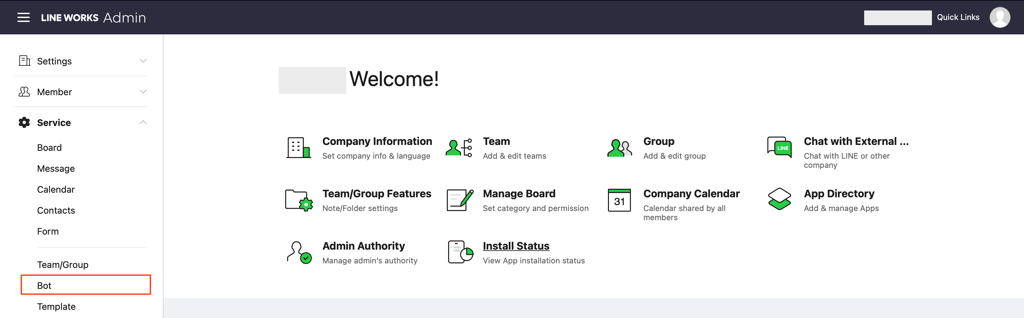
2. Bot Settings
Select 'Bot' from the service menu and press the 'Add Bot' button.
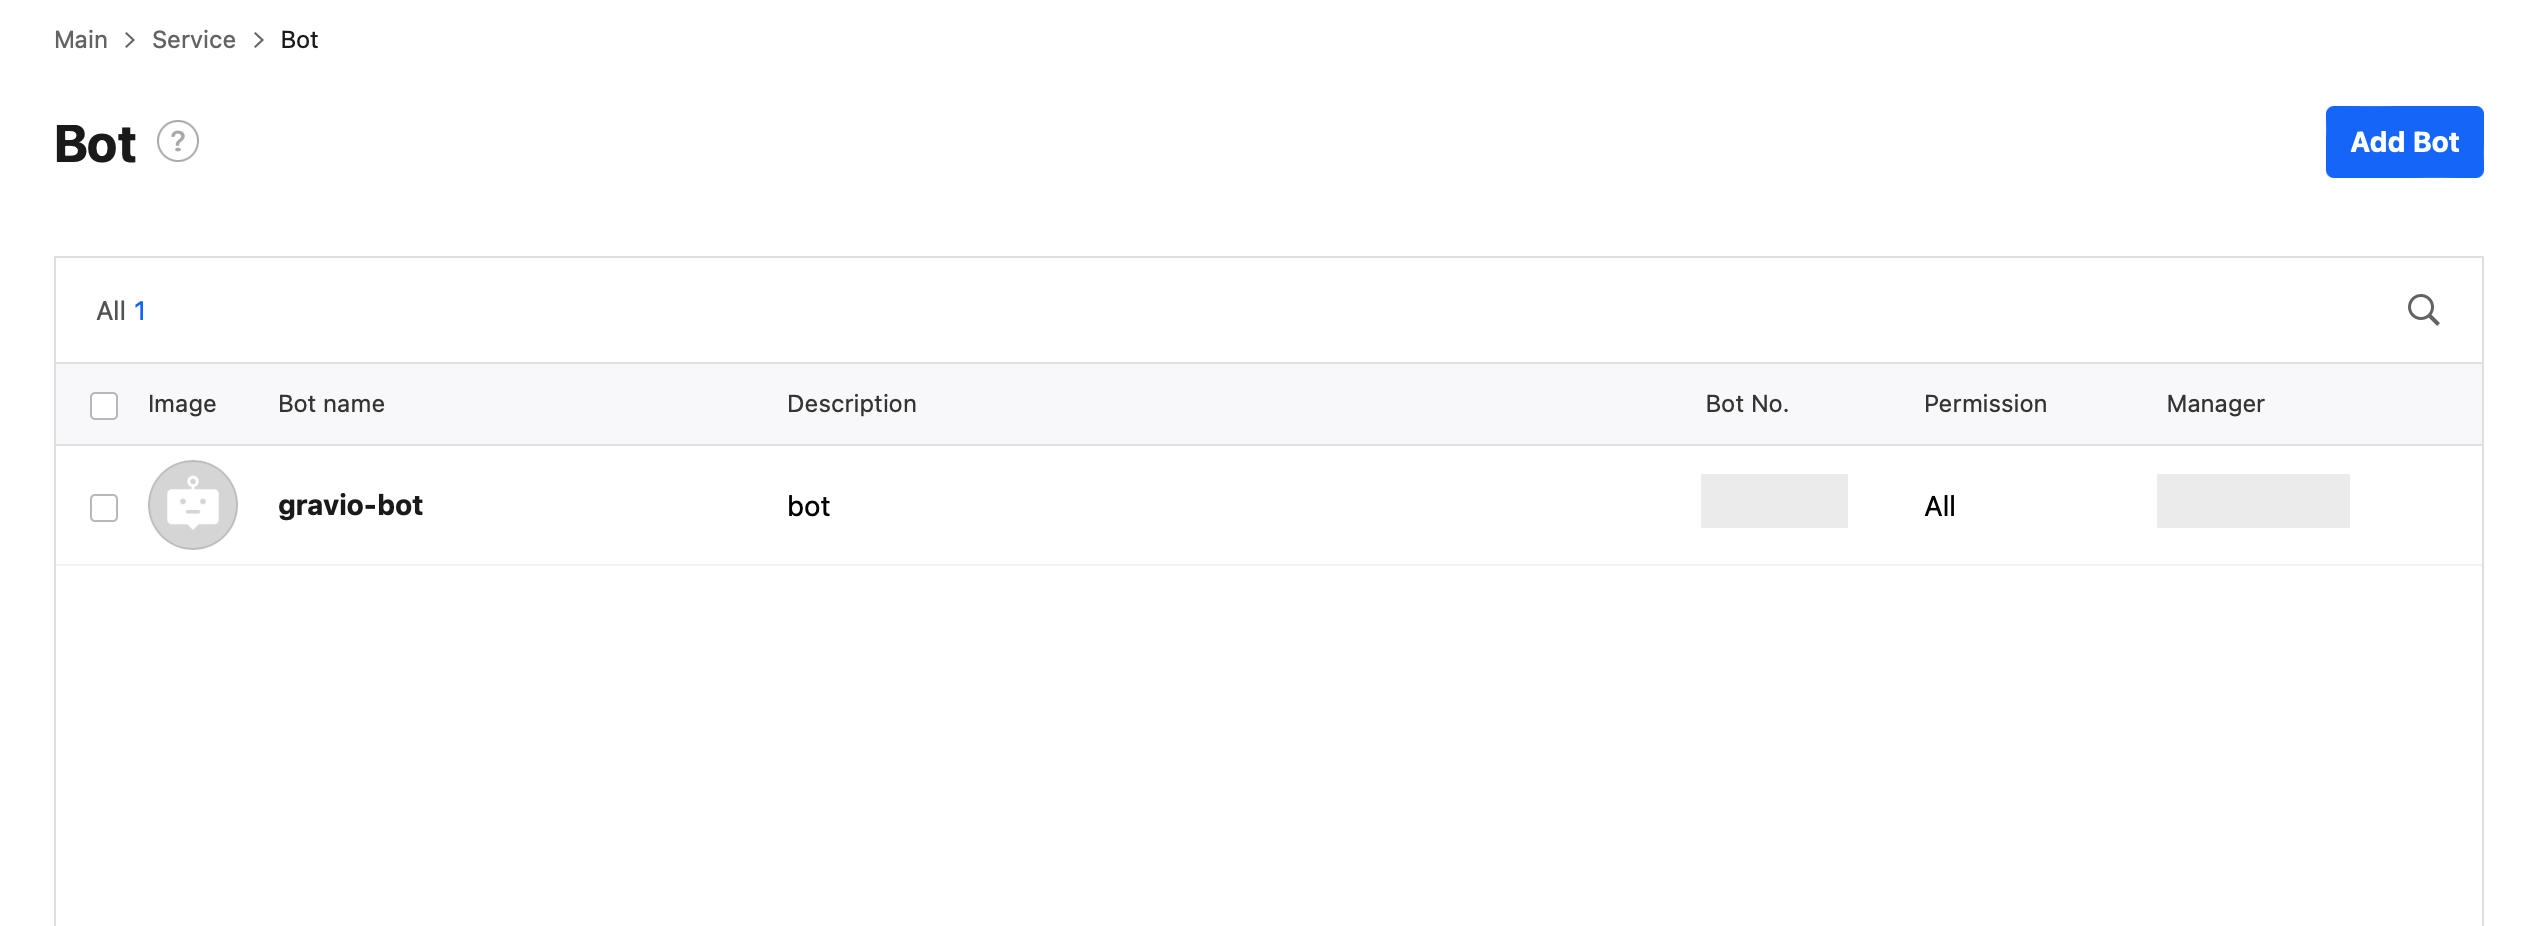
When you re-display the Bot screen, the added Bot will be displayed.
3. Adding a Bot to the Chat Room
If you want to use the Bot within a chat room, create a new chat room or add it to an existing chat room.
4. Confirming the Chat Room ID
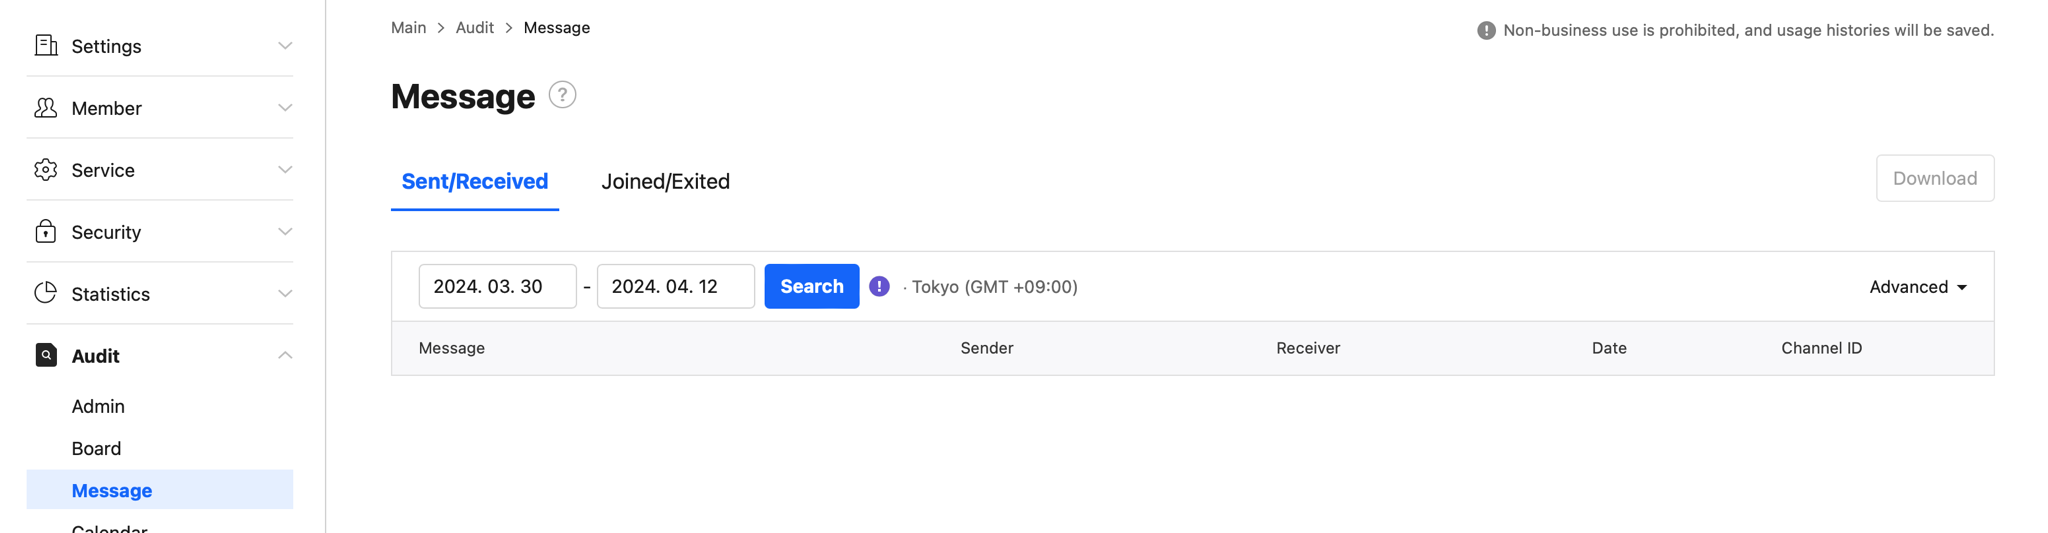
Even if you create a chat room using the LINE WORKS app or website, the chat room ID is not displayed. Therefore, have a member send a message in the chat room where the Bot will be used.
After a while, select 'Talk' from the audit menu and search. The chat room ID will be displayed. Use this in the LINE WORKS2 component properties.
With this, the preliminary preparation is complete.
OAuth2 Setup
This section explains how to set up OAuth2 authentication for various Gravio components including email services and Google Drive.
How to set up sending e-mail with OAuth2.0 : Advanced Authentication (OAuth2)
This document explains how to set up advanced authentication (OAuth2) for sending mail with the Mail component.
Advanced authentication (OAuth2) has been tested and confirmed to work with Gmail and Outlook.
To set up OAuth2, use GCP for Gmail and Azure for Outlook.
Correct settings require accurate knowledge of GCP or Azure.
If you are unsure about the detailed setting method, please contact Google for GCP and Microsoft for Azure.
1. How to set up mail sending in Gmail
Flow of setting method
We will set up the following steps in GCP.
1-1. Enable GMail API from the API service library.
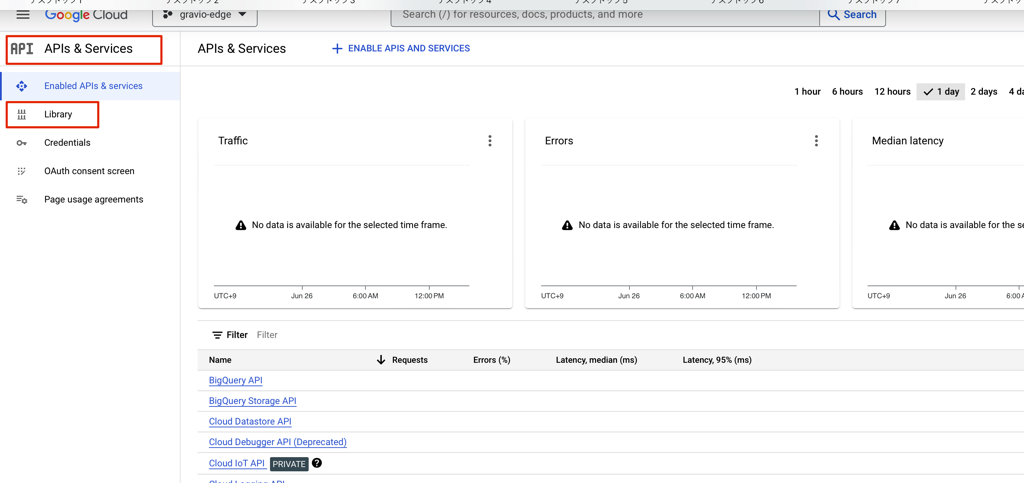
Select the library from the API service menu.
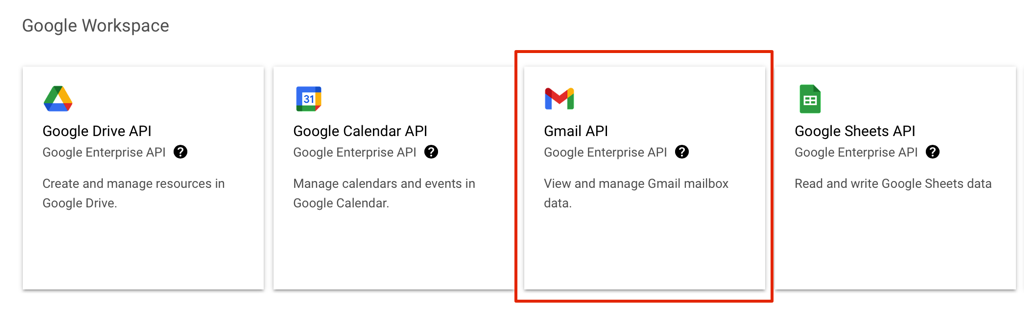
Select Gmail API.
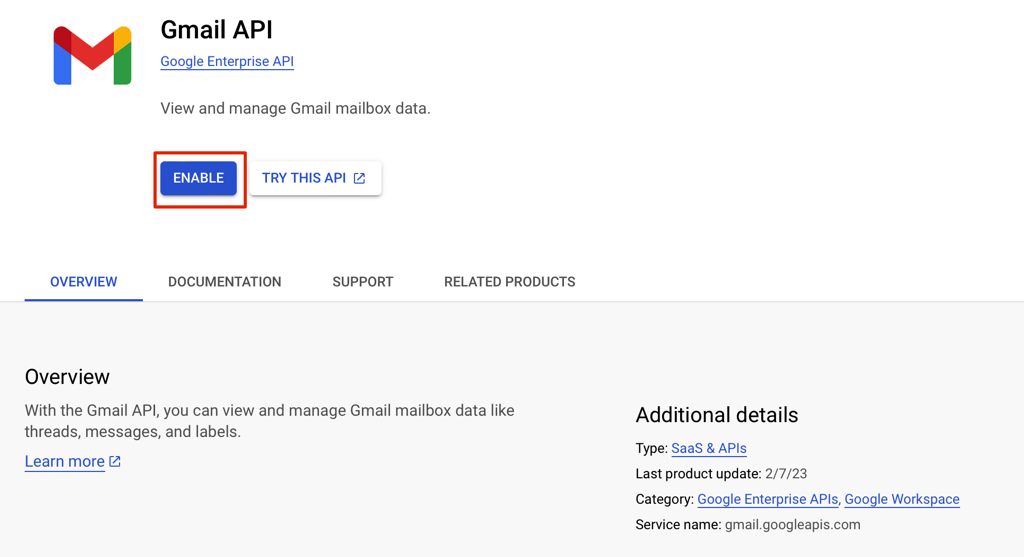
Enable Gmail API.
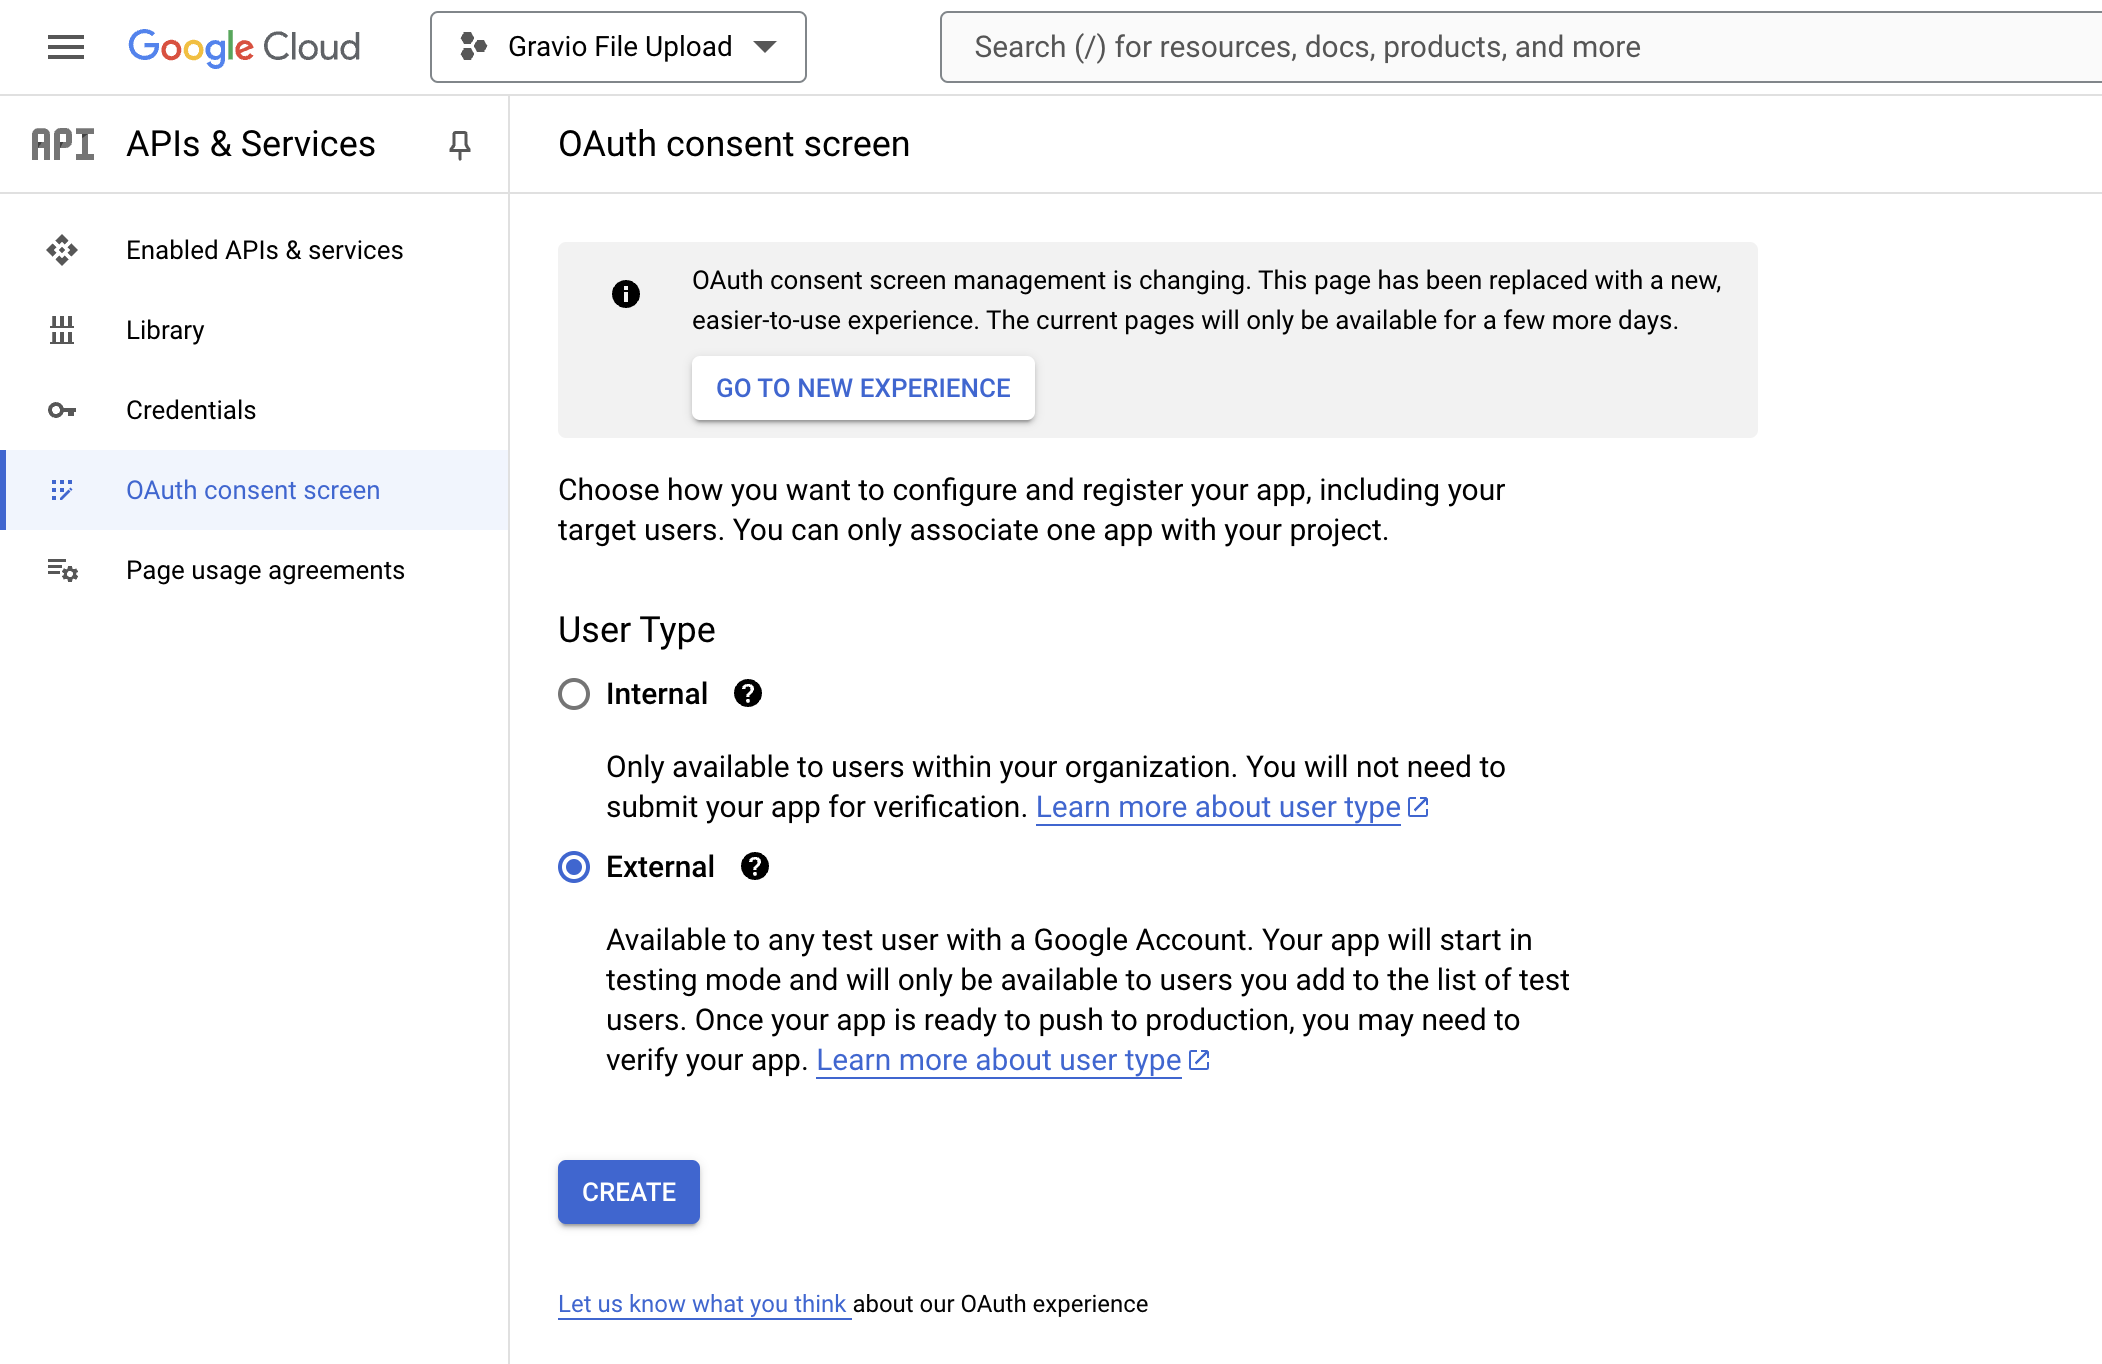
1-2. Press the Create button by selecting "External" from the OAuth consent screen menu.
1-3. Register Gmail's scope in the scope.
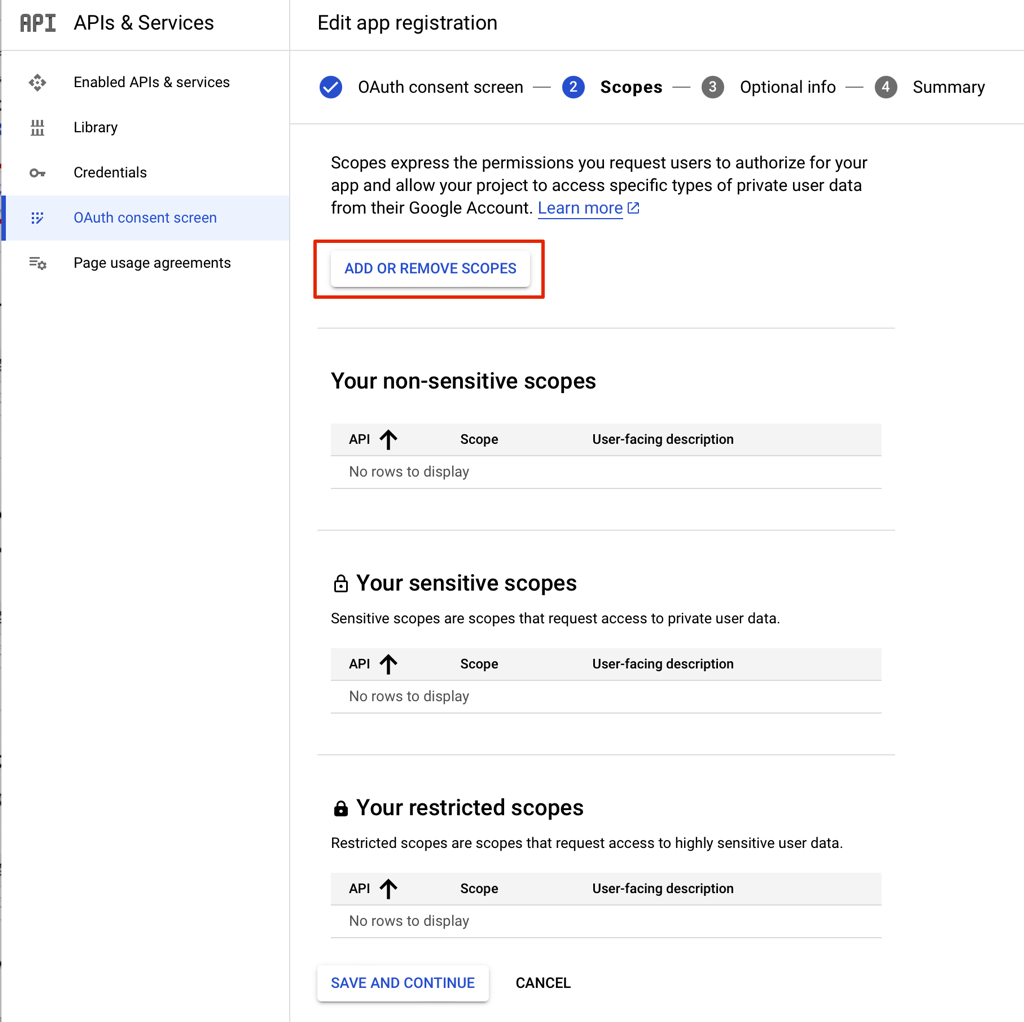
For scope, specify necessary permissions such as "Gmail view all mail, create, send, complete delete".
1-4. Register the Gmail email address that sends GMail mail in the test user.
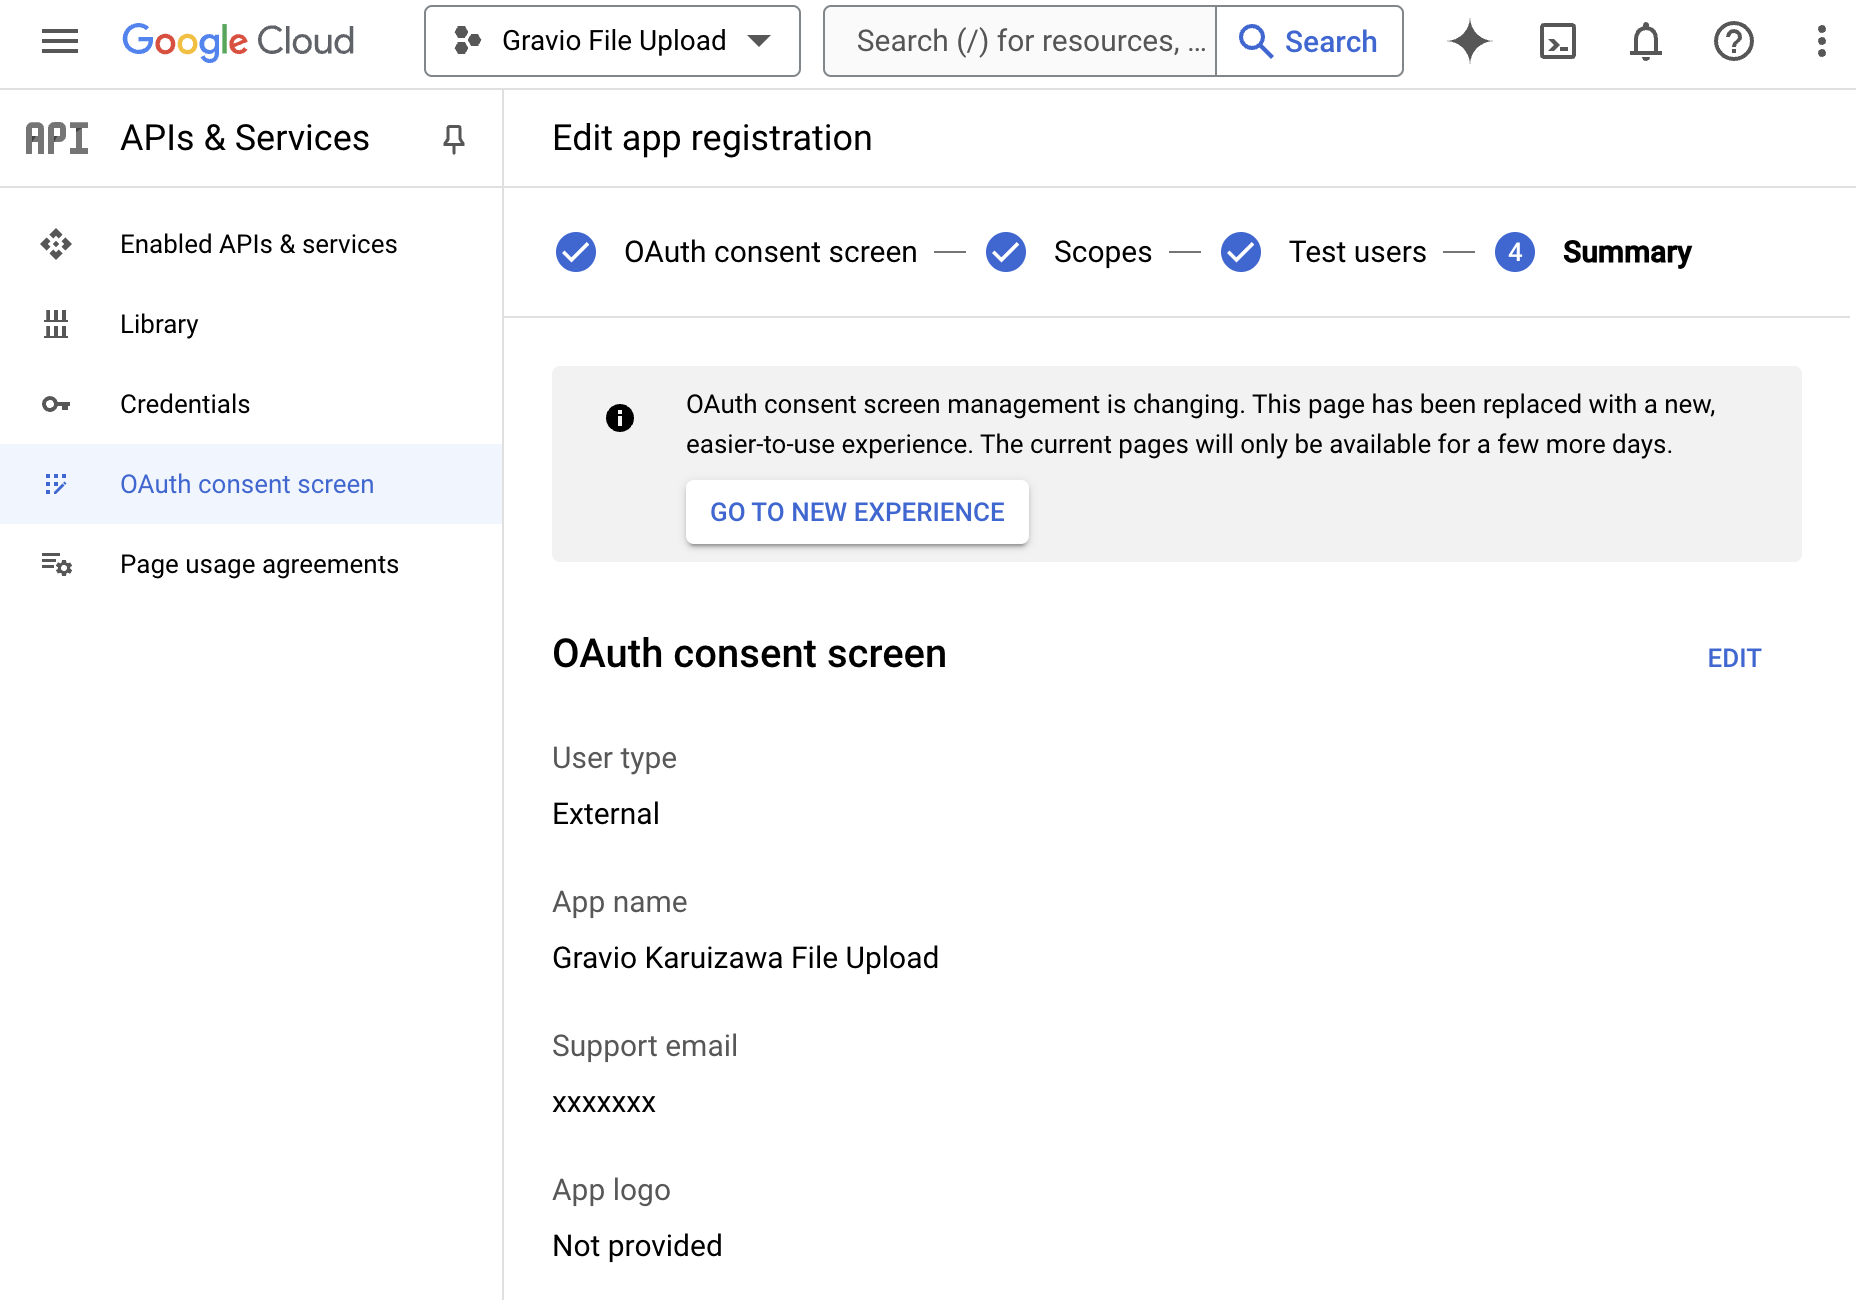
1-5. Check the contents registered in the summary.
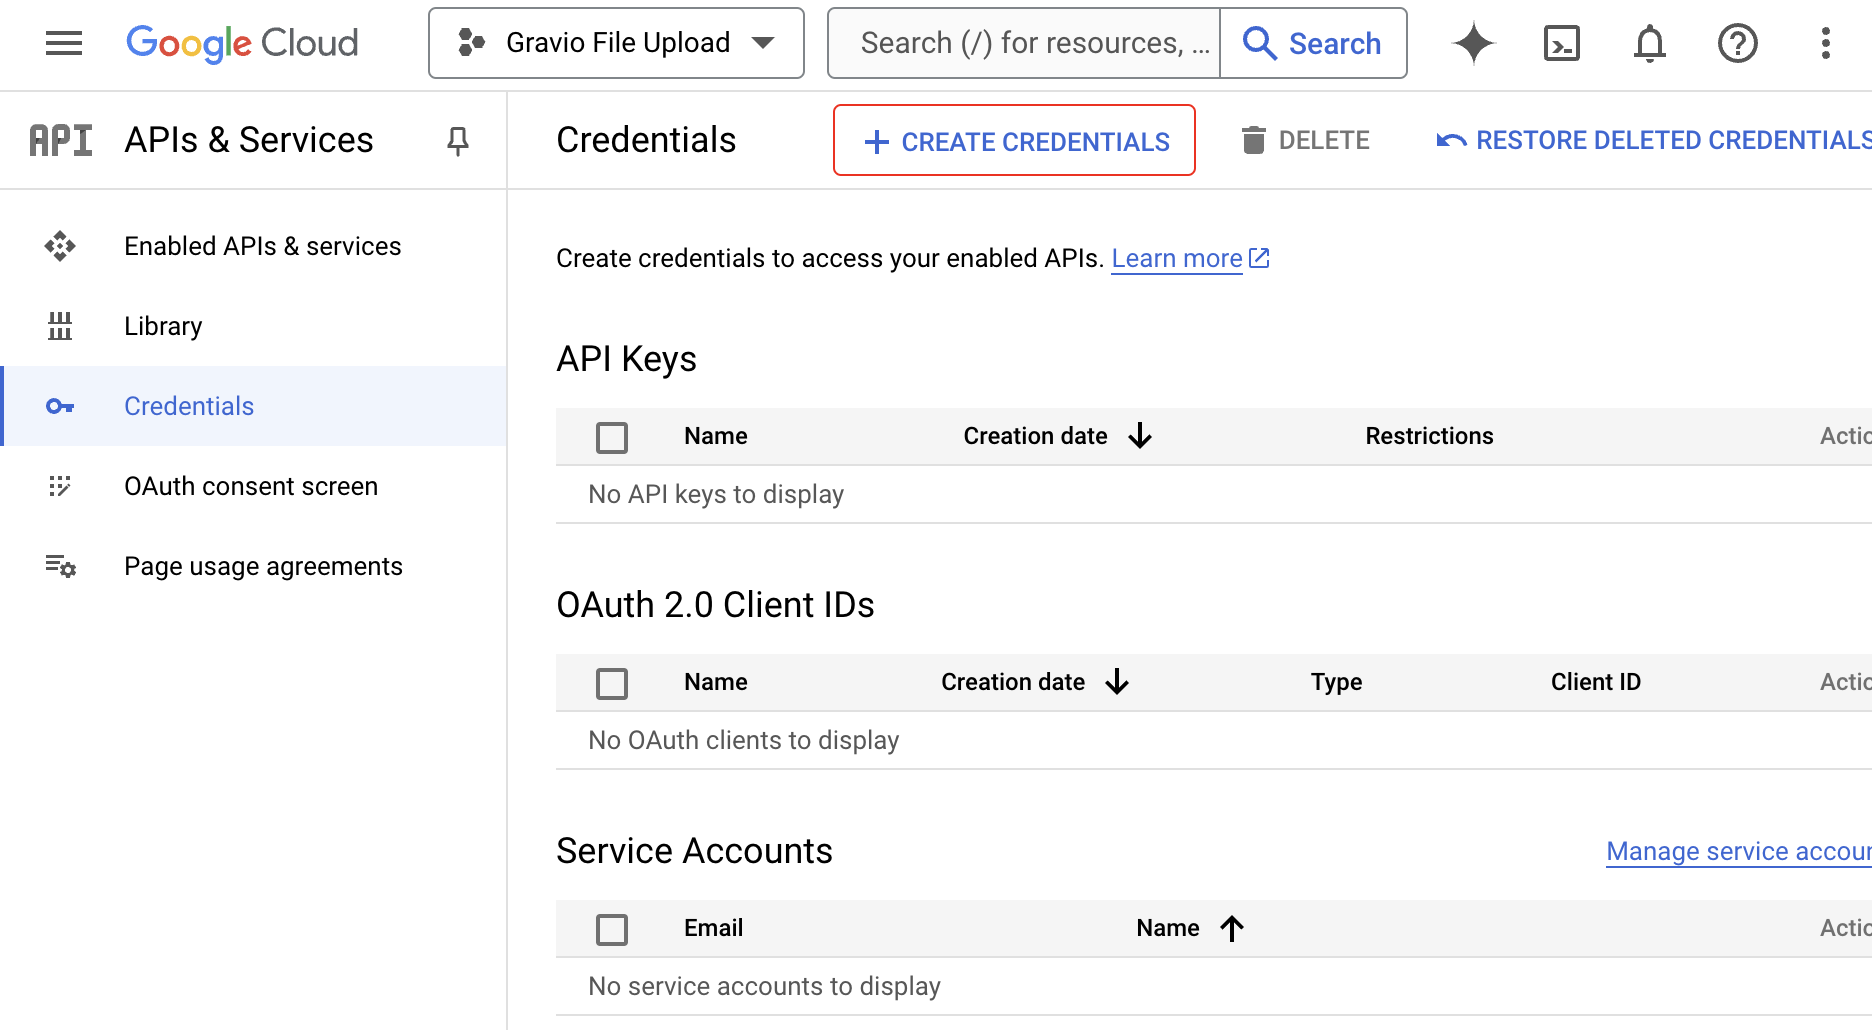
1-6. Click Create Credentials from the Credentials Menu and select OAuth 2.0 Client ID.
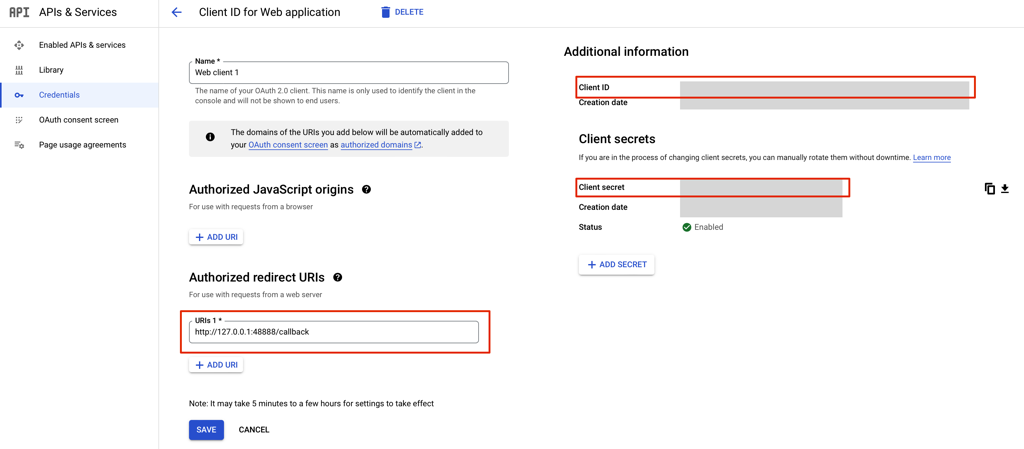
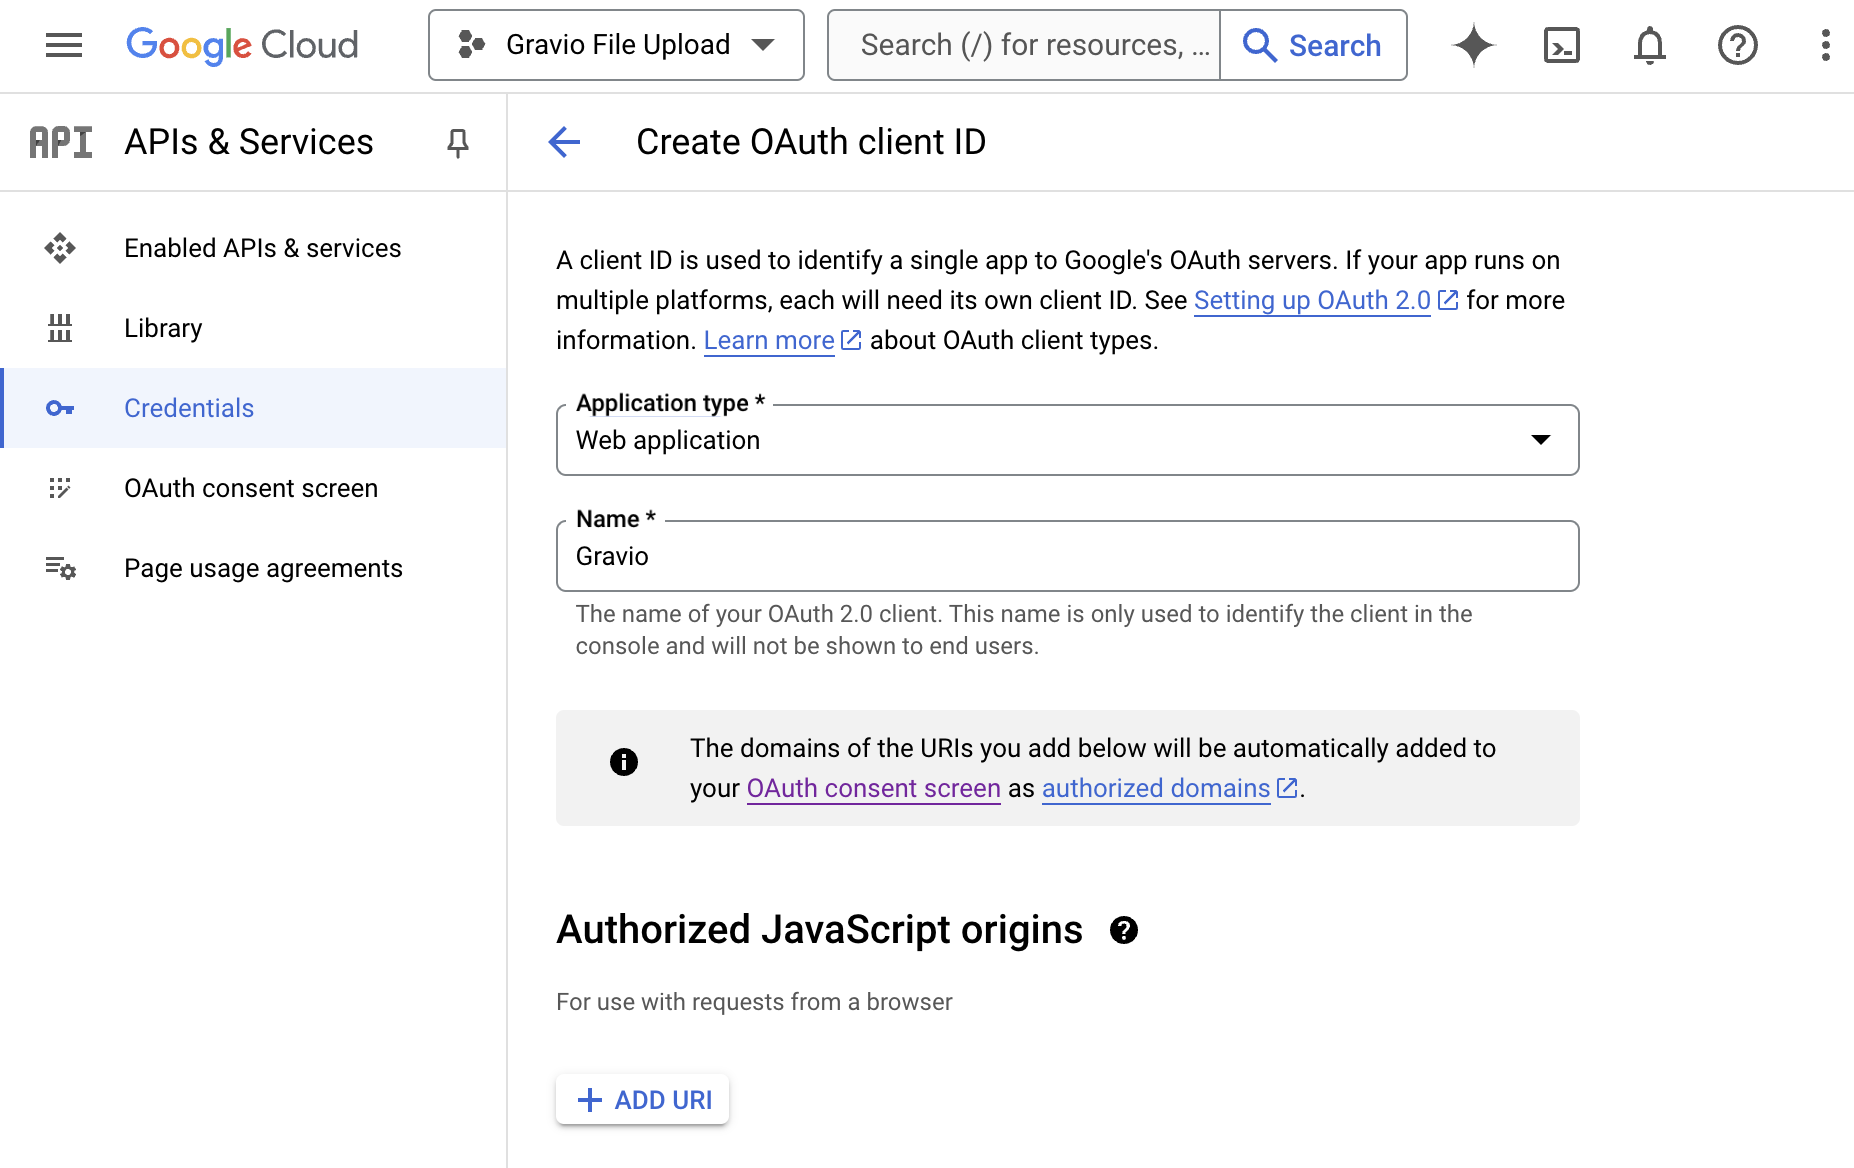
1-7. Please select "Web application" for the type of application and give it a name. Please add "http://127.0.0.1:48888/callback" to the authenticated redirect URI and save it.

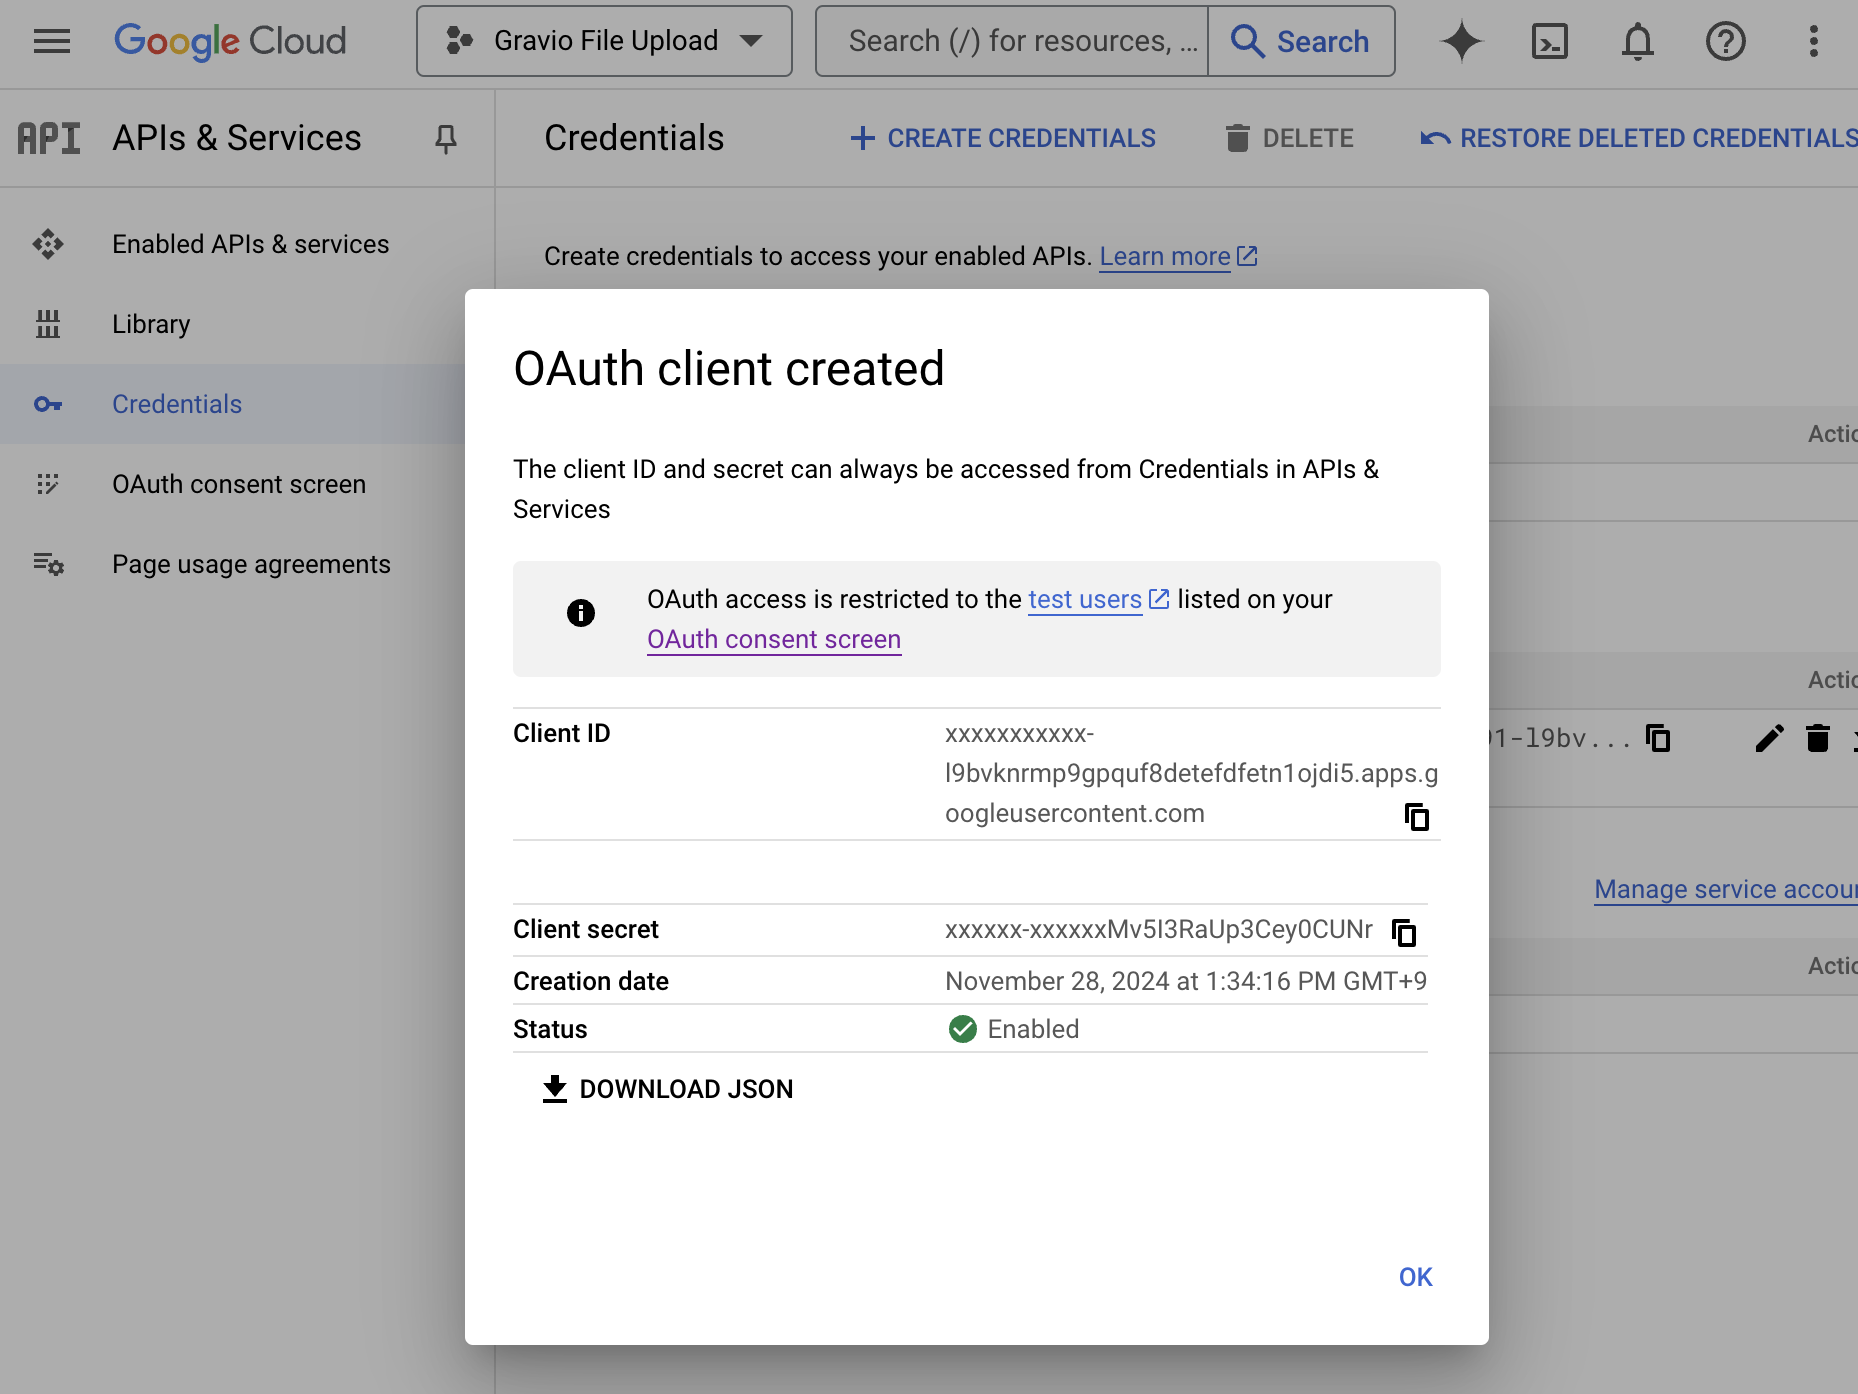
1-8. When you check the data saved from the Credentials menu in OAuth2.0 Client ID2, the Client ID, Client Secret ID, and Authenticated Redirect URI are displayed, so please take a note for use in the component.
※In the above settings, the public status is "Test", and it is a mode where mail can be sent only to test users. By setting this mode to "Public", you can send mail from email addresses other than the test user. If you are unsure about the detailed setting method, please contact Google. There may be cases where we cannot support individual GCP setting methods.
Now that we have the Client ID, Client Secret ID, and Authenticated Redirect URI required for OAuth 2.0, the preliminary preparation is complete.
2. How to set up mail sending in Outlook
To use OAuth2.0 in Outlook, you need a contract with Microsoft365 for Business.
Flow of setting method
We will set up the following steps in Azure.
When sending mail, if an error like MailSend: failed to send mail: 535 5.7.139 Authentication unsuccessful, SmtpClientAuthentication is disabled for the Tenant. Visit https://aka.ms/smtp_auth_disabled for more information. occurs, please enable authenticated SMTP settings in Microsoft 365 management center from 2-9 onwards.
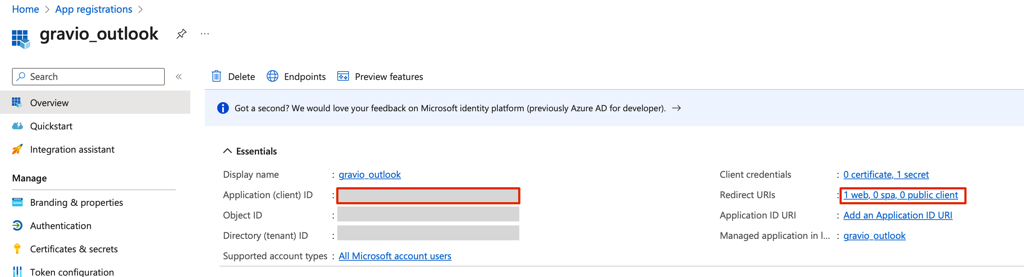
2-1. Register the app in the Azure service.

Click the Create App button.
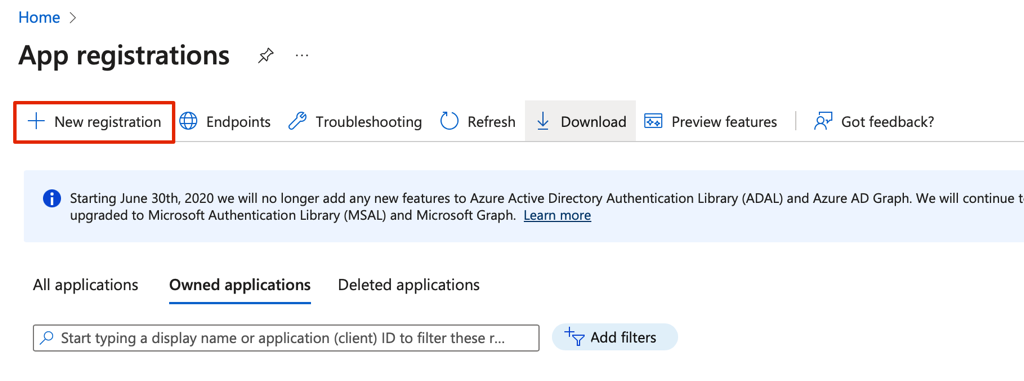
Click the New Registration button.

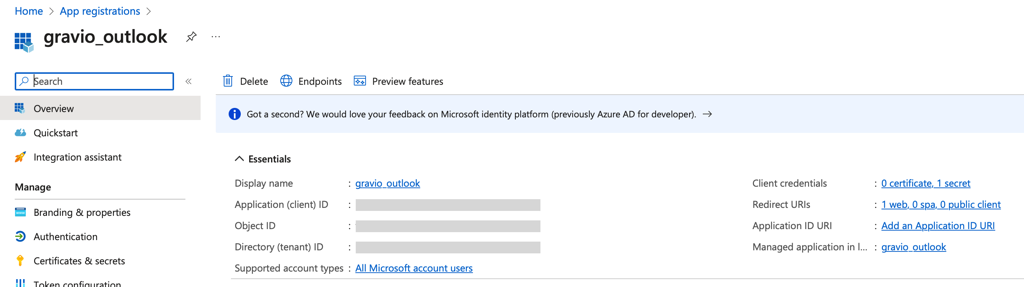
Specify the name of the application, supported account information, and redirect URI. Specify "http://localhost:48888/callback" for the Redirect URI.
2-2. When the app is registered, basic information is displayed in the summary.
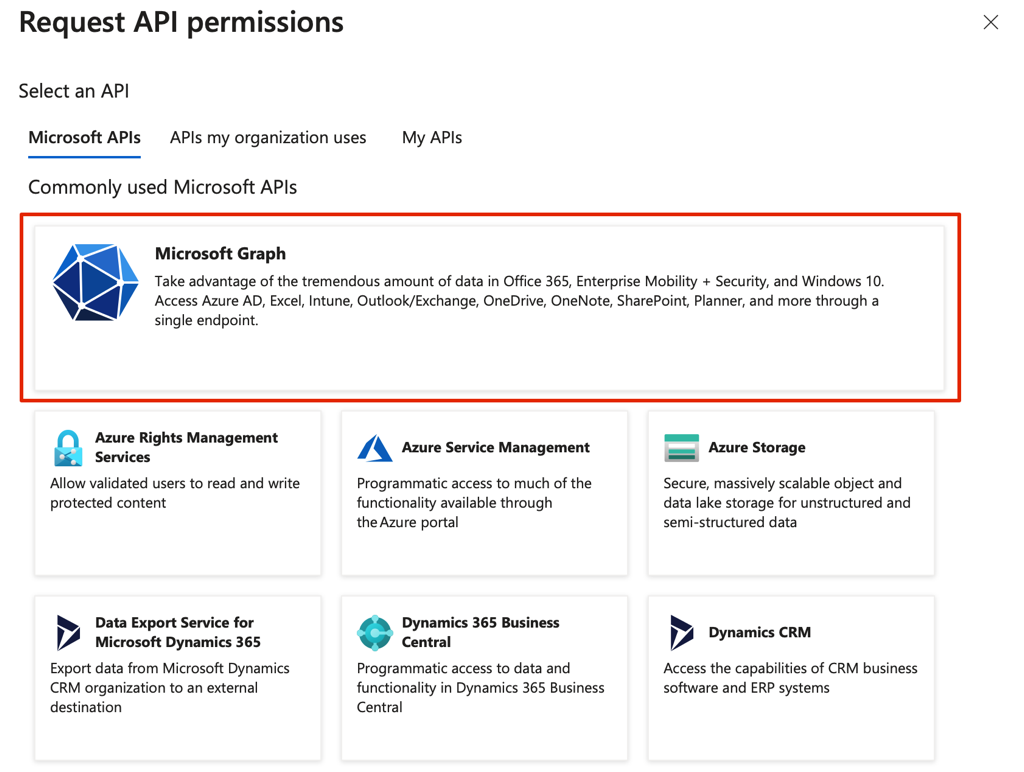
2-3. Click Add Permission from the API Permissions Menu.
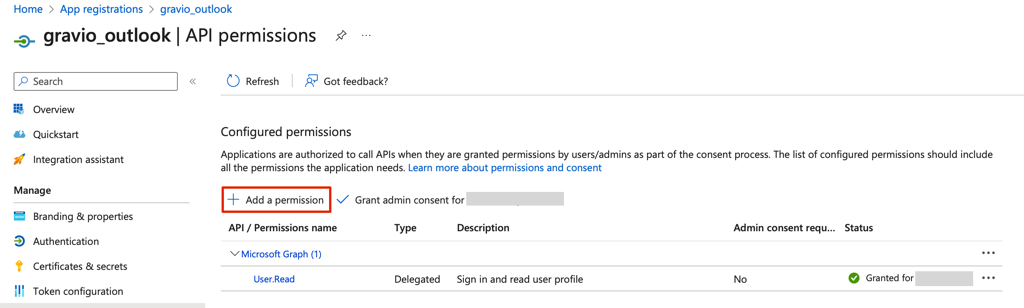
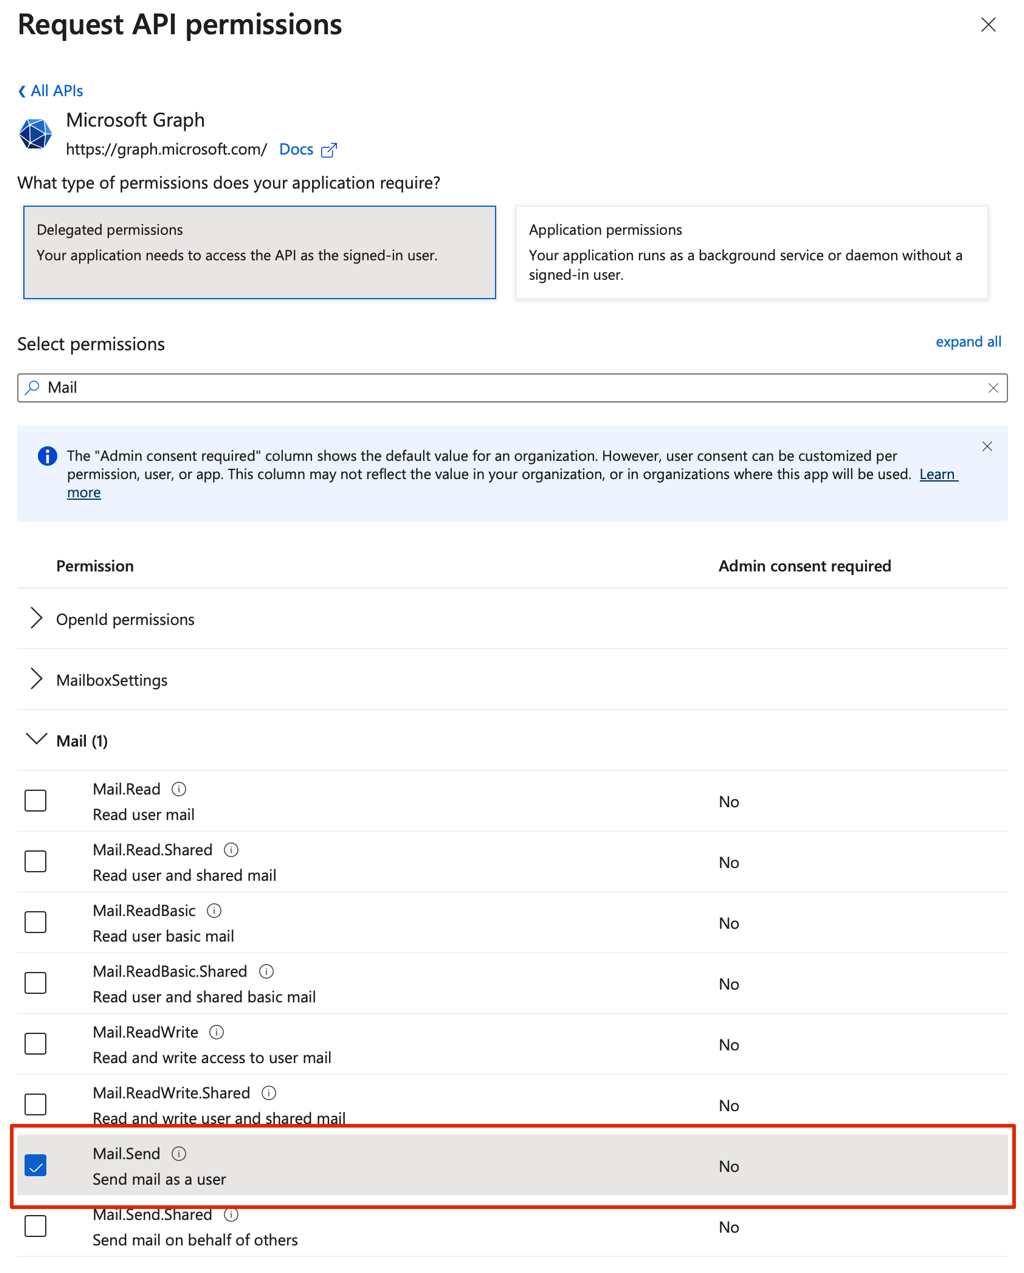
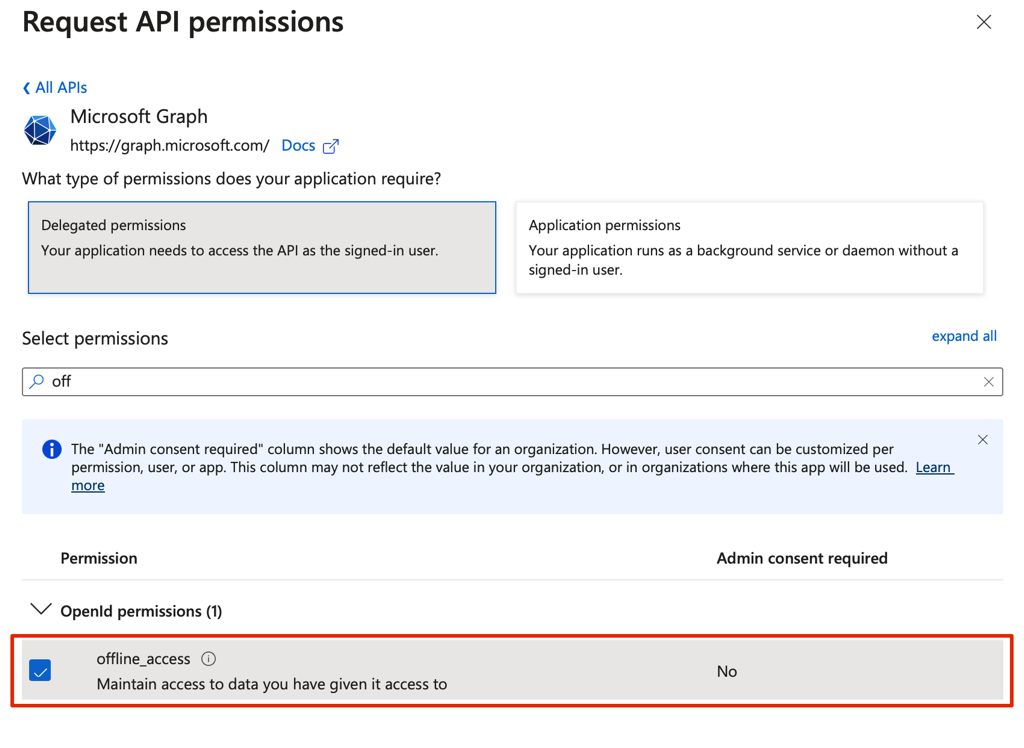
2-4. Select the Microsoft Graph of the Microsoft API and check Mail.Send and offline_access to add them.
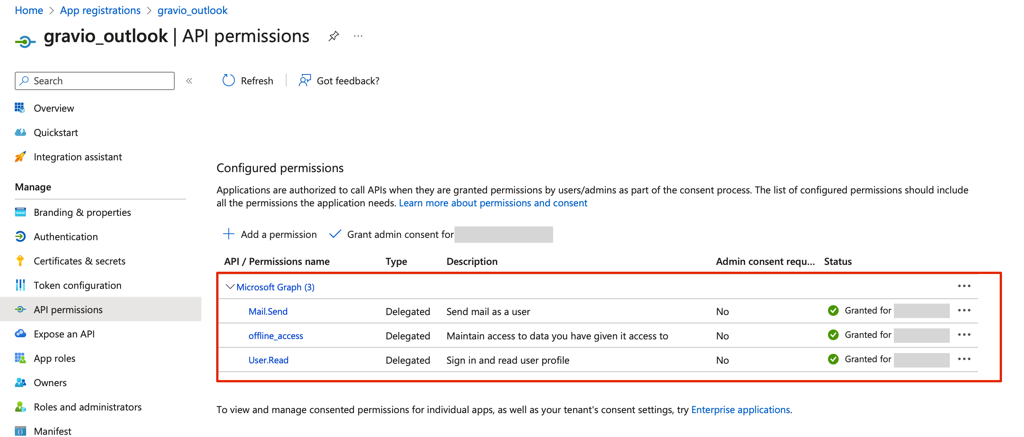
2-5. Once saved, it will be displayed in Configured Permissions. Click Grant admin consent for your organization to give consent.
2-6. Note the client ID and redirect URI.
2-7. Click New Client Secret in the Certificates and Secrets menu to create it.
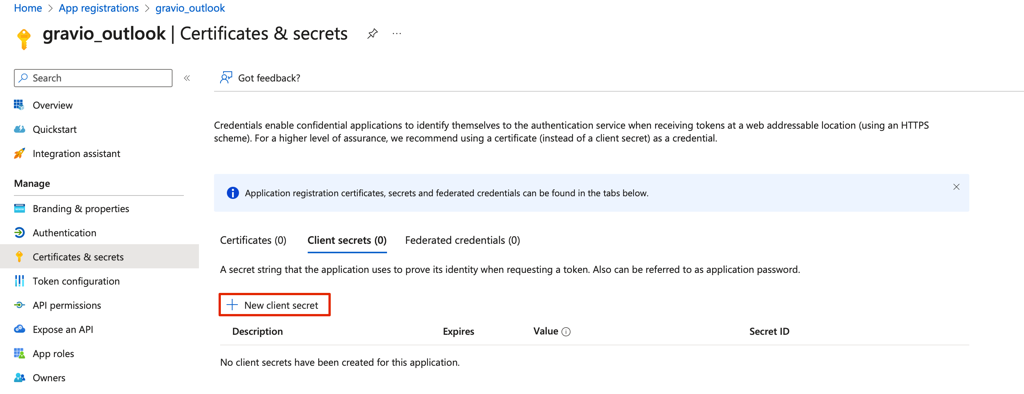
Create a client secret.
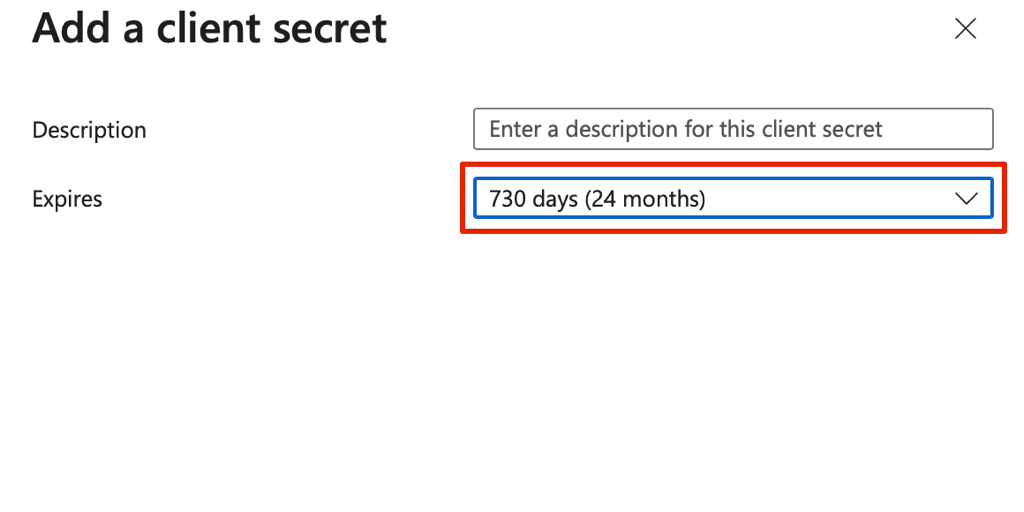
You can specify an expiration date for the client secret.
2-8. Display the client secret.
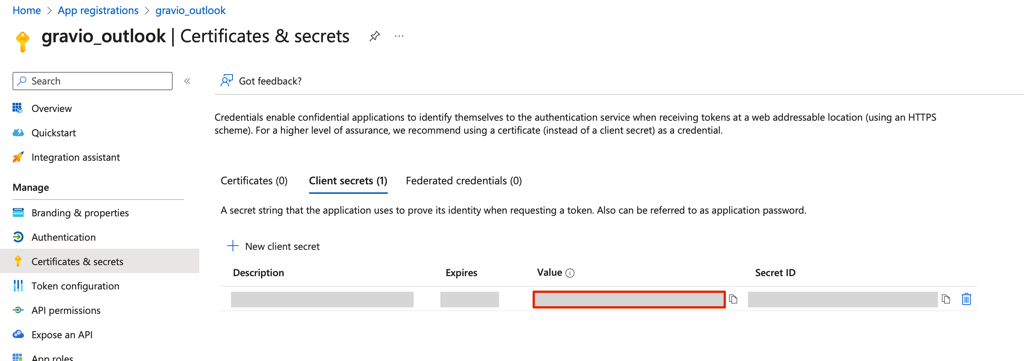
The value is the client secret, so please note it.
Now that we have the Client ID, Client Secret, and Redirect URI required for OAuth 2.0, the preliminary preparation is complete.
2-9. Enable authenticated SMTP settings in the Microsoft 365 management center.
Open Microsoft 365 Management Center.
Select Active Users from the left menu.
When you select the target user, a panel will open on the right.
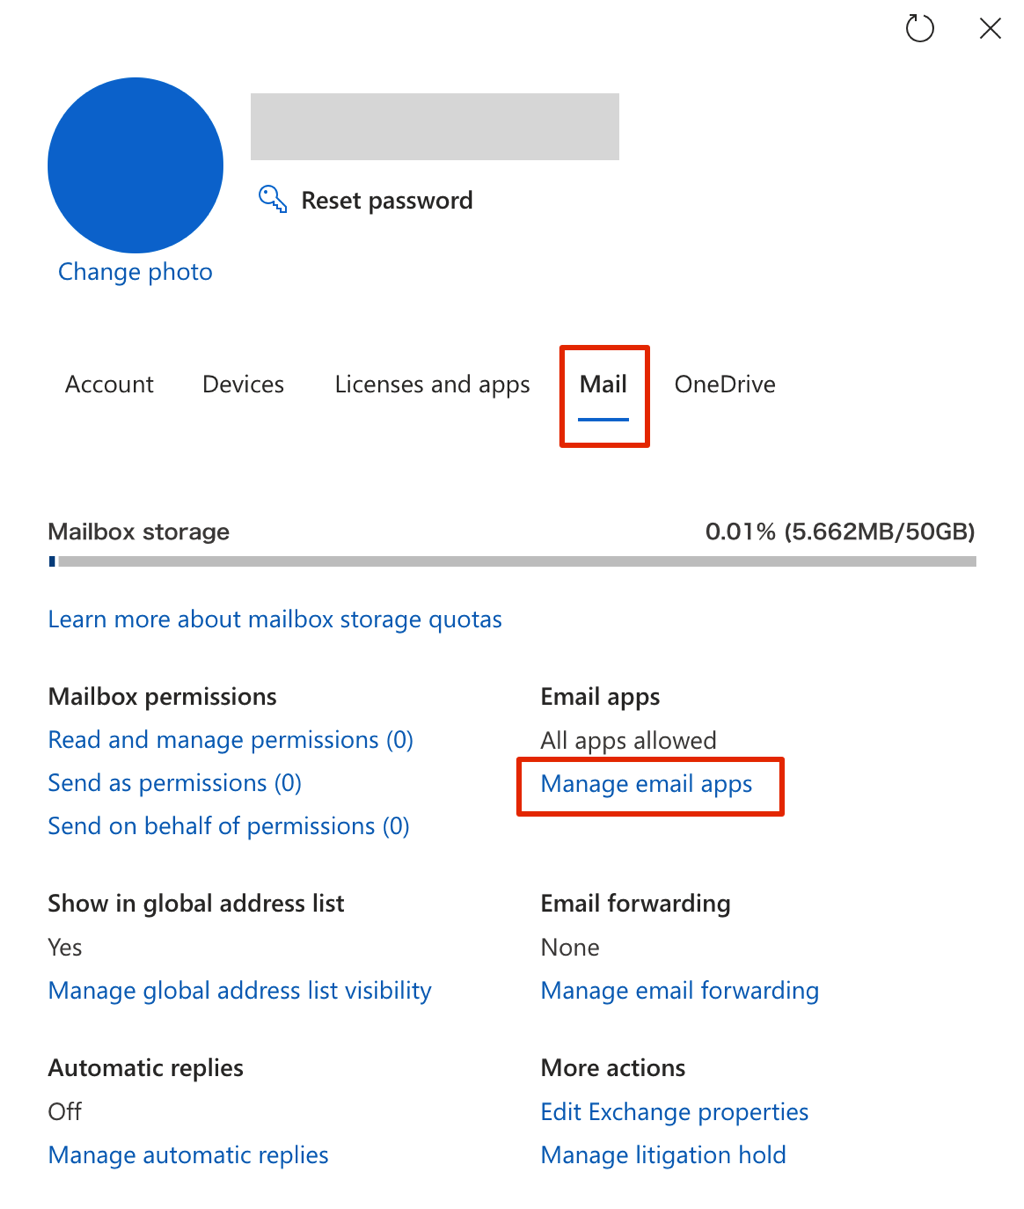
Select Manage Mail Apps in the Mail tab.

Please enable authenticated SMTP and save it. The set contents may not be reflected immediately, so if the same error continues to occur in sending mail, please try again after a while. If the error continues to occur, please check the settings again.
How to set up Google Drive with OAuth2.0
This section describes how to configure authentication with OAuth2 to Google Drive in the Google Drive Upload/Download component. You will need your Client ID, Secret and the oAuth Token for the components to work. This page describes to get the former two.
To configure OAuth2 settings, Google Drive uses GCP.
Proper knowledge of GCP is required to configure it correctly. Please refer to the GCP documentation if you are not sure how to configure it in detail.
How to set up Client ID and Secret to access to Google Drive
Set up process
Follow the steps below to set up in GCP.
1-1. Enable Google Drive API from the library of API service.
Select Library from the API service menu.
Select Google Drive API and enable it.
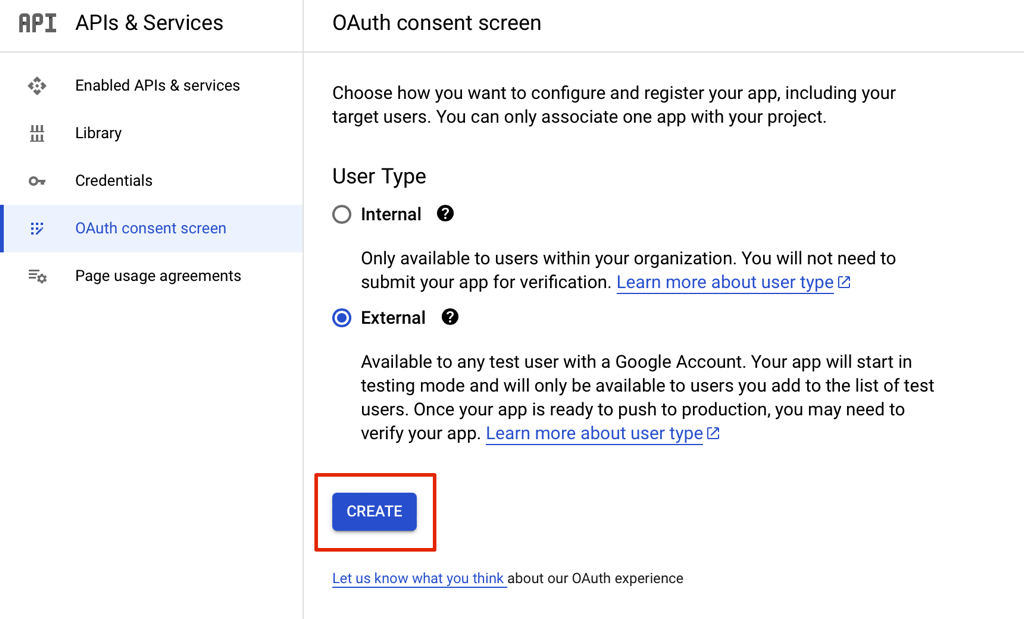
1-2. Select "External" from the OAuth agreement screen menu and press the Create button.
1-3. Register your Google account email address for the test user and fill in the information where required.
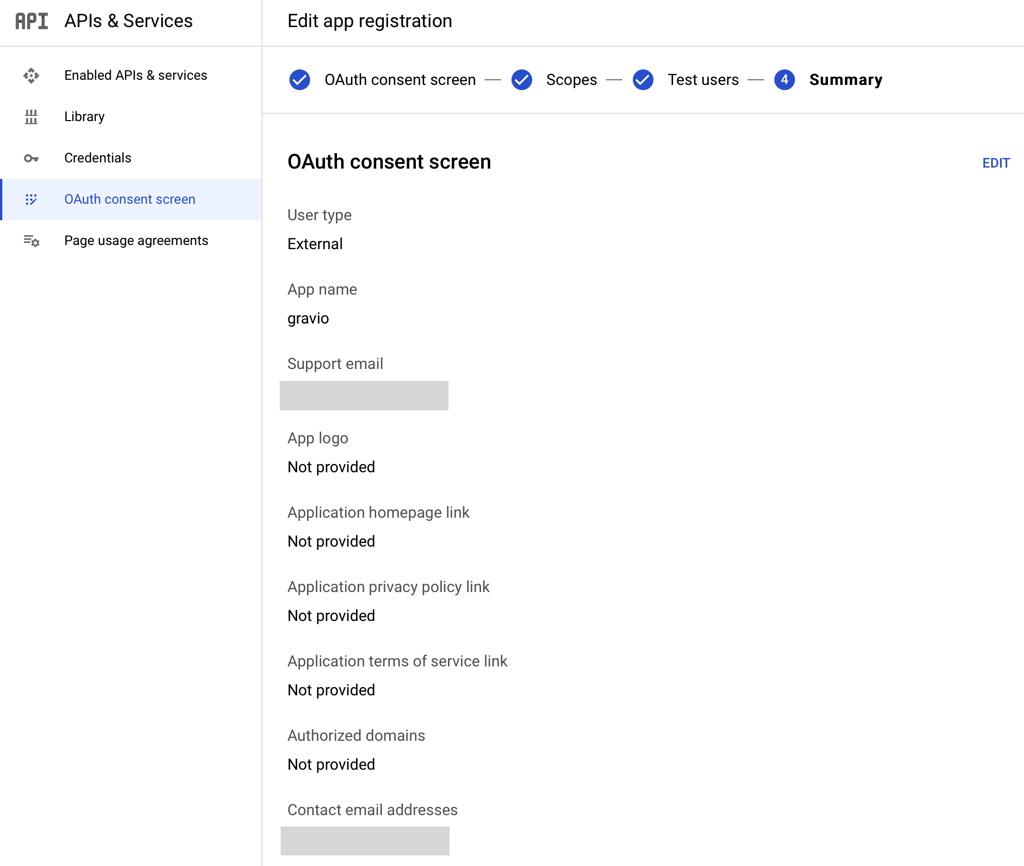
1-4. Confirm the registered information in the Summary.
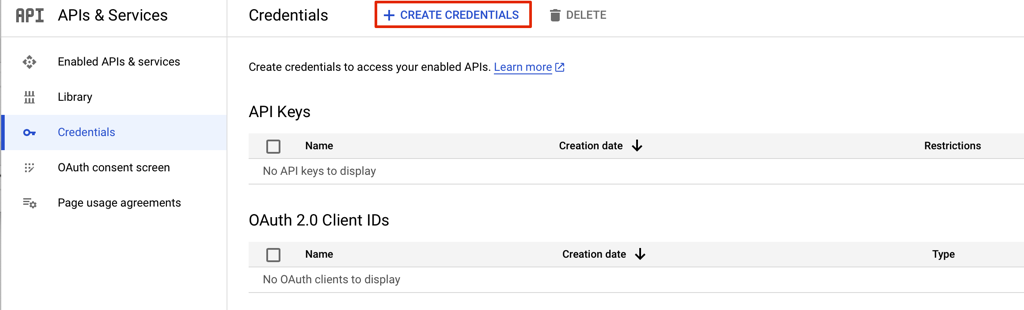
1-5. Click Create Authentication Information from the Authentication Information menu and select OAuth 2.0 Client ID.
For the application type, select "Web Application" and give it a name. Add "http://127.0.0.1:48888/callback" to the authenticated redirect URI and save it.
Check the OAuth2.0 Client ID2 saved data from the Authentication Information menu. The Client ID, Client Secret ID, and the authorized redirect URI will be displayed, so please note them down for use in the component.
With the above settings, the publish status is "test" and the mode is only available to test users. By setting this mode to "Public", it can be used by non-test users. Please contact Google if you have any questions on how to configure the settings in detail. Please note that we may not be able to provide support for individual GCP configurations.
Now that you have the client ID, client secret ID, and approved redirect URI required for OAuth 2.0, the preliminary preparations are complete.
Obtaining the oAuth Token
Now that you have Client ID and Secret, you can obtain your oAuth Token in an interactive way using your browser following the steps below:
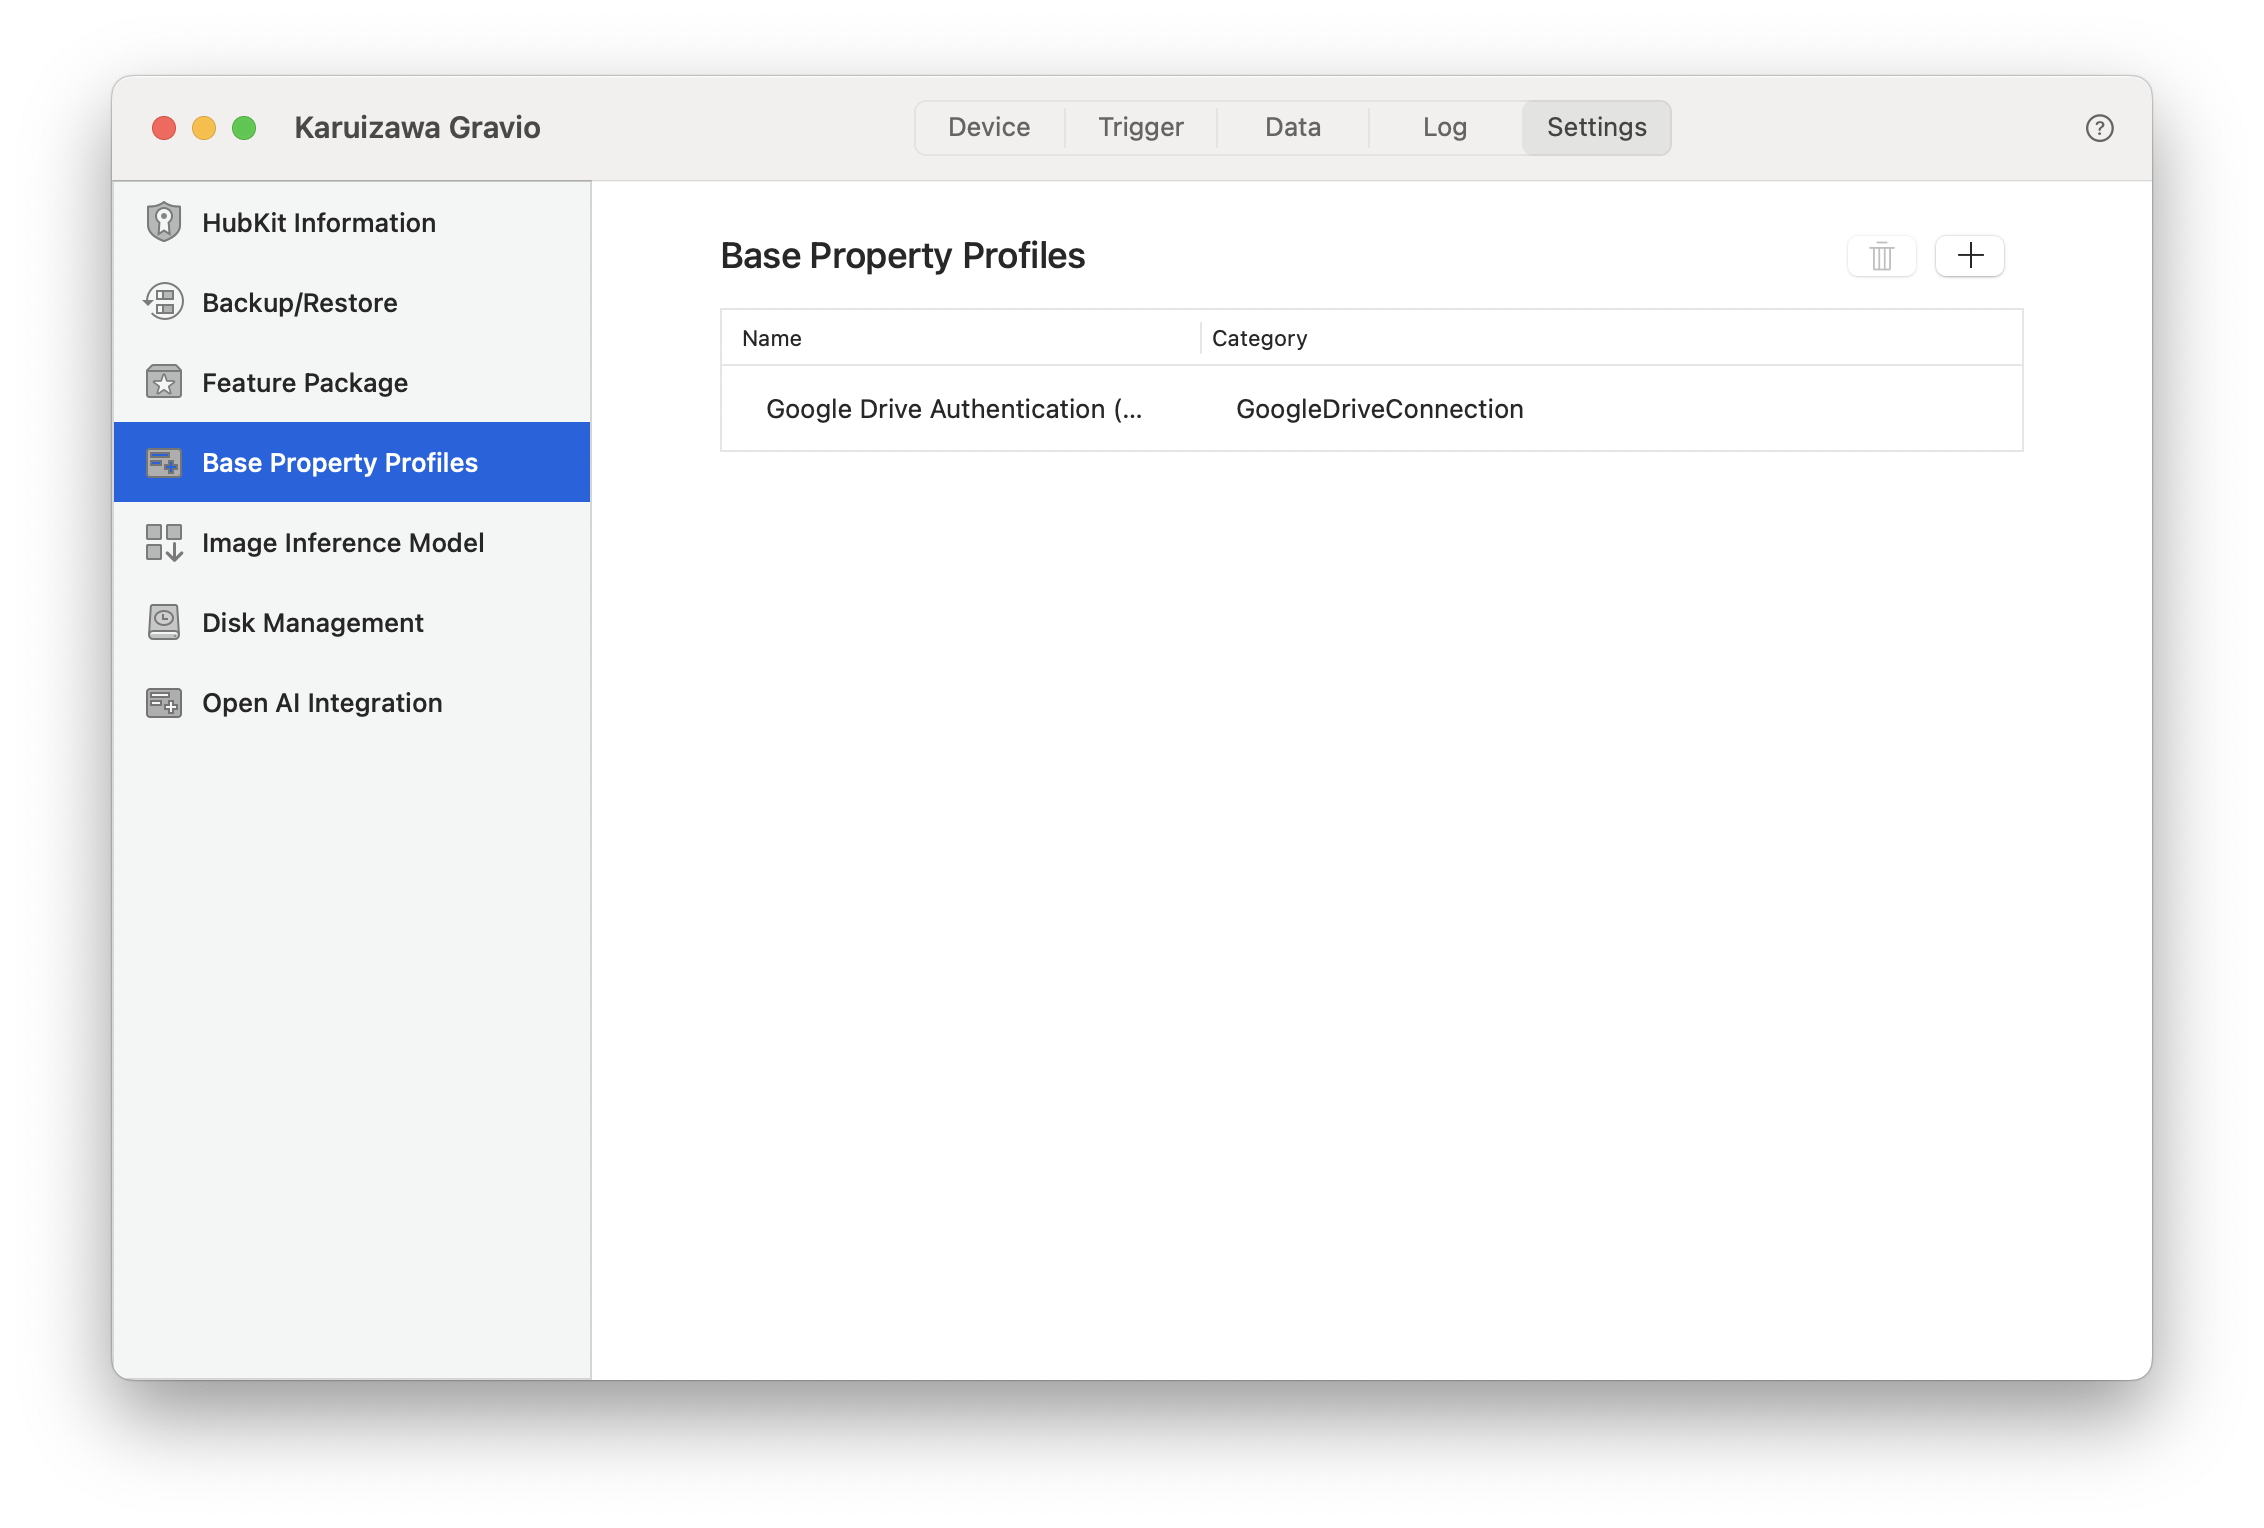
Go to the settings and open the Base Property Profiles view, add your Google Authentication.
Once you have inserted your Client ID and and Secret, you can click on the "Obtain" button to retrieve your token using your web browser.
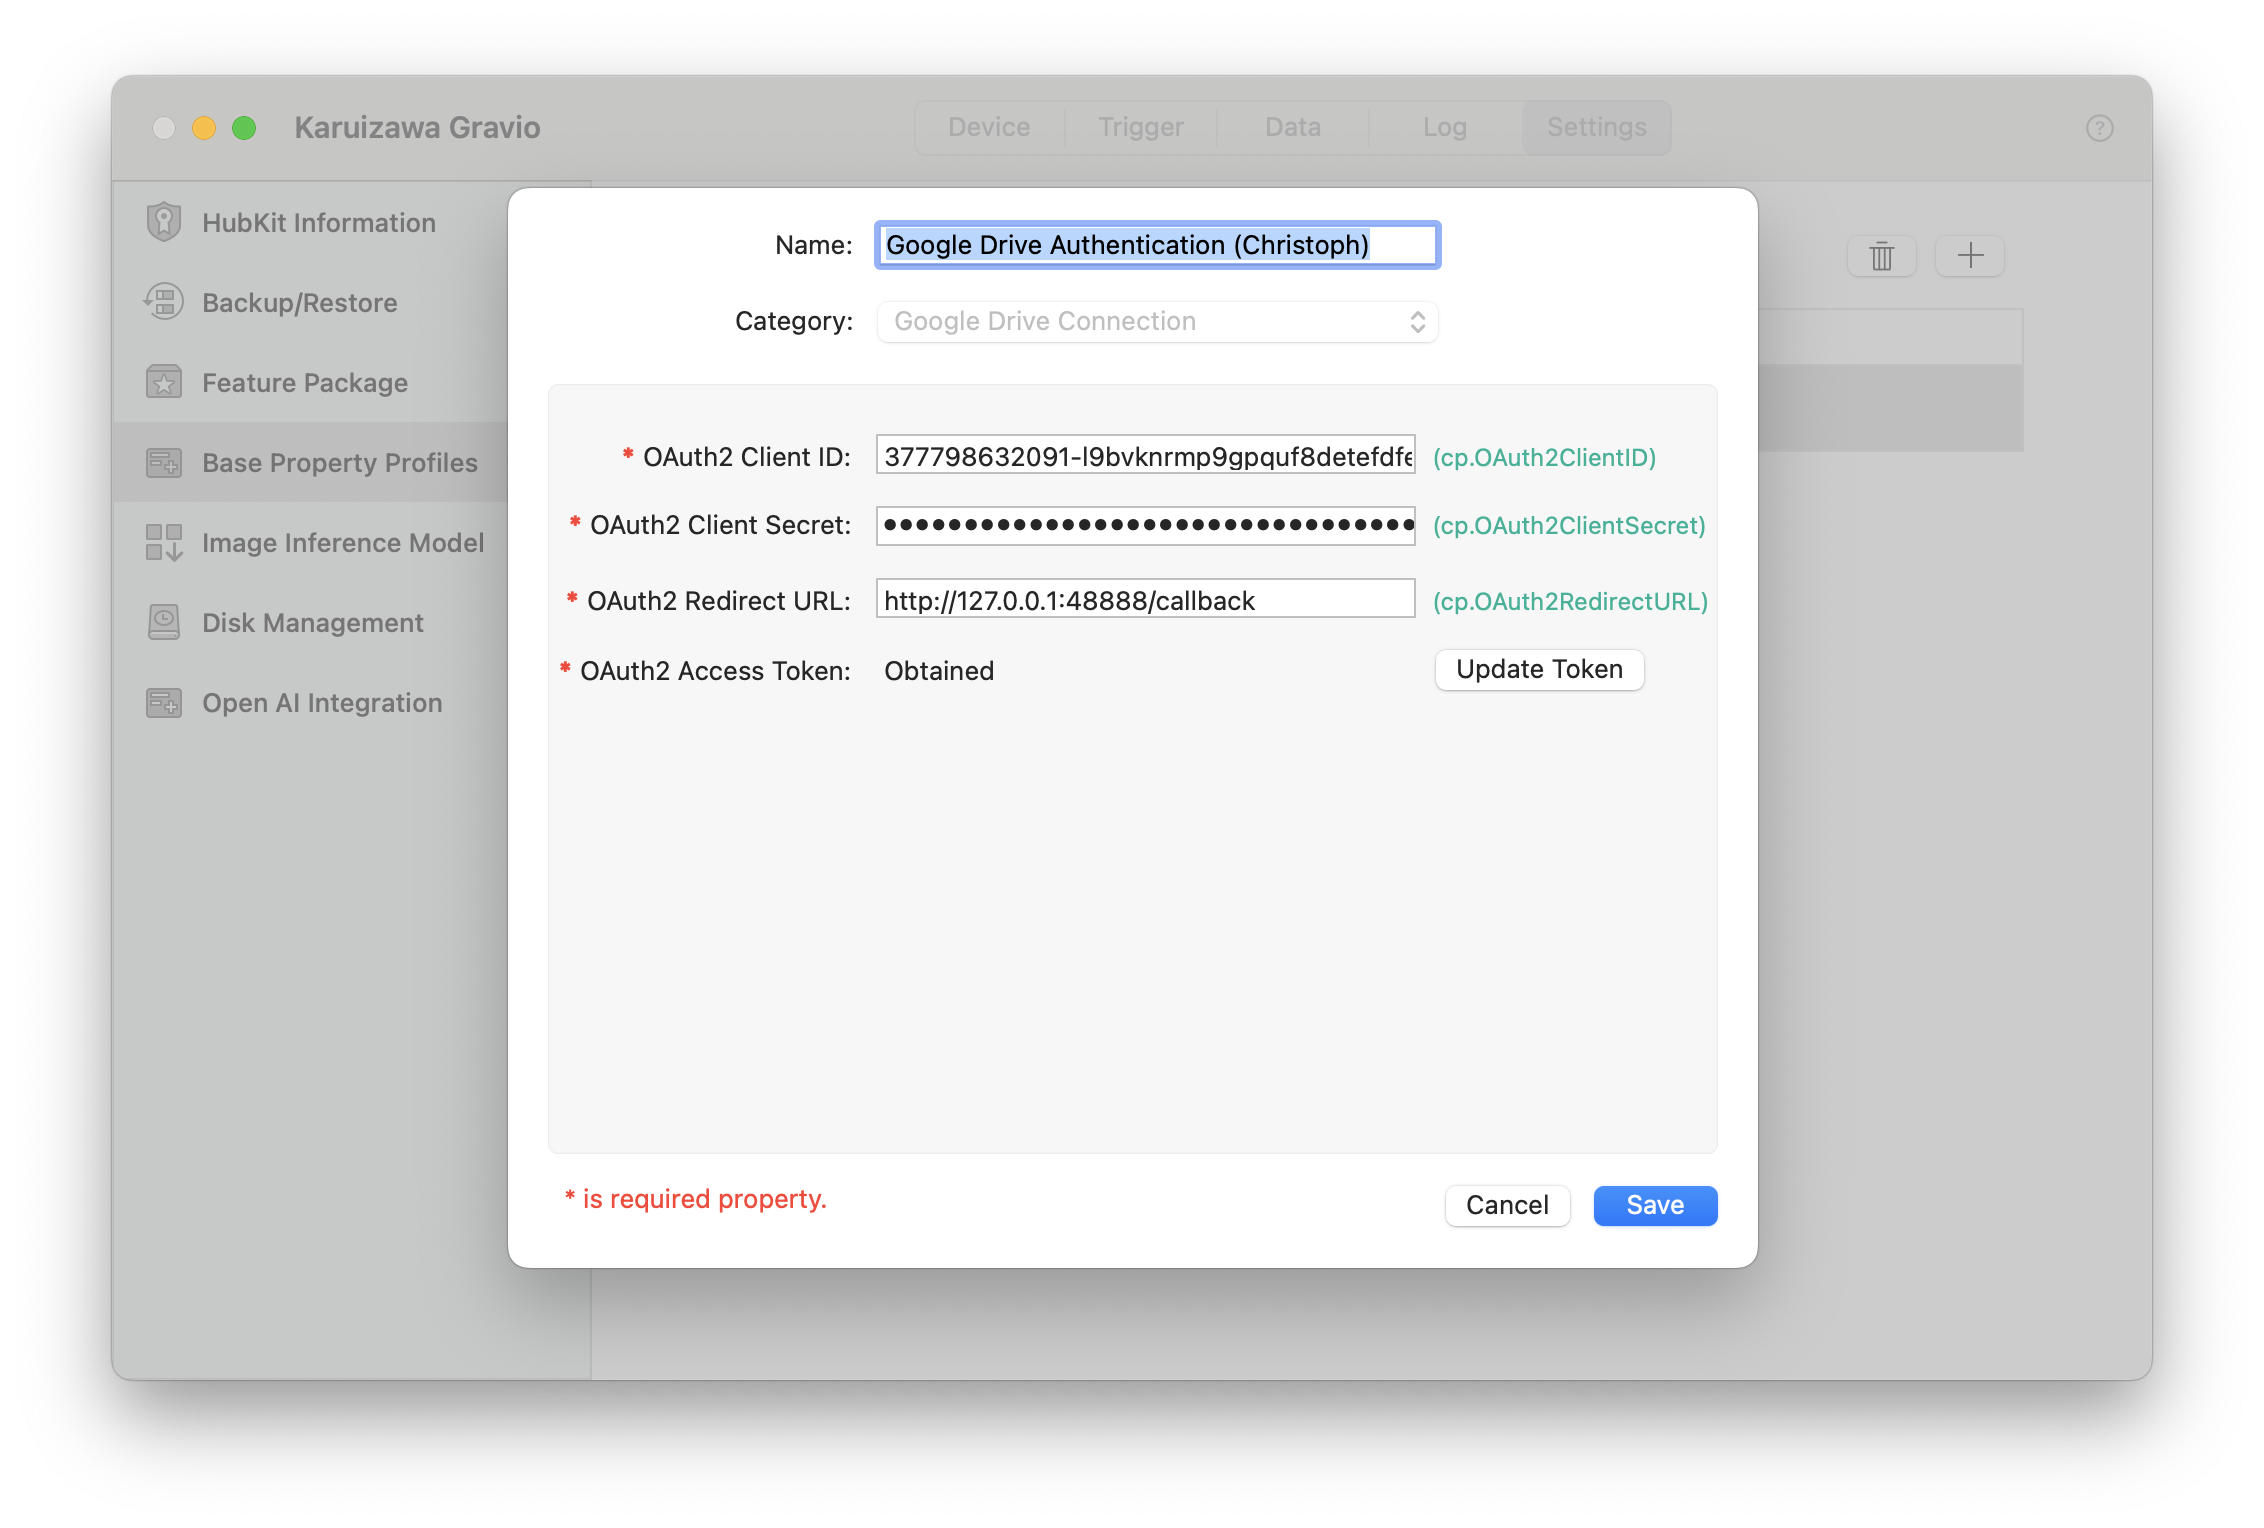
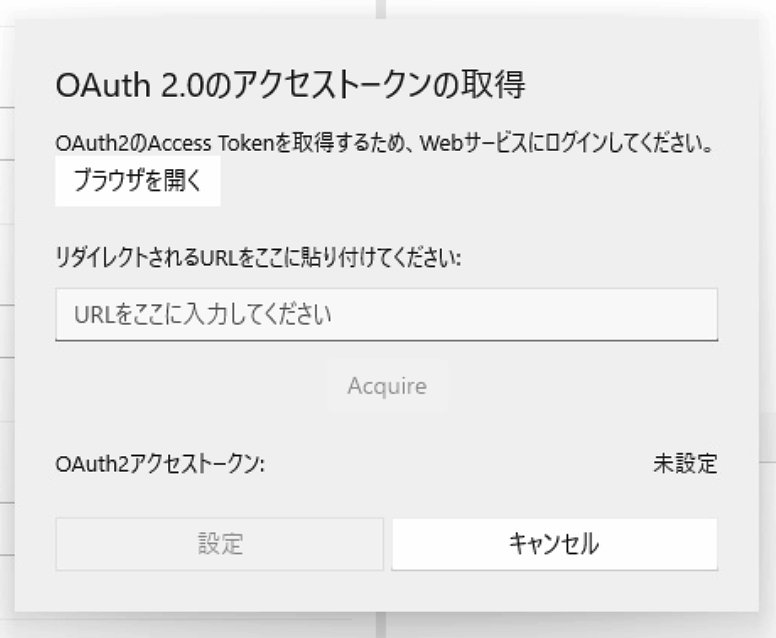
OAuth2 access token button to display the Get OAuth 2.0 access token panel. Press the Open Browser button to obtain the token. Once the token is obtained, press the Set button to automatically set it to the OAuth2 access token property.
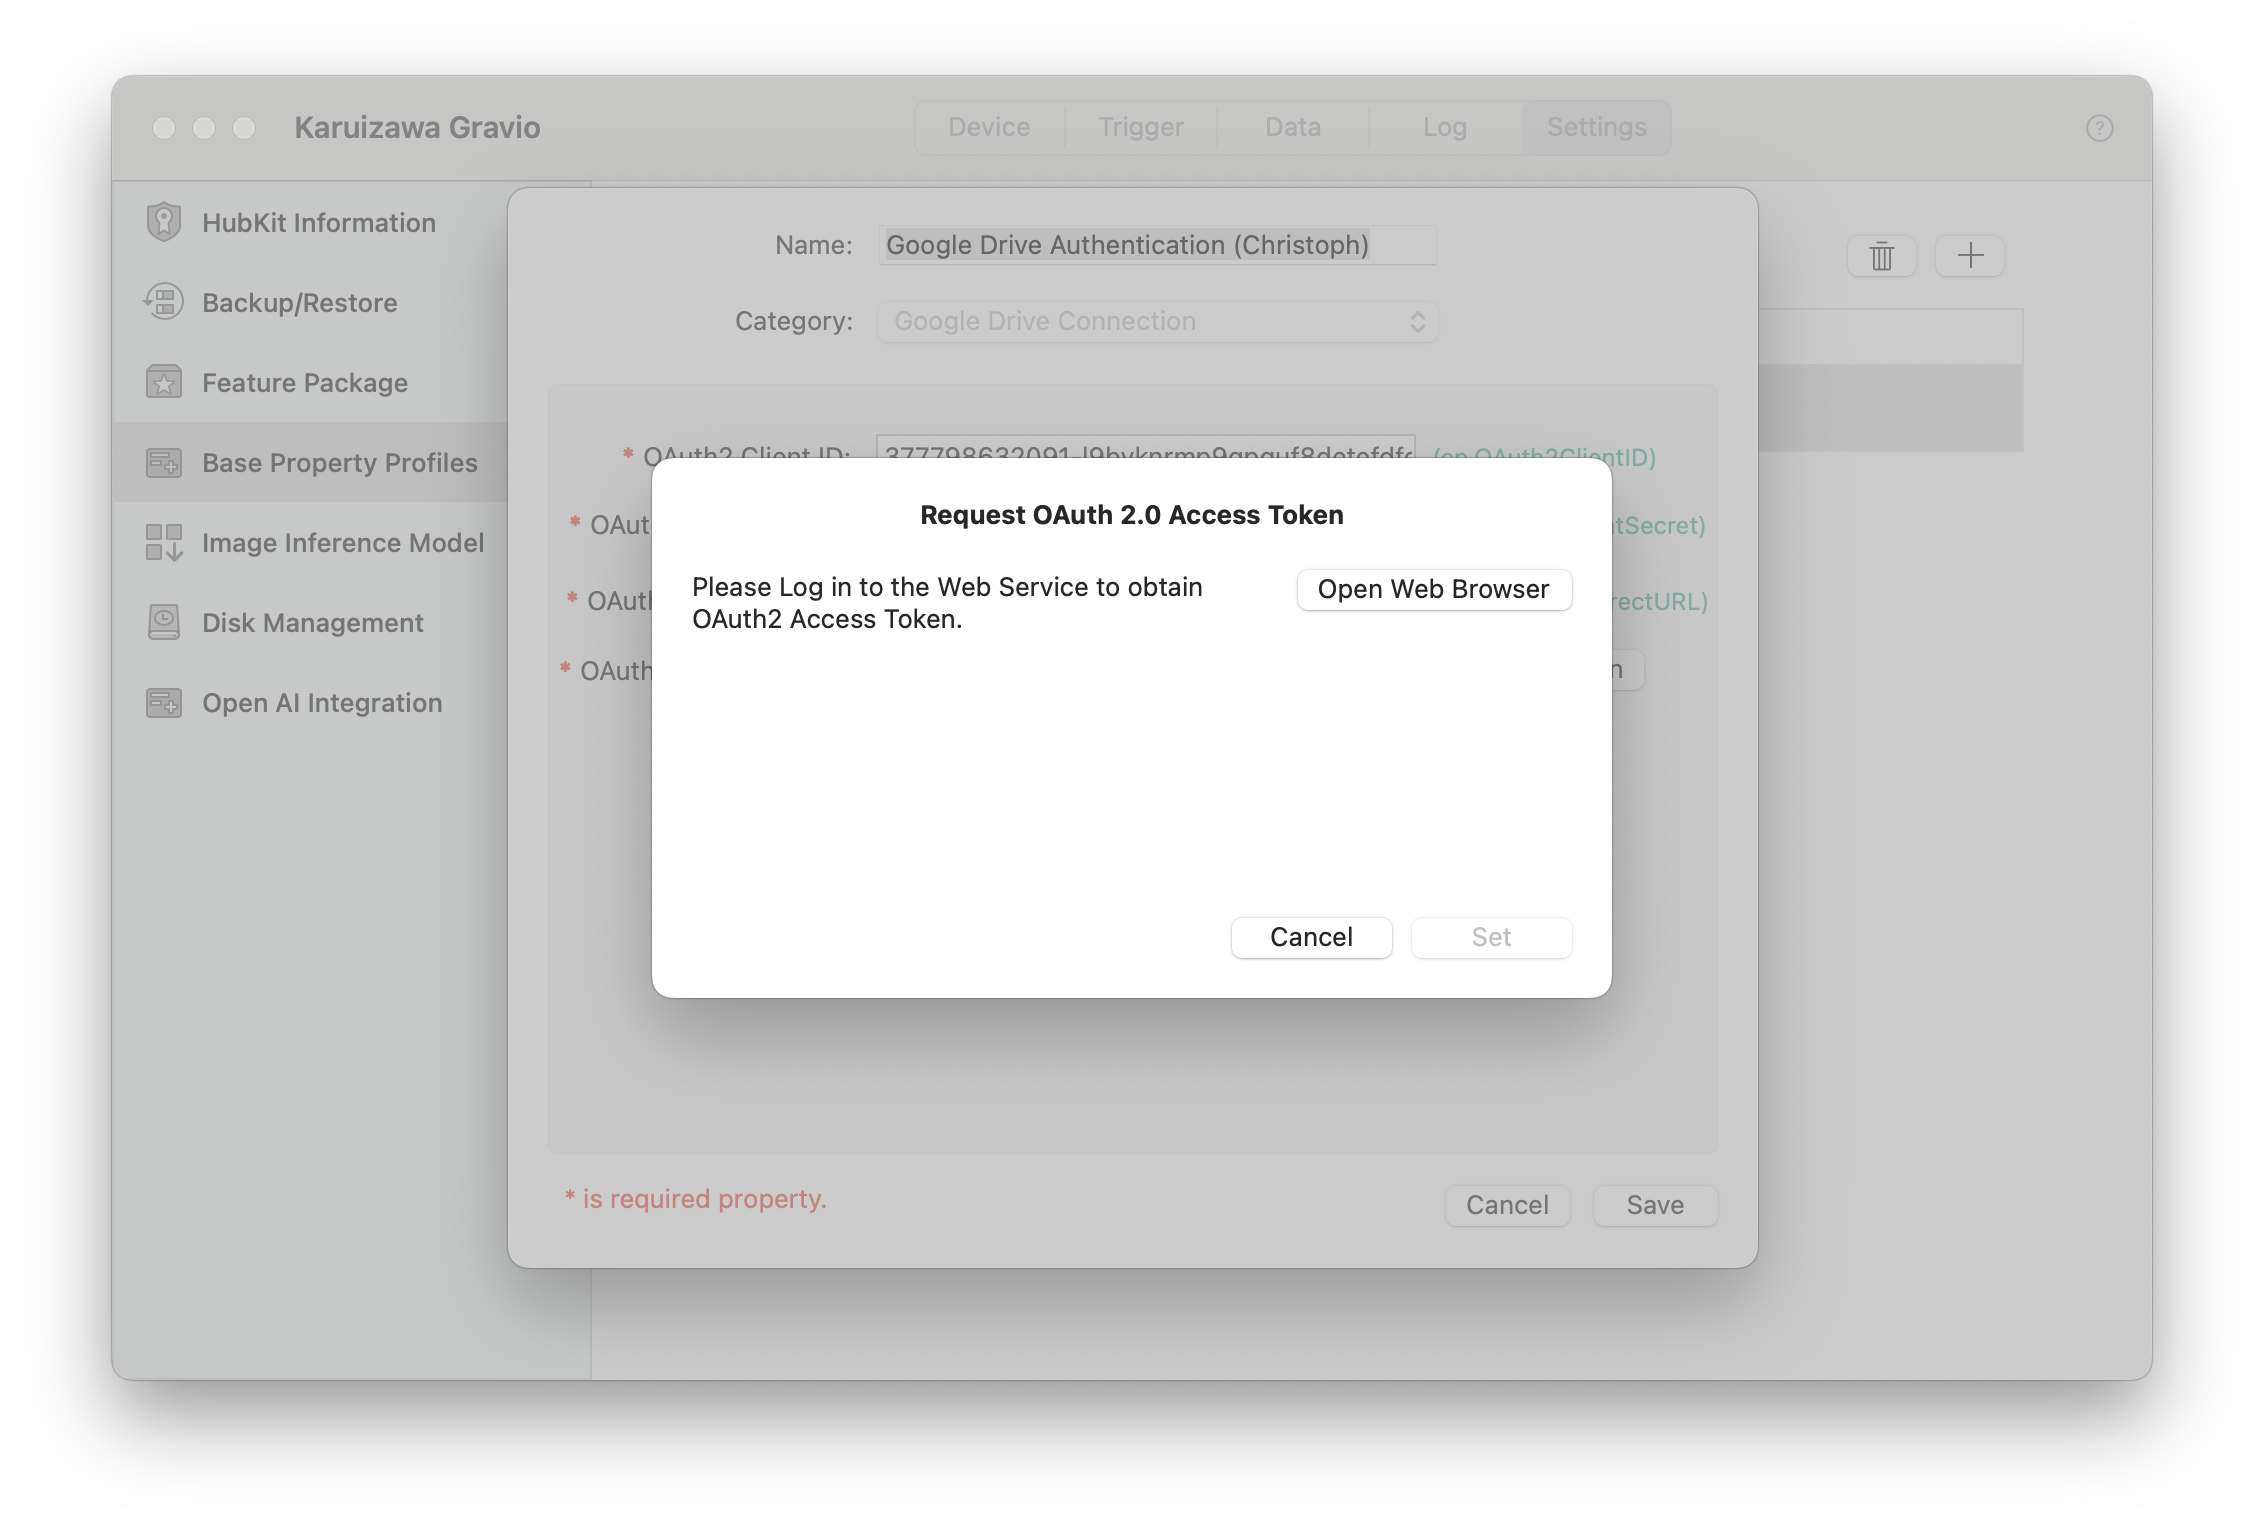
Follow the steps on your browser, and return to Gravio Studio to set the authentication.
How to obtain an OAuth2 access token
※3 When you click the "Obtain OAuth2 Access Token" button, the OAuth 2.0 Access Token Retrieval panel will be displayed. Click the "Open Browser" button to retrieve the token. Once the token is obtained, click the "Set" button to automatically configure it in the OAuth2 Access Token property.
In the case of Gravio Studio for Windows, click the "Open Browser" button to retrieve the token. However, an error screen will appear. In this state, copy the URL from the address bar and paste it into the panel. Then, click the "Retrieve" button. Once the token is obtained, click the "Set" button to automatically configure it in the OAuth2 Access Token property.
Clicking the "Open Browser" button will automatically initiate authentication in the browser. If necessary, follow the instructions on the screen, such as performing login procedures.
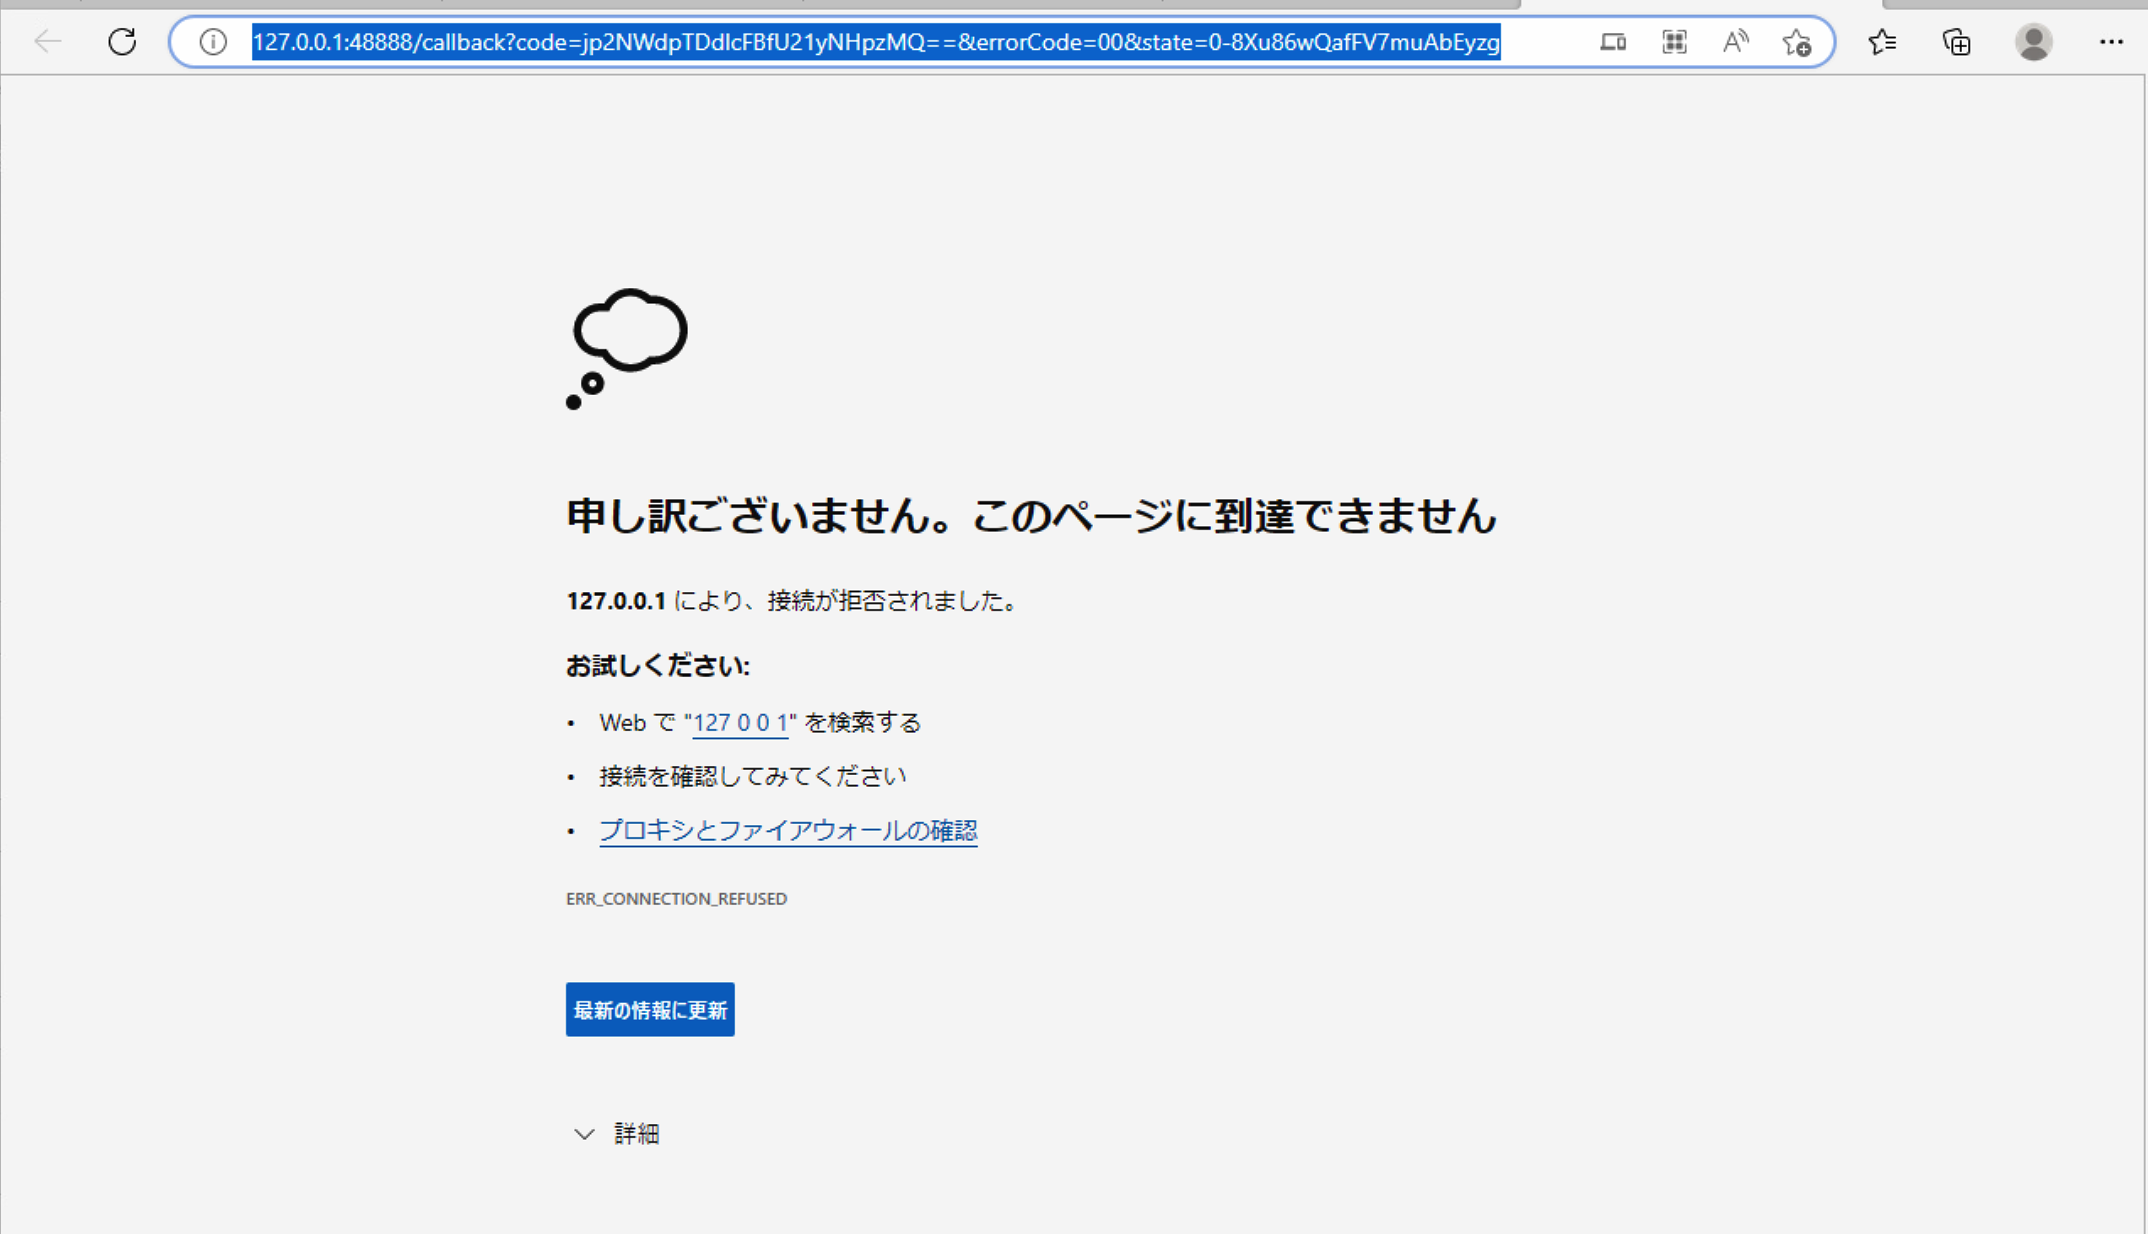
After authentication is complete, an error such as "This page cannot be reached" will be displayed. At this point, copy the URL from the address bar.
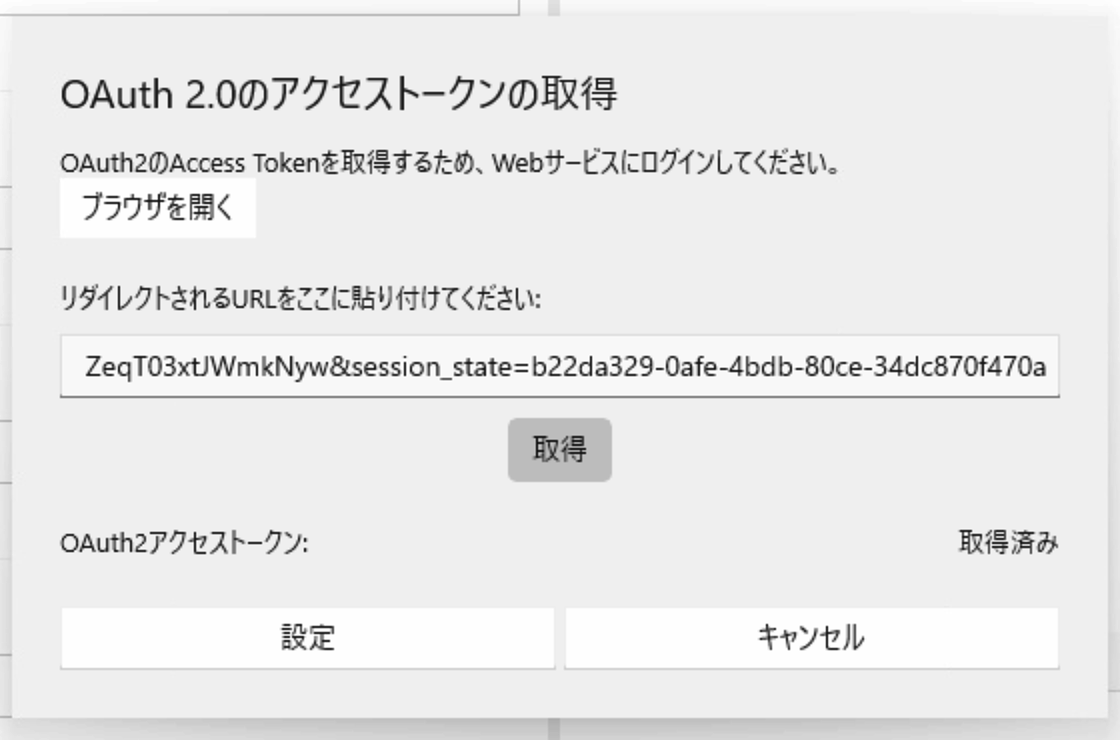
Paste the copied URL into the panel and click the "Retrieve" button. The OAuth2 access token will be "Retrieved." Click the "Set" button to close the panel.
How to set up Box with OAuth 2.0
This explains how to set up OAuth2 authentication for the Box Upload/Download component using Box.
To configure OAuth2, use the Box Developer site Proper configuration requires a good understanding of Box. If you are unsure about the detailed setup, please contact Box directly.
1. How to Set Up Access to Box
Setup Flow
Configure the following steps on Box Developer:
1-1. Create a My App.
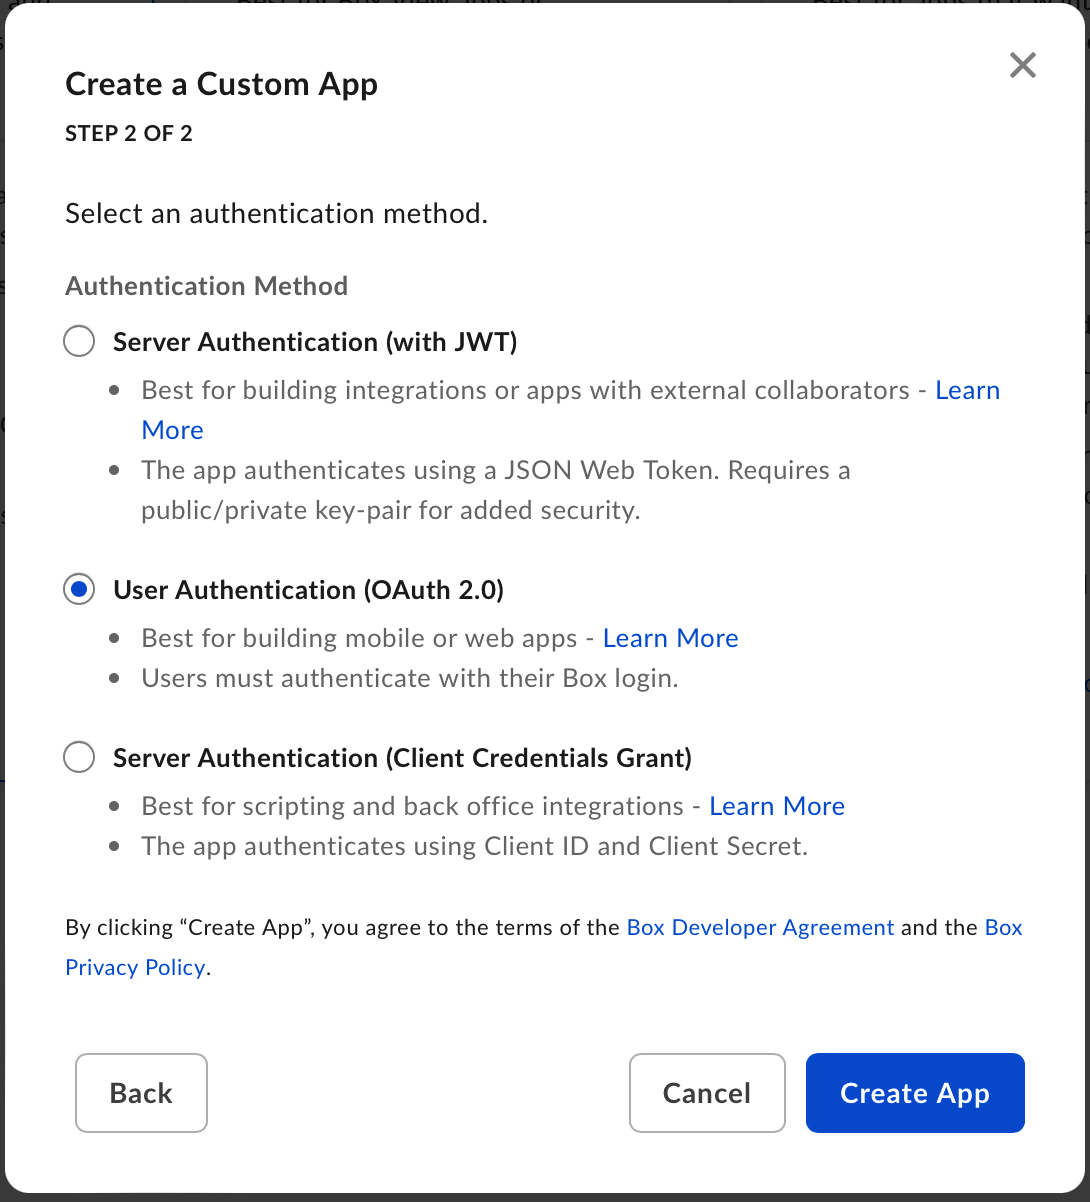
Select Custom App.

1-2. Enter a name for the app and create it.
Choose Automation for the Purpose.
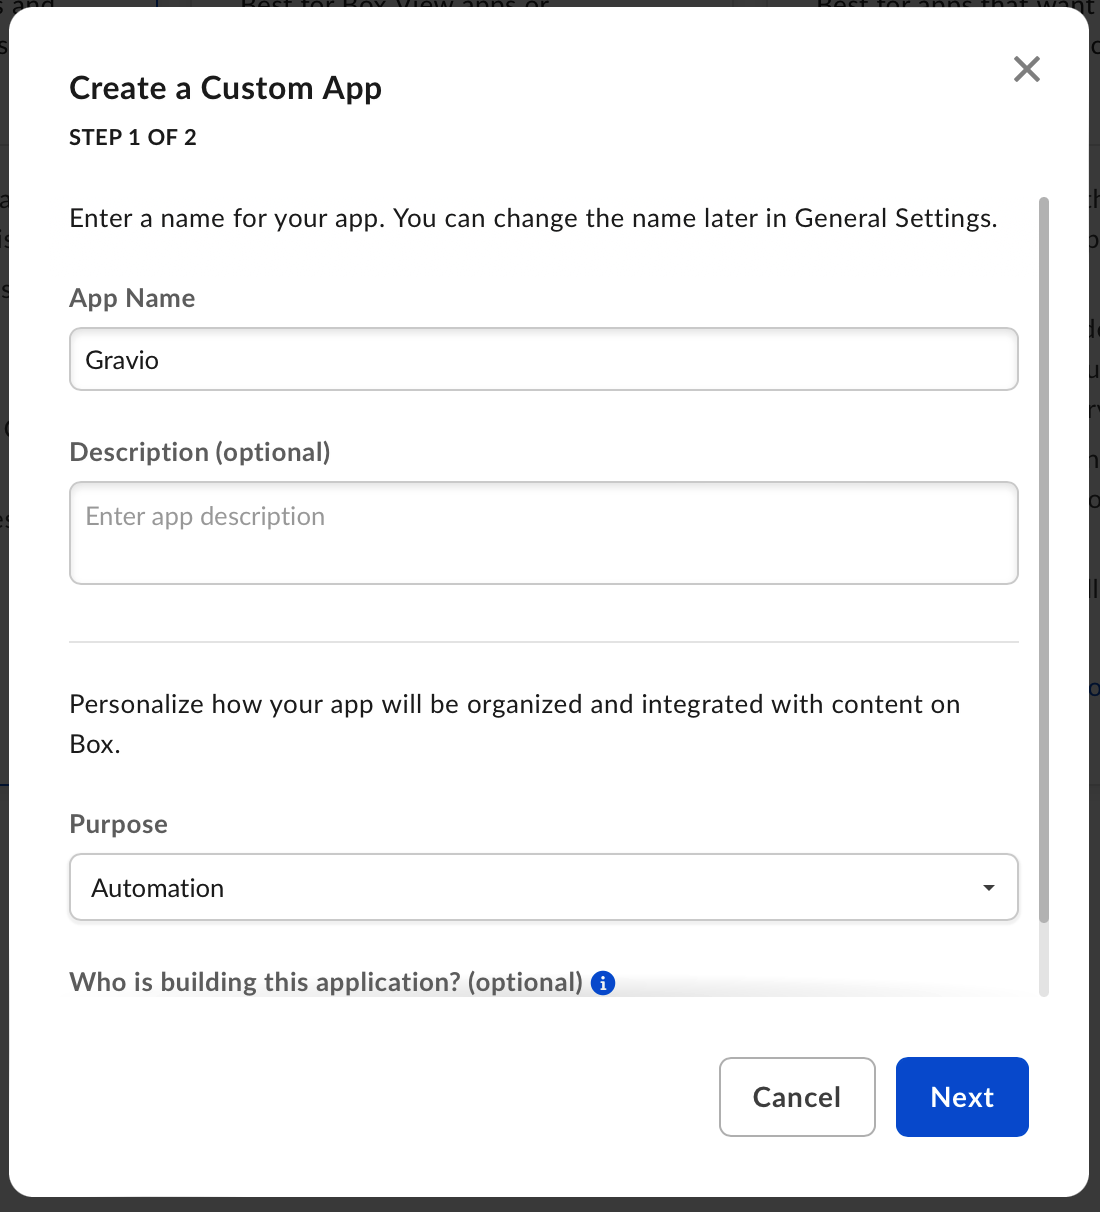
Specify User Authentication (OAuth2.0).
1-3. Select the app you created.

1-4. Obtain OAuth2.0 information.
Note the Client ID as the client ID and the Client Secret as the client secret from OAuth 2.0 Credentials.
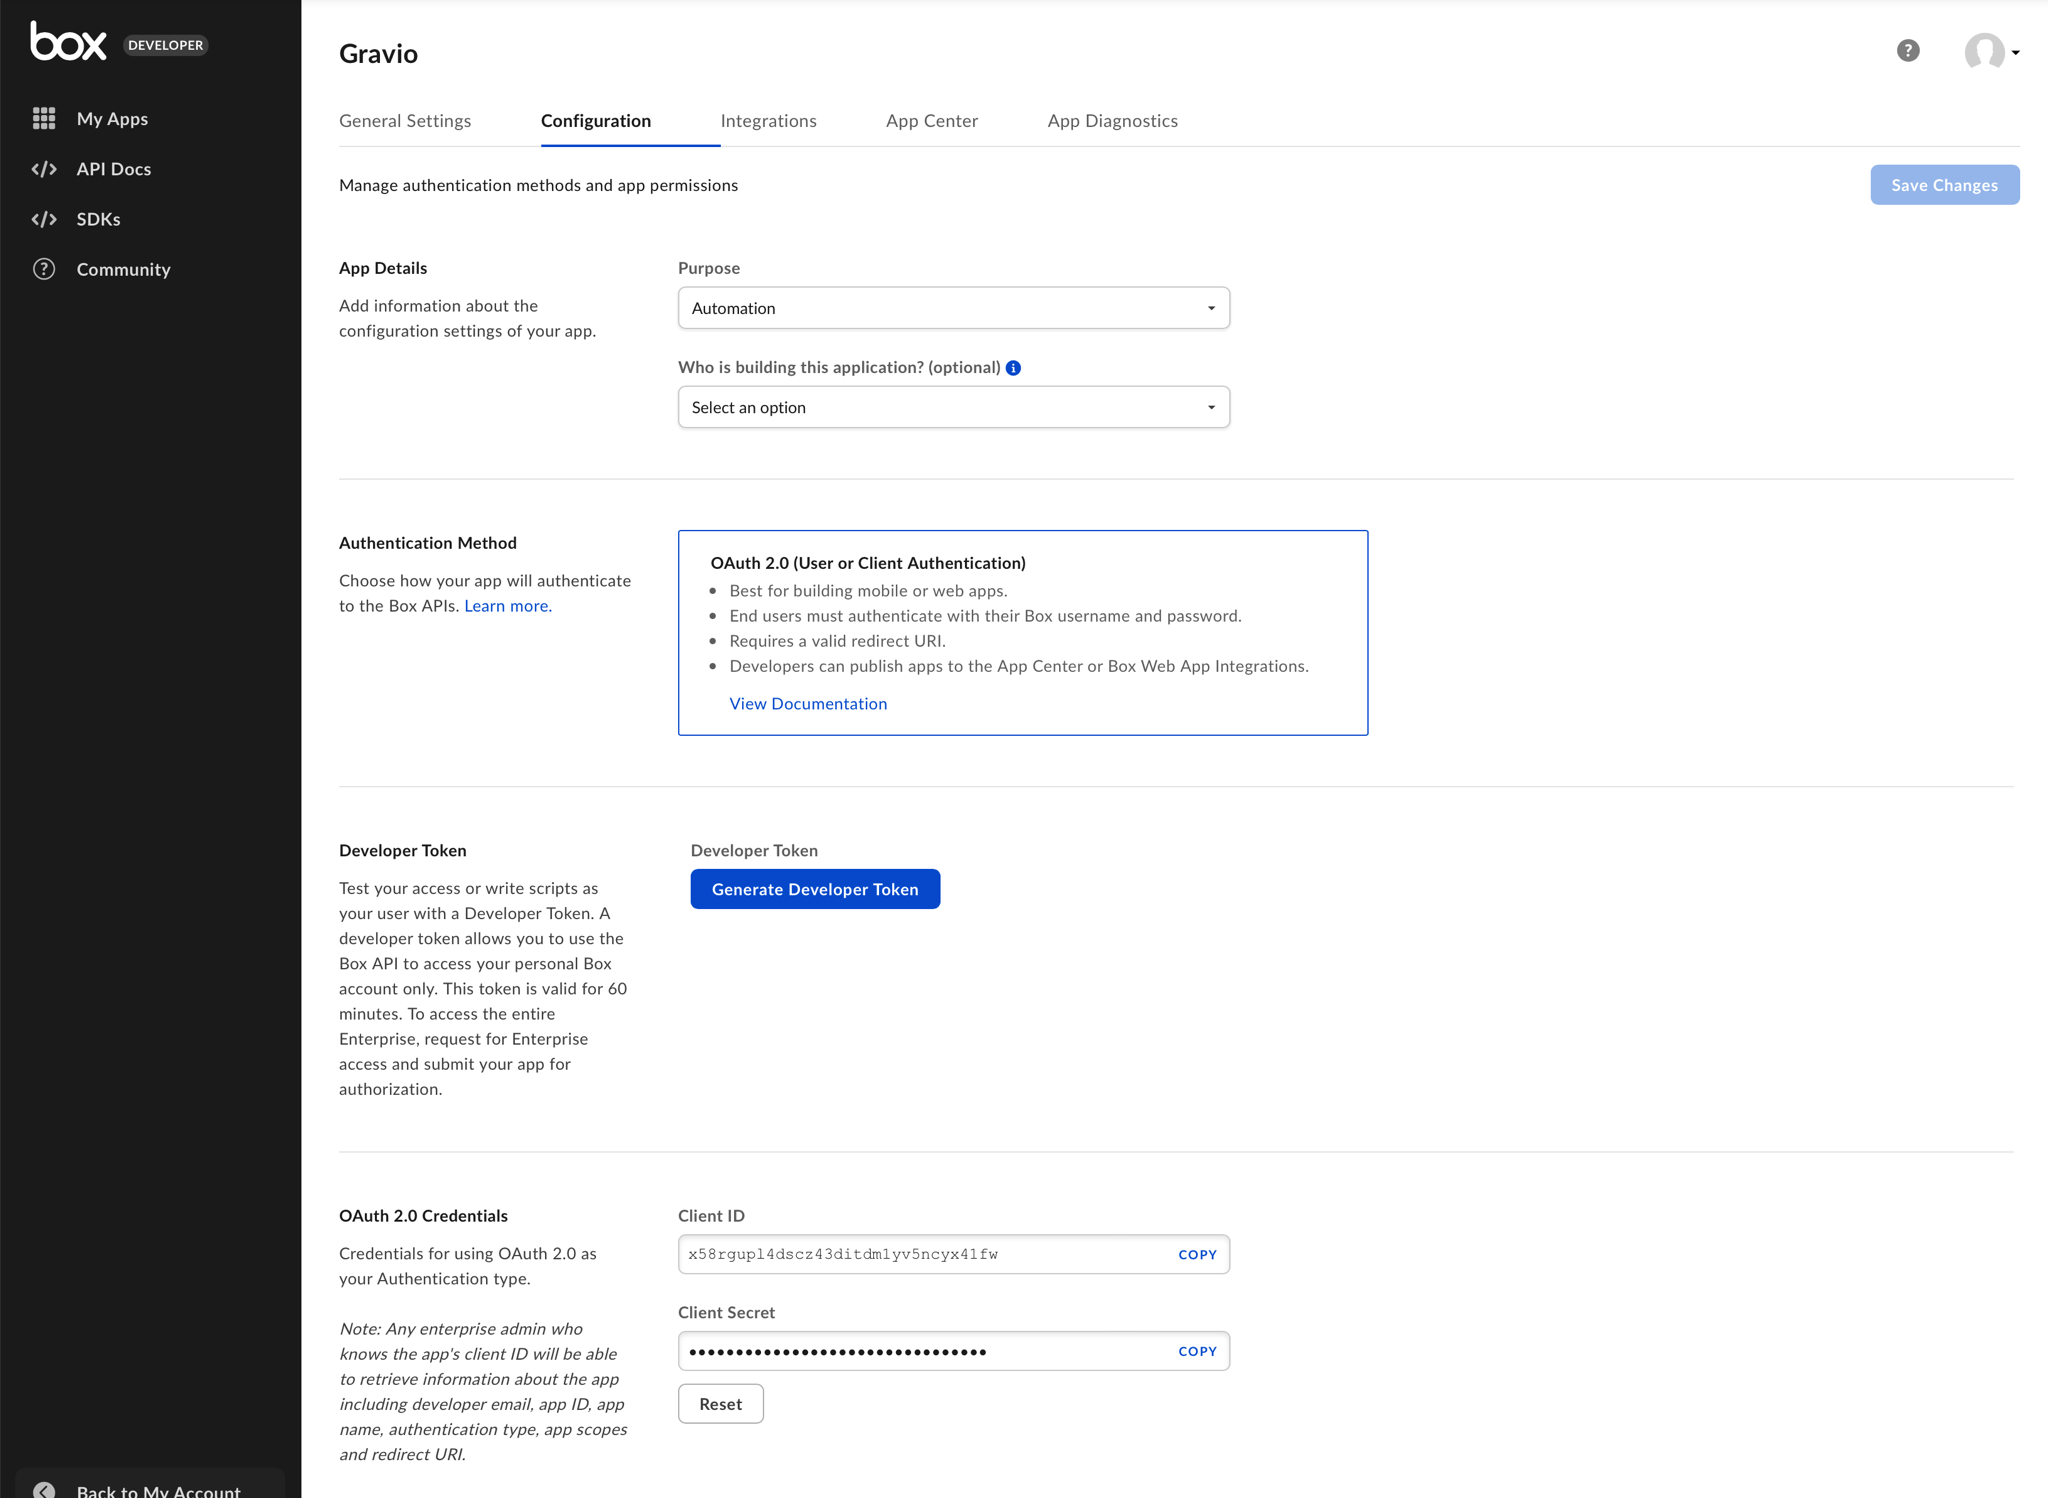
For the OAuth 2.0 Redirect URL, specify a URL like http://localhost:4999 and note it as the redirect URL. In Application Scopes, check Write all files and folders stored in Box and save.

With this, the necessary client ID, client secret ID, and redirect URL for OAuth 2.0 are ready, and the preliminary preparations are complete.
Software Sensors Setup
Gravio also supports software sensors. An example for a software sensor could be a camera that detects how many people are in a room and triggers certain Actions if certain thresholds are reached. These sensors are created using software and artificial intelligence (with inference files) using TensorFlow.
Creating a Software Sensor
Adding a Camera
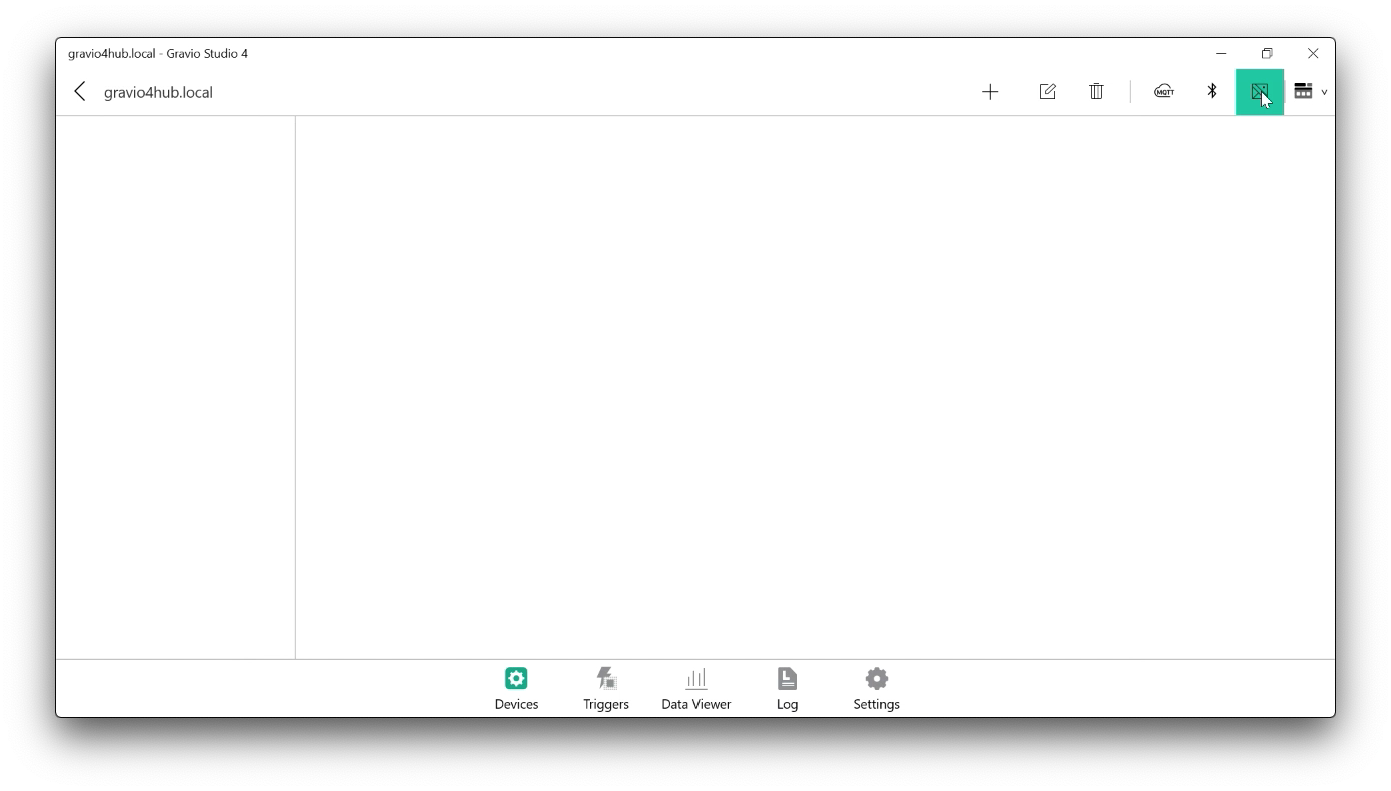
First you need to add a "ONVIF (Open Network Video Interface Forum)":https://www.onvif.org/ compatible camera to the network. Gravio supports the ONVIF standard ( need to provide Profile T), which is very common in security camera settings. For this, please find the camera in your devices window:
You will see ONVIF compatible camera(s) in your network. Please note that Gravio can detect ONVIF cameras that adhere to the ONVIF discovery standard. If you don't see your camera, please check your network or camera setting:
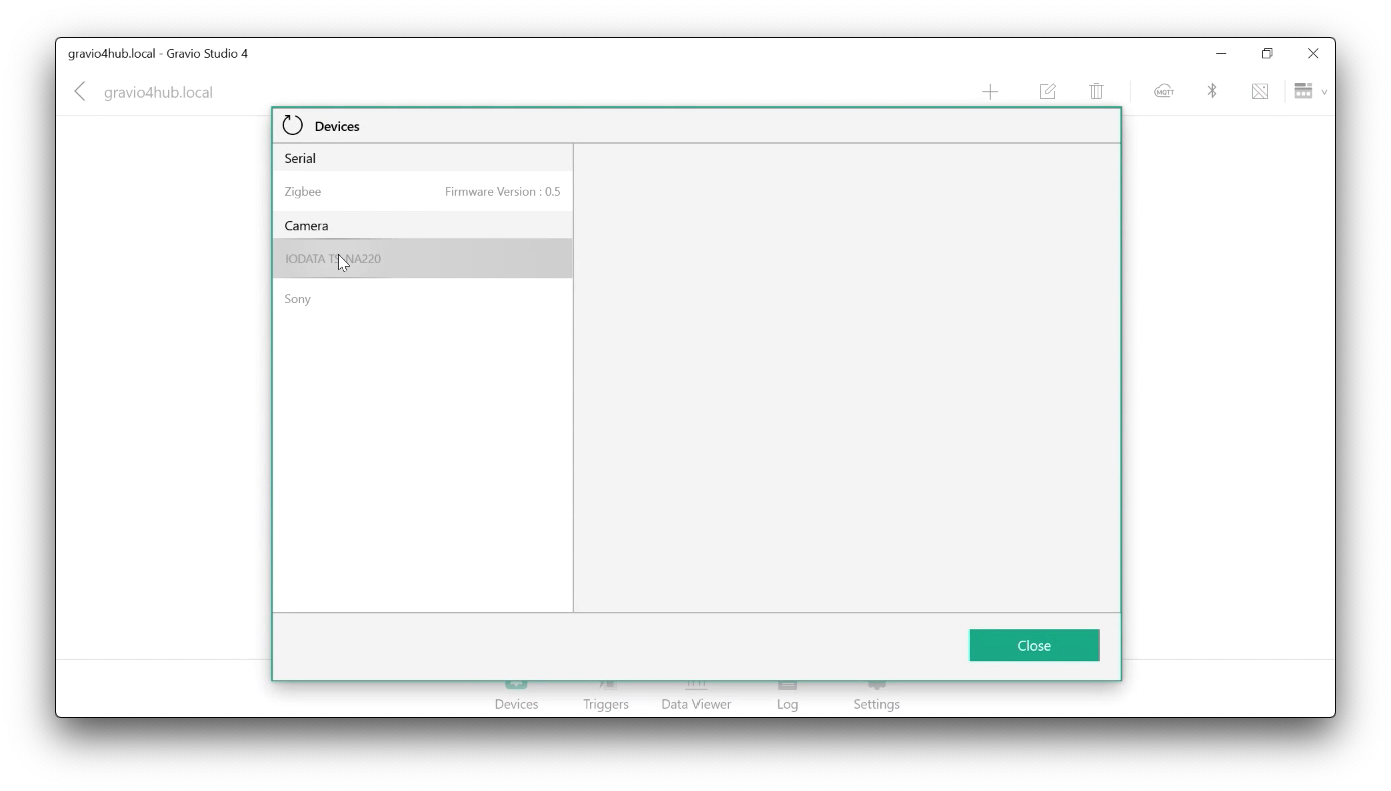
In this case we connect to a "IODATA TS-NA220":https://www.amazon.co.jp/-/en/TS-NA220-Watch-proof-Dustproof-Waterproof-Compliant/dp/B07J65926X and to a "Sony IPELA":https://pro.sony/en_SI/products/fixed-cameras/snc-cx600 camera.
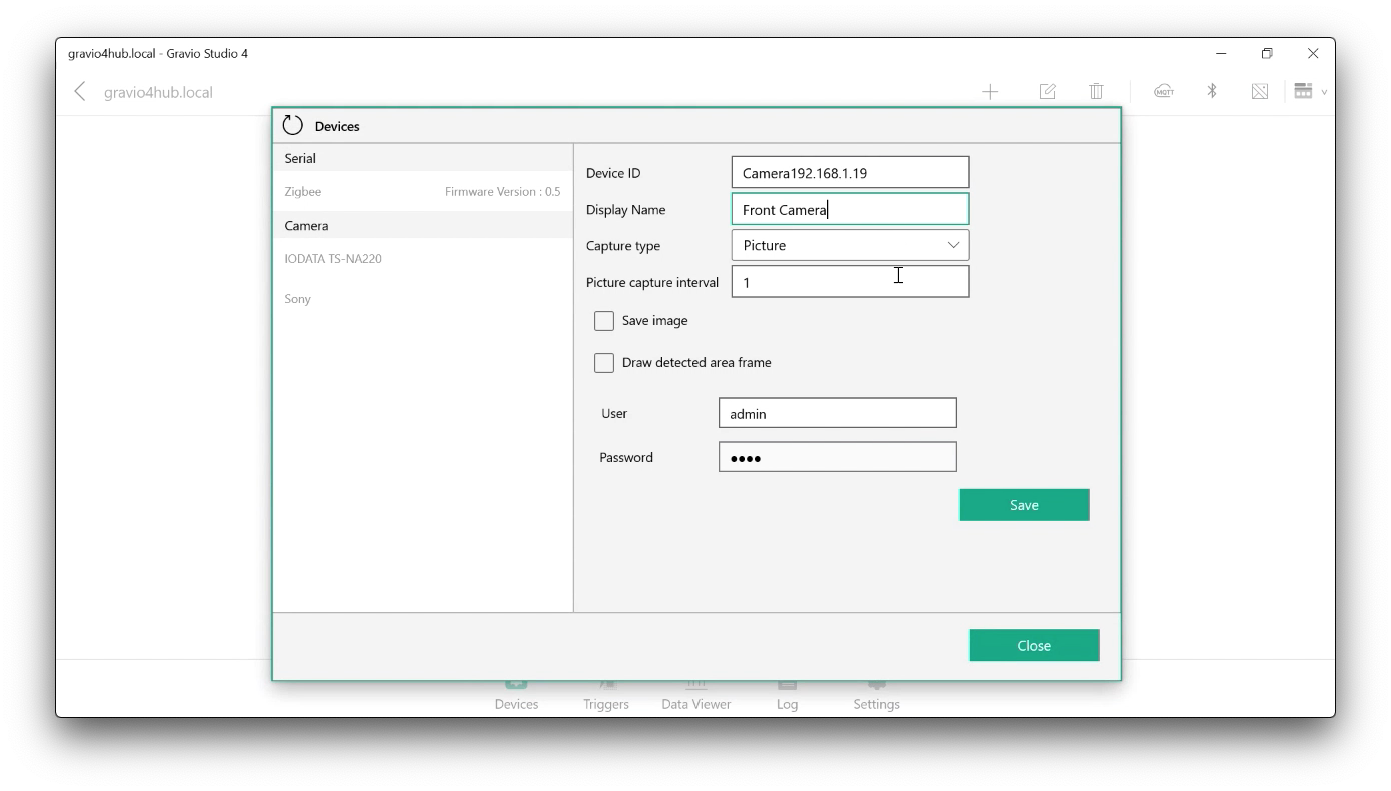
In the following screen you can set the parameters of the camera:
The Device ID is fixed and needed to identify all information associated with this camera. It typically consists of the word Camera followed by the IP address You can choose the display name to make sense for your setting Pick either Picture or Video depending on what you like to capture. We recommend picture as it uses less space. The interval sets how often a picture should be taken. Note again, the less often, the less space you need on your hard drive. Both the above items are relevant if you decide to save the picture. The Save image tickbox determines if the picture should be saved after it has been processed. Leave it blank to save space, leave it ticked, to verify if the computer is doing the right thing If you save the picture, you can also draw a box around the detected area. For example, if you are detecting people in a picture, it will draw a line around the detected people. This helps to verify if the visual recognition model works correctly. Camera Take Photos Component you see where the images get stored. Note, if you store the images, your hard disk might fill up very quickly. You may therefore go to "Settings" and under "Disk Management" set an auto-delete of the media files after a suitable amount of days. * The username and password are the authentication details to access your camera.
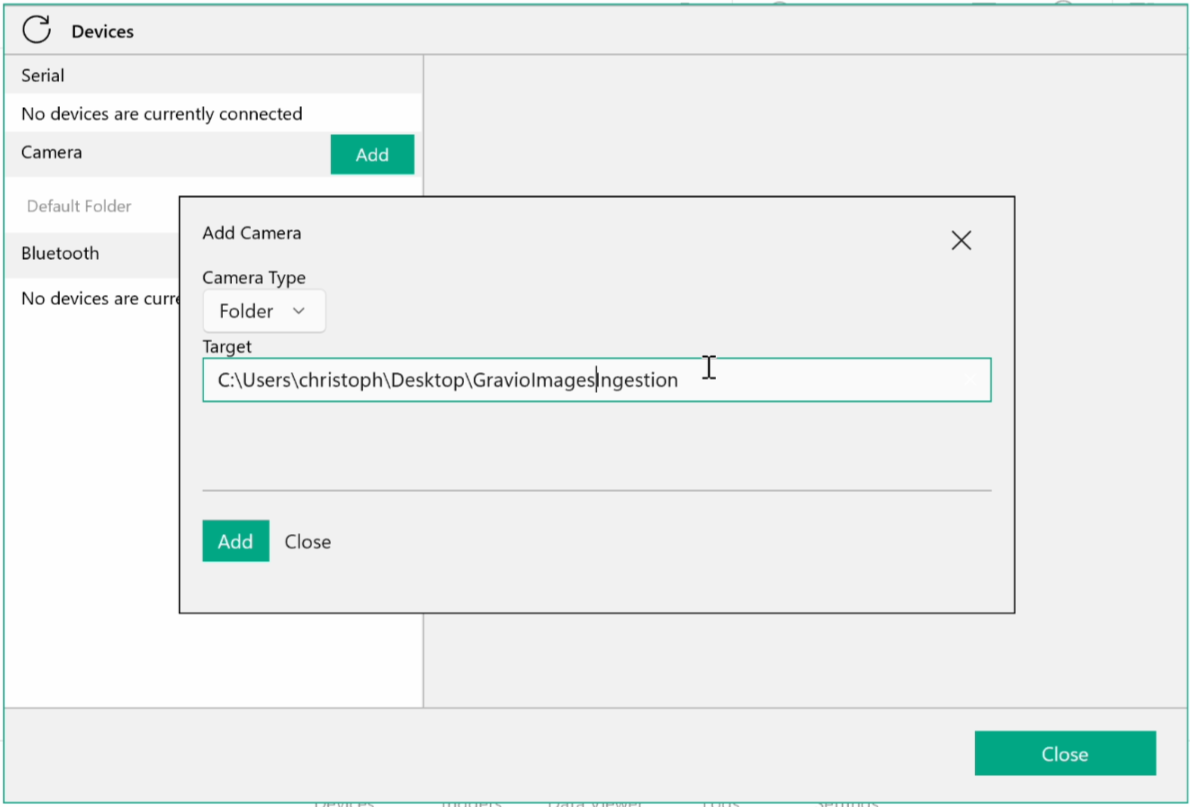
Adding a Image Ingestion Folder
You can also define a folder on your computer, where you can dump image files. Gravio will then automatically detect as soon as an image has been dumped to that folder and will treat it like a camera input sensor image.
There are two ways to use that:
1. Either you run your ingested image past an AI first, in which case you have to deploy your AI model first. Then, assign the AI model to a Area and Layer, and bind it to the newly created image ingestion folder. Adding images to the folder will be ingested immediately and run by the AI model. Results of the model's detection will appear in the Data Viewer.

If you choose to save and/or draw a frame around the image, the output will be stored in your regular video output folder in HubKit/mediadata/
2. The second option is to trigger an Action with the dropped image, in which case the tv.Data will be the path to the ingested file. You then use a "File Read" component to read the file and process it in the upcoming components via the cv.Payload.
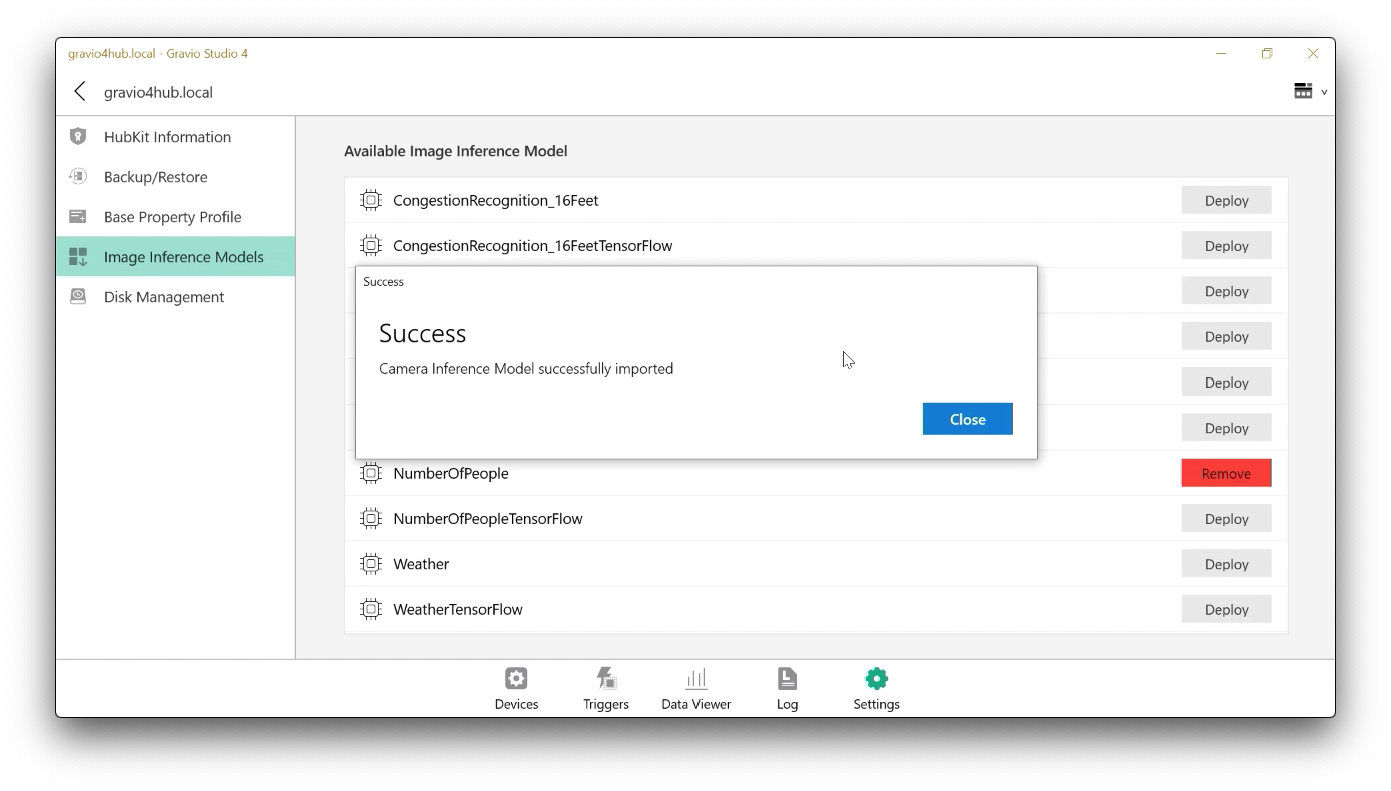
Adding the AI/Image Recognition Model
Now that you have added the camera, you can add the Image Recognition models to Gravio that the camera should process. You can find the available models in the Settings tab of Gravio Studio, then in the "Image Inference Models" section:

On the right-hand side, you will see all the available models. Make sure your Gravio has access to the internet, then just press the "Deploy" button to the right of the model you require. It will download the necessary model files and make them available for the final setup. Please note, that each model file can easily reach 200-300 megabytes in data, so be aware of this when downloading and storing the models.
You can also create your own models, however, this is more advanced, and needs a bit more bespoke work. Please don't hesitate to get in touch with us in our slack channel if you are interested in doing this: "Join Gravio Slack":https://bit.ly/gravioslack
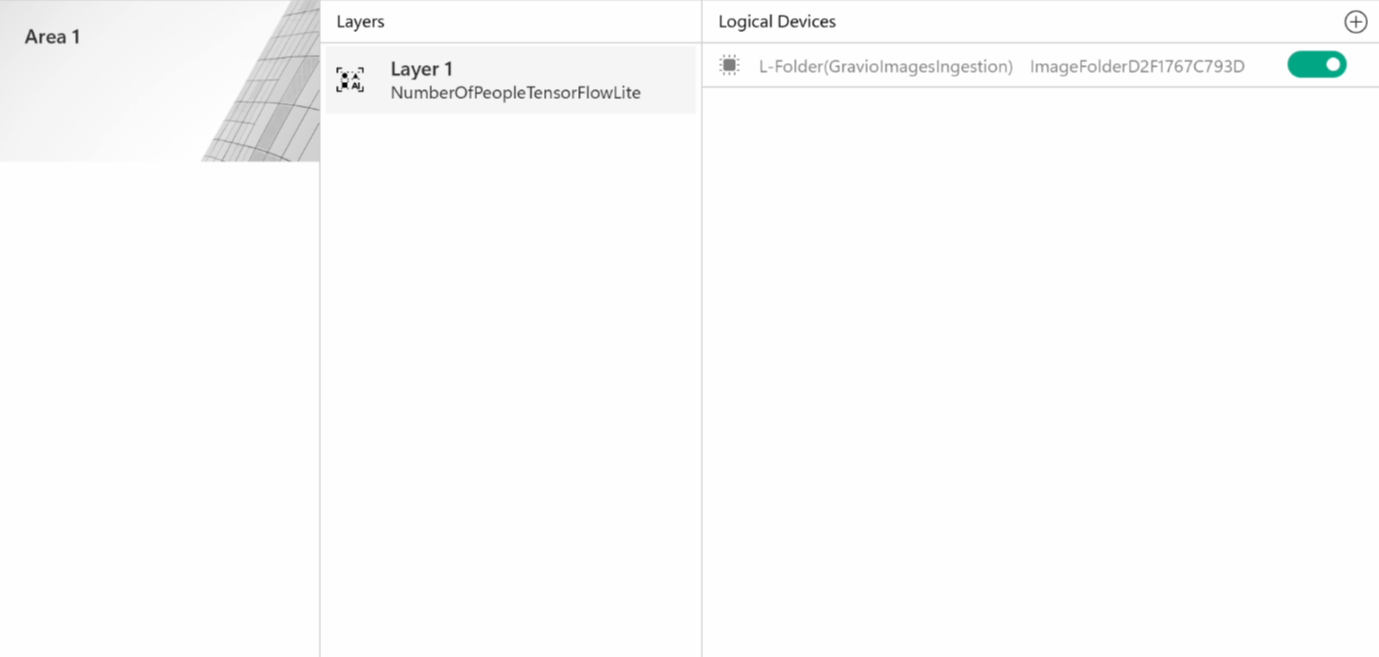
Adding the Layer and connecting the device and trigger
Now that you have installed and connected the camera and deployed the AI model, you have a new layer available that you can add in the Area section of the Gravio Devices tab. Just add the layer as you would any layer and pick the layer named after the AI model. This will then behave like any other hardware sensor.
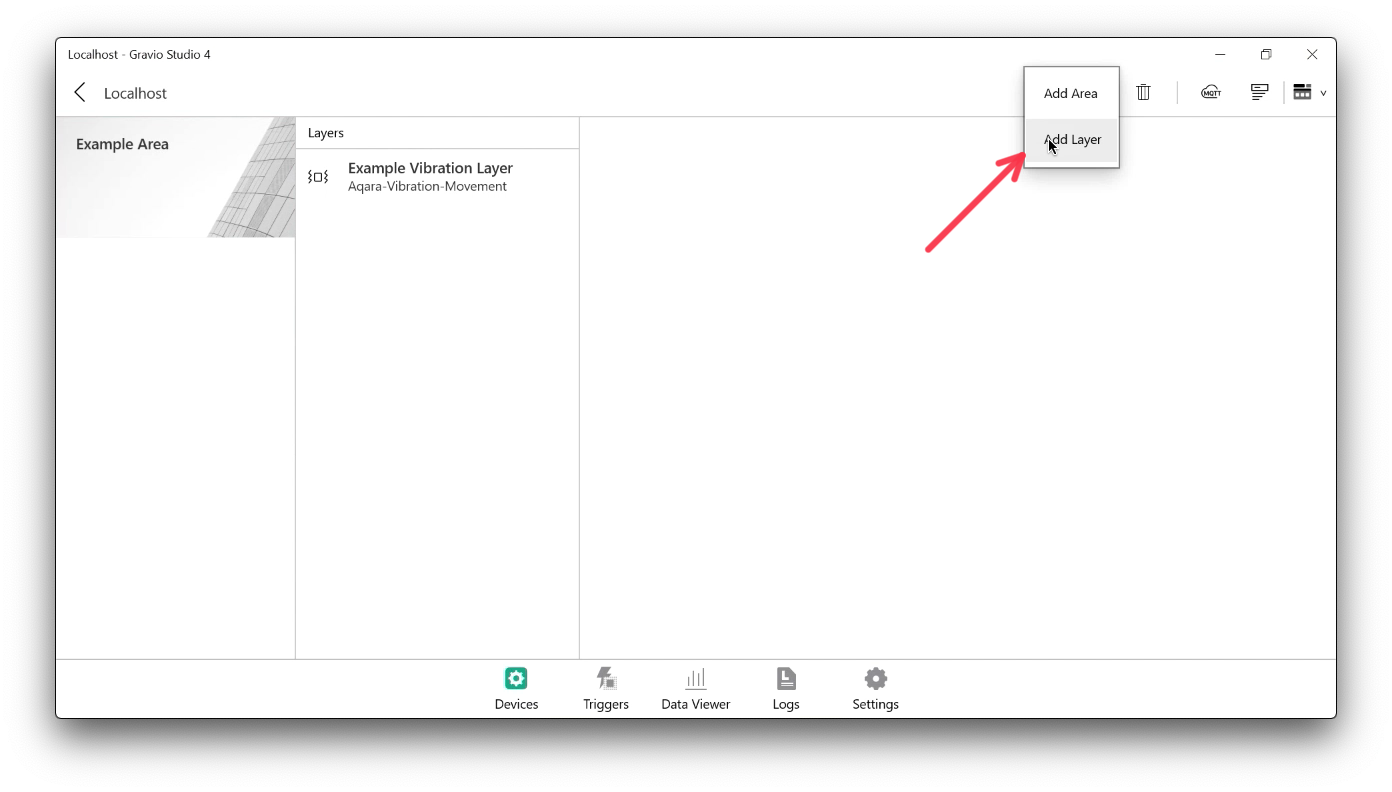
Add a layer to the area:
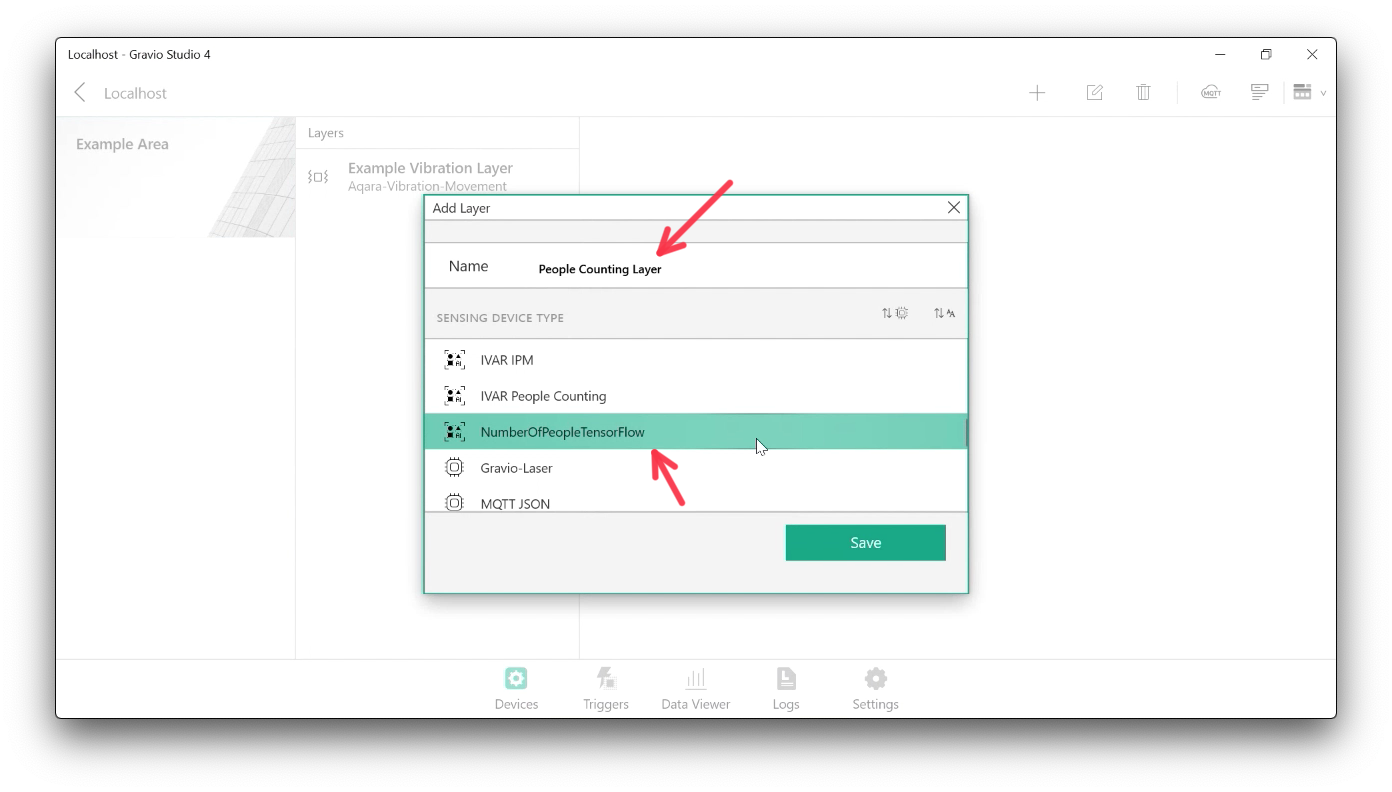
Give it a meaningful name. You now have a new Sensing Device Type from the AI model, choose it and save it:
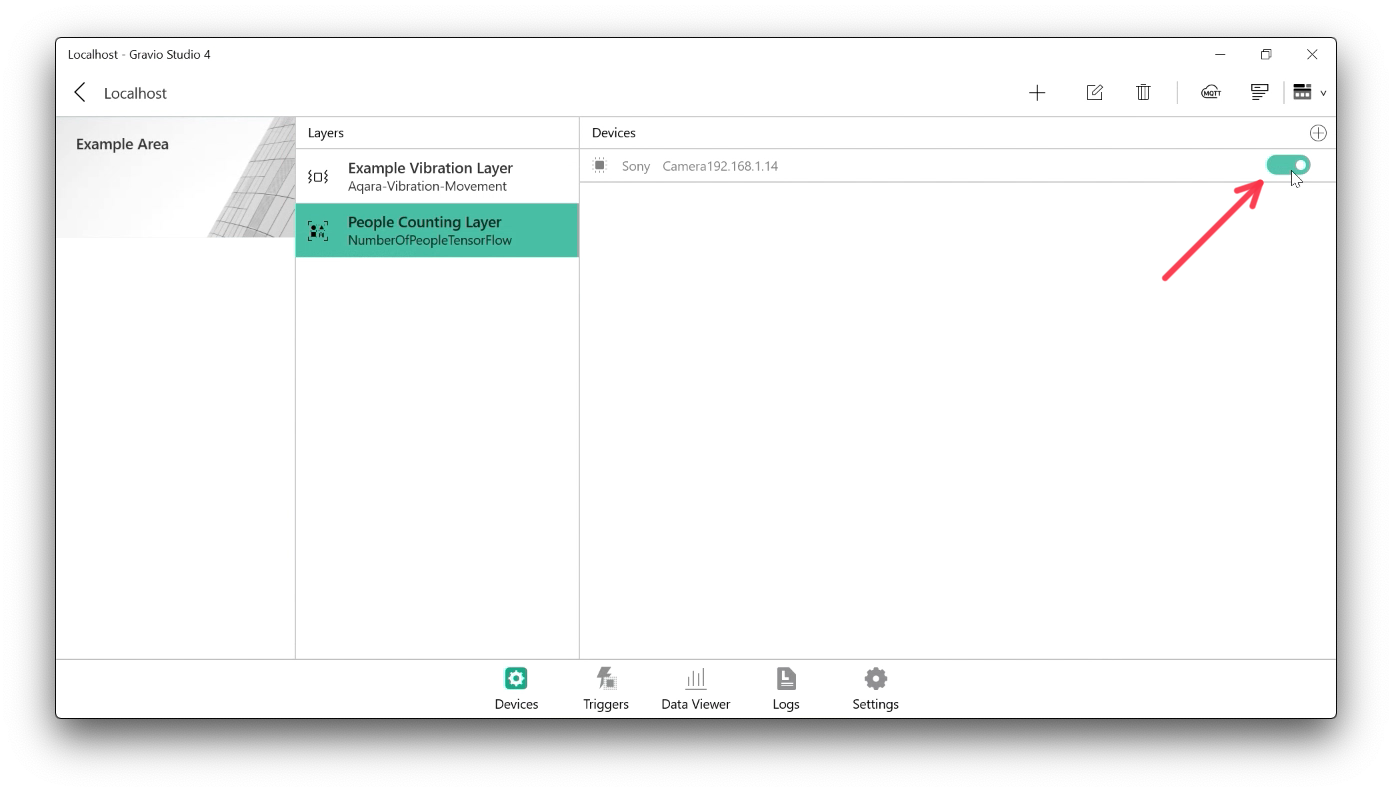
Pick the camera feed you want to use with this model. These camera devices will automatically appear here if they are using the standard ONVIF and its discovery protocol (see above):

Enable the layer:
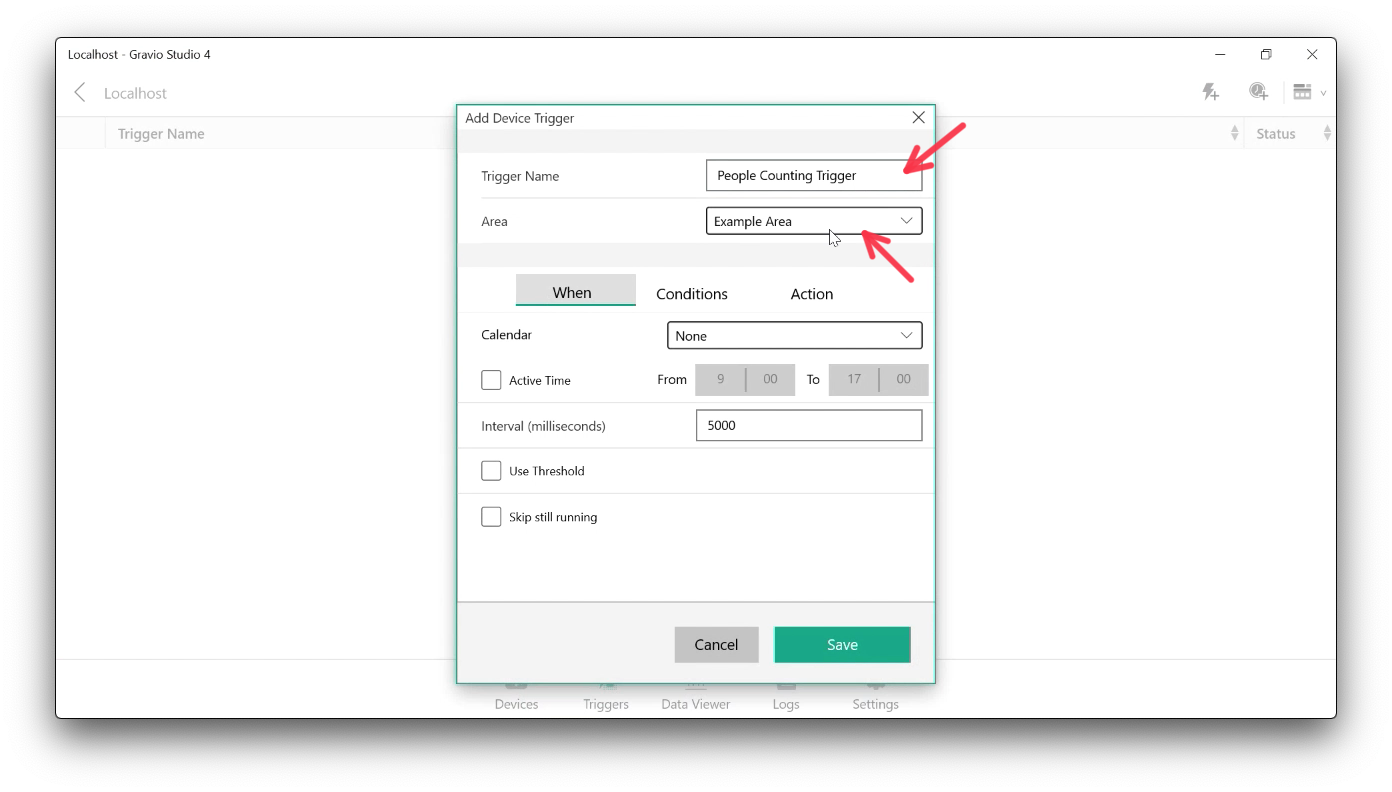
Now let's add a trigger to the software sensor. Pick the trigger tab and create a new trigger. Give it a sensible name and pick the right Area that contains the software sensor layer:
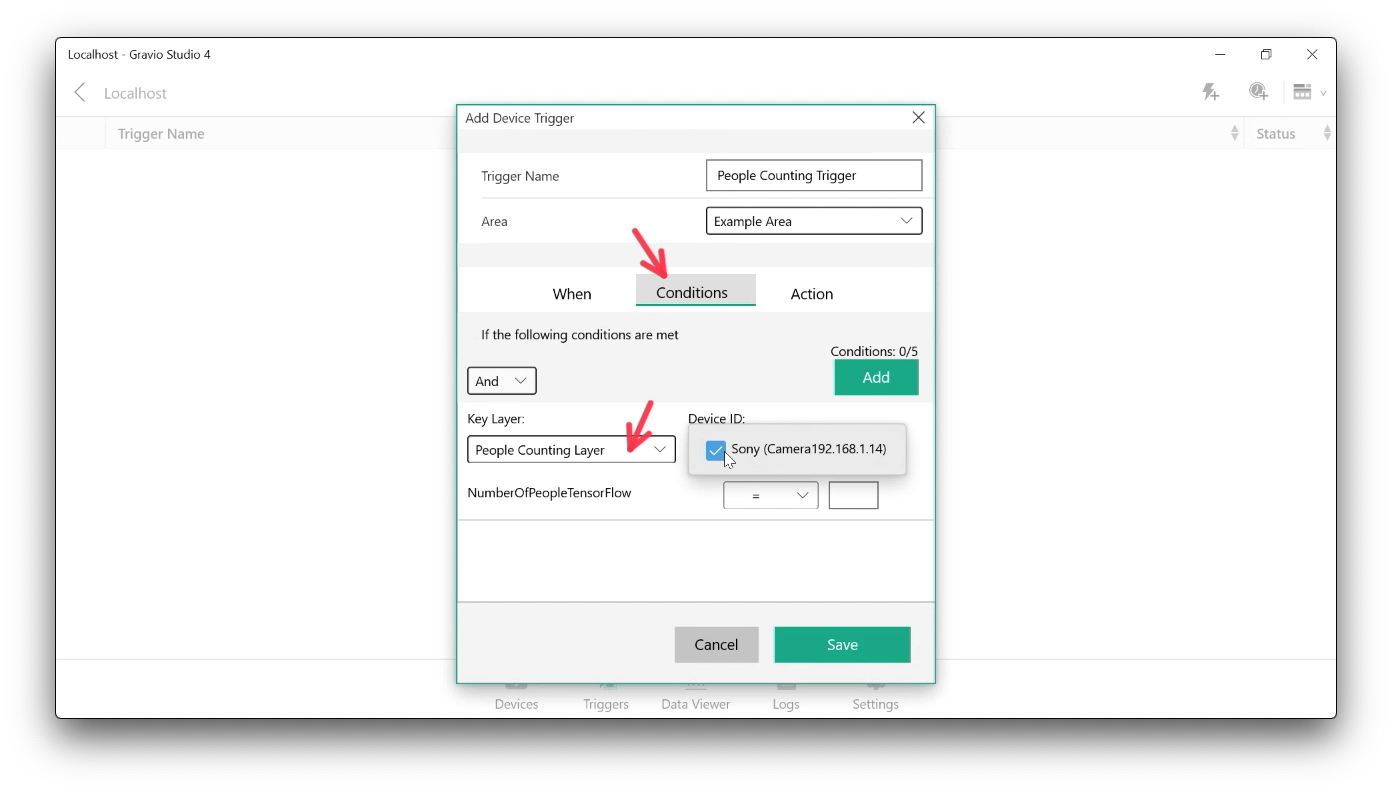
Under "Conditions" select the layer and the camera:
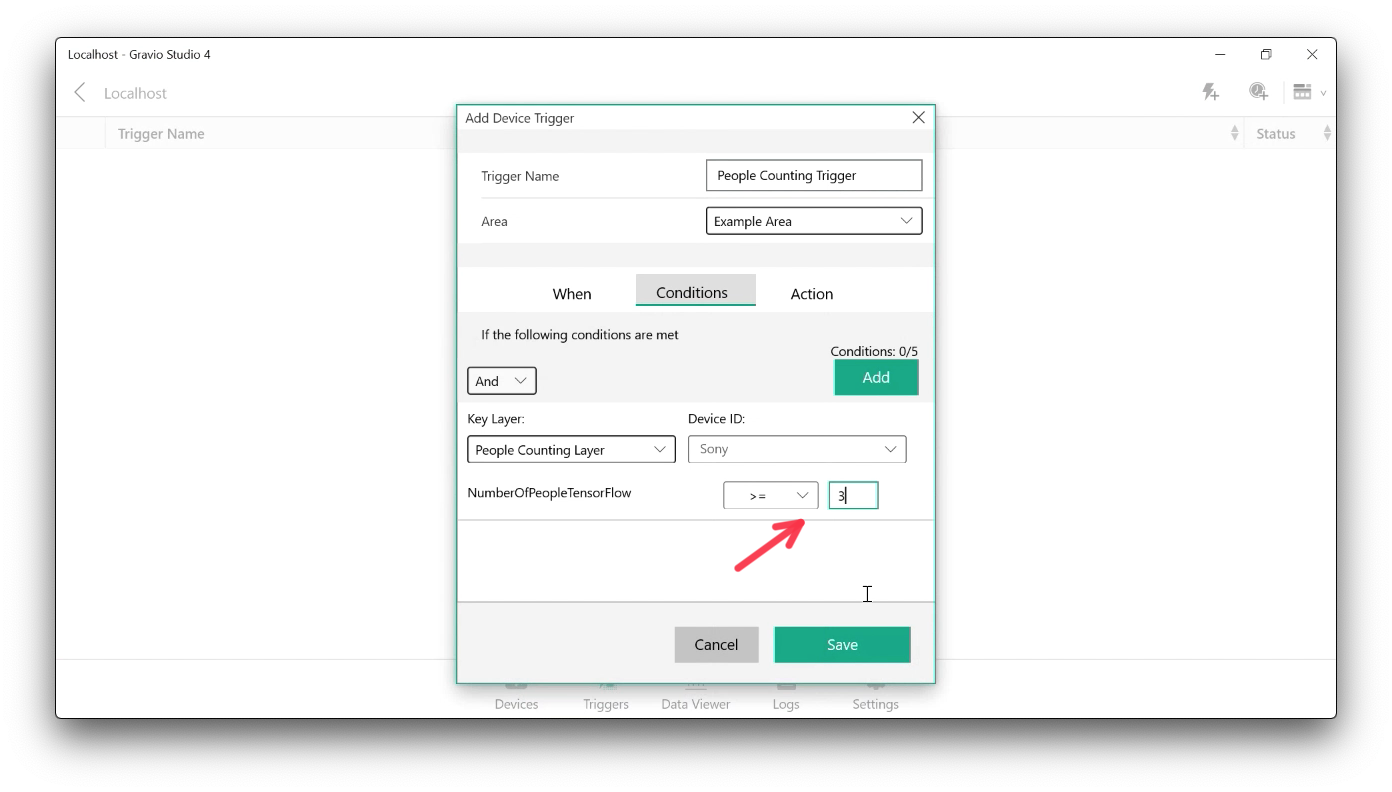
Then set the condition under which the trigger should fire:
And an action it should execute:

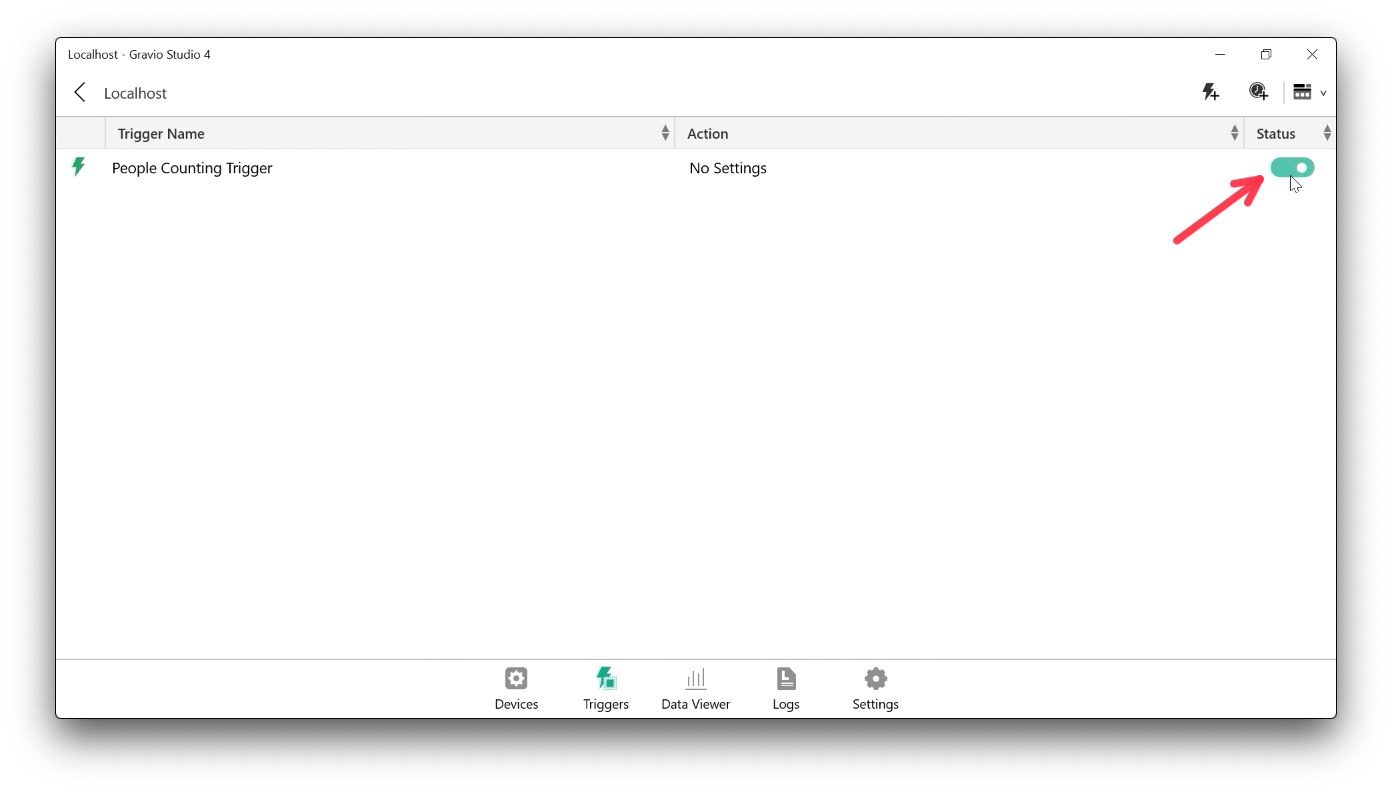
Don't forget to enable the trigger
You are now ready to go and have created a camera vision layer and trigger. You can find more info about creating triggers under the section Trigger Tab
You can find more about how to setup a ONVIF Camera by watching this video: "https://www.youtube.com/watch?v=8dkSIz_5810":https://www.youtube.com/watch?v=8dkSIz_5810
You can find out Camera Take Photos Component