Gravio Trigger Manual
Table of Contents
- 1. Overview of the Trigger Tab
- 2. Device Triggers
- 2.1 Creating a Device Trigger
- 2.2 Setting Trigger Active Hours
- 2.3 Setting Trigger Conditions
- 2.4 Setting Actions
- 2.5 Enabling the Trigger
- 2.6 Configuration Examples
- 3. Timer Triggers
- 3.1 Creating a Timer Trigger
- 3.2 Schedule Settings
- 3.3 Setting Actions
- 3.4 Enabling the Timer Trigger
- 4. Trigger Variables and Properties
- 4.1 Trigger Variables
- 4.2 Trigger Properties
1. Overview of the Trigger Tab
The [Trigger] tab allows you to set up device triggers that activate based on sensor values and timer triggers that execute periodically based on a schedule.
Before creating triggers, please set up devices according to the device tab and configure at least one action following the "Action Steps."
2. Device Triggers
2.1 Creating a Device Trigger
After setting up devices and actions, you can create a device trigger.
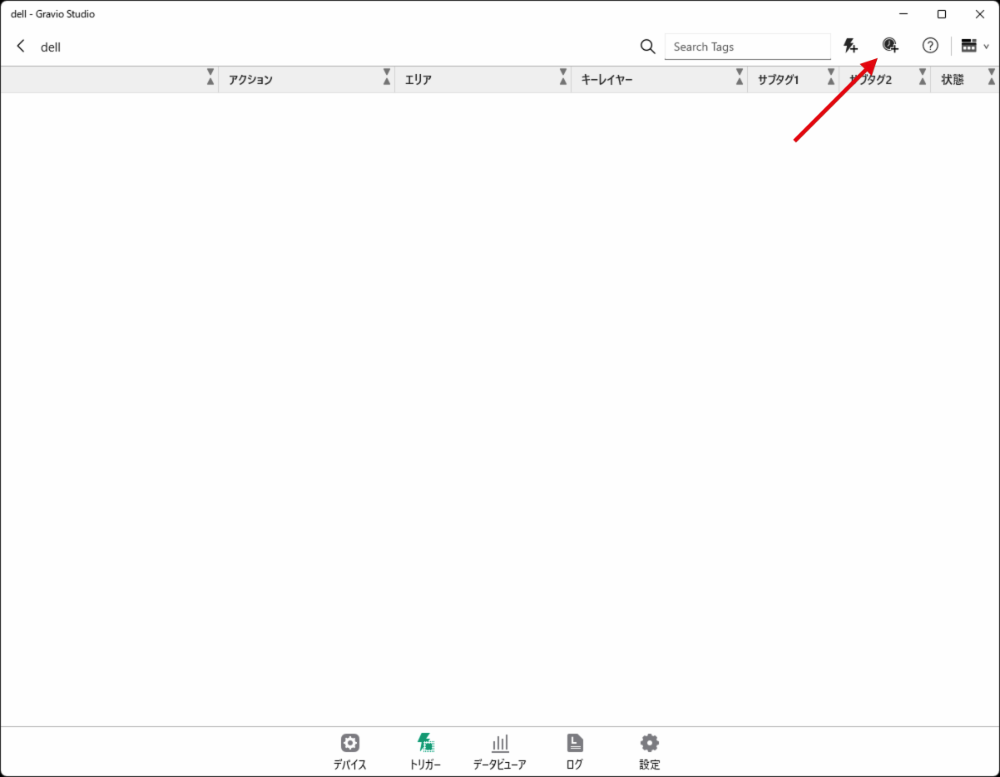
To create a device trigger, click the "+" icon in the top right.
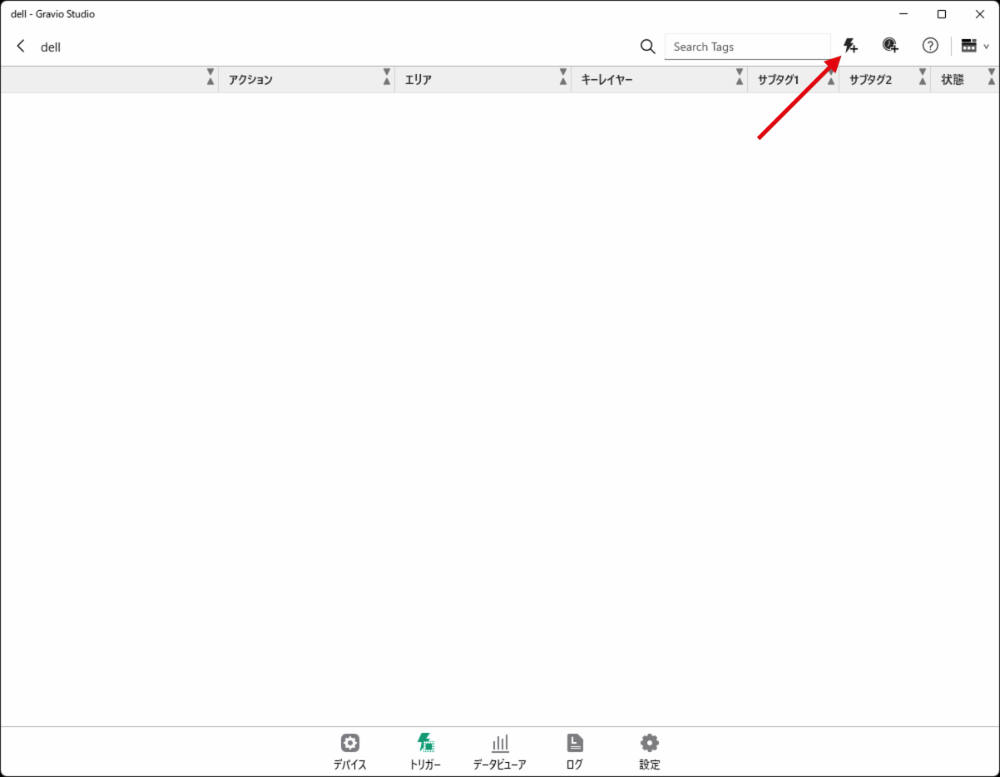
The following dialog will appear:

Enter a name in the trigger name field and select the area for the registered device.
2.2 Setting Trigger Active Hours
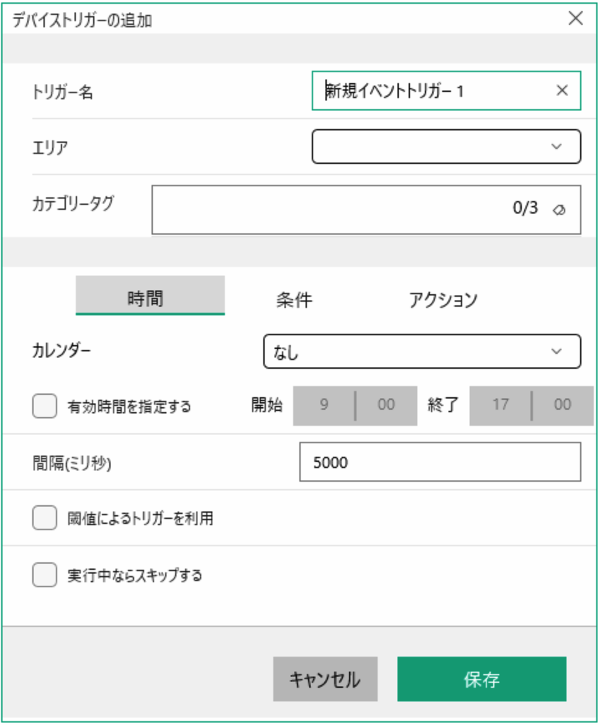
- In the Time tab, select the calendar to use. Calendars are available when using Coordinator.
- Check Specify active hours and set start and end times to make this trigger condition active only during those hours.
- Interval specifies how often to monitor the trigger condition.
- When Use threshold-based trigger is selected, re-execution only occurs when received data exceeds the set threshold.
- When Skip if running is selected, new trigger conditions are not executed if a trigger is already running.
2.3 Setting Trigger Conditions
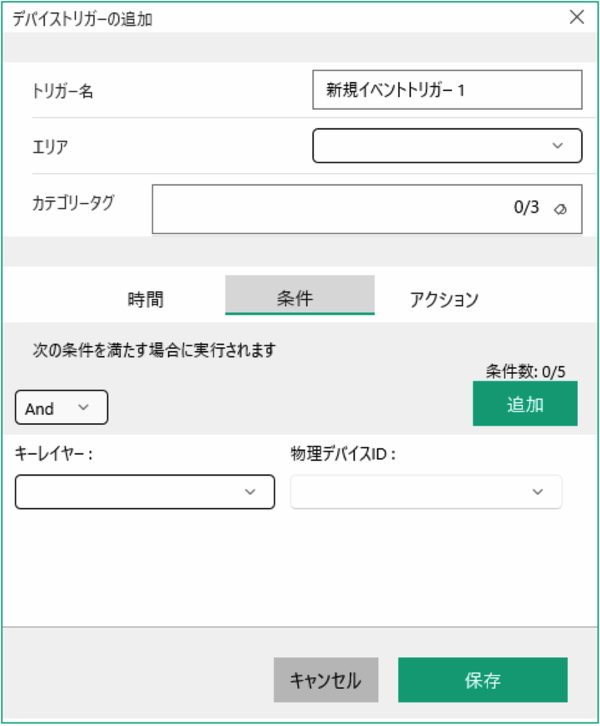
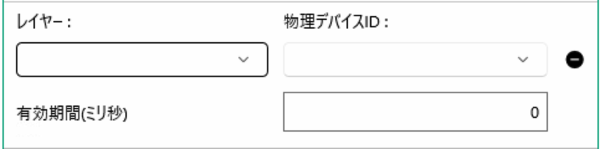
In the Conditions tab, select the key layer/layer and device ID. Various options appear at the bottom of the dialog box depending on the sensor type.
When entering conditions for multiple layers (up to 4) in addition to the key layer, specify And or Or. - When specifying And: "Key layer condition And (Layer condition And Layer condition And ...)" - When specifying Or: "Key layer condition And (Layer condition Or Layer condition Or ...)"
The key layer condition is always And.
Condition expression types: - Numeric comparison expressions: Any value, =, !=, >, >=, <, <=, Range, Expression - String comparison expressions: Any value, =, !=, Contains, Does not contain, Starts with, Does not start with, Ends with, Does not end with, Regular expression, Expression
Expressions can use functions available within triggers. For functions, refer to here.
For layers added to the key layer, you can specify an expiration period (milliseconds). This is the expiration period for received data when judging layer conditions after the key layer condition is met.
2.4 Setting Actions

In the Actions tab, select the action to execute.
You can also specify multiple trigger properties (up to 5) as arguments for action execution.
Trigger properties include three predefined properties and custom property names:
- tp.KeyAreaName: Sets the selected area name
- tp.KeyLayerName: Sets the first key layer name specified in conditions
- tp.TriggerName: Sets the executing trigger name
In addition to these three, you can specify custom property names and values that can be referenced within actions.
For configuration examples, please refer to Configuration Examples.
2.5 Enabling the Trigger
Don't forget to enable the new trigger by switching the toggle to green.
2.6 Configuration Examples
Setting Trigger Active Hours
Interval Examples
Device triggers operate when data matching the set conditions arrives, but by specifying an interval, you can set it so that the next execution won't occur until this interval has passed since the last execution time.
Example: When device data arrives every 2 seconds but you want the trigger to execute every 10 seconds, set the interval to 9000ms (about 10% lower than 10 seconds).
With this setting, trigger execution for data received every 2 seconds will occur at the following timing:
| # | Received Data | Result |
|---|---|---|
| 1 | Data 1 | ← Trigger executed |
| 2 | Data 2 | No action |
| 3 | Data 3 | No action |
| 4 | Data 4 | No action |
| 5 | Data 5 | No action |
| 6 | Data 6 | ← Trigger executed |
| 7 | Data 7 | No action |
| ... | ... | ... |
Threshold Examples
This parameter was introduced to handle sensors that continuously send data (temperature sensors, door/window sensors, wireless switches, etc.).
Example 1: Temperature Sensor
With threshold-based trigger enabled and trigger condition set to >20°:
- After the trigger executes when the sensor sends data above 20°, it won't execute again until the temperature drops below 20° and then exceeds 20° again
- With threshold-based trigger disabled, the trigger executes every time the sensor sends data above 20°
When the sensor sends 21°, 22°, 18°, 23°:
| Received Data | Threshold ON | Threshold OFF |
|---|---|---|
21° |
Trigger executed | Trigger executed |
22° |
No action | Trigger executed |
18° |
No action | No action |
23° |
Trigger executed | Trigger executed |
Example 2: Door/Window Sensor
With threshold-based trigger enabled and trigger condition set to =close:
- After the trigger executes when the sensor sends close data, it won't execute again until it receives open data
- With threshold-based trigger disabled, the trigger executes every time the sensor sends close data
When the sensor sends close, close, open, close:
| Received Data | Threshold ON | Threshold OFF |
|---|---|---|
close |
Trigger executed | Trigger executed |
close |
No action | Trigger executed |
open |
No action | No action |
close |
Trigger executed | Trigger executed |
Example 3: Wireless Switch
With threshold-based trigger enabled and trigger condition set to =click:
- After the trigger executes when the sensor sends click data, it won't execute again until it receives non-click data
- With threshold-based trigger disabled, the trigger executes every time the sensor sends click data
When the sensor sends click, click, double click, click:
| Received Data | Threshold ON | Threshold OFF |
|---|---|---|
click |
Trigger executed | Trigger executed |
click |
No action | Trigger executed |
double click |
No action | No action |
click |
Trigger executed | Trigger executed |
Setting Trigger Execution Conditions
Key Layer Examples
The key layer is the required layer condition. The trigger condition is met and actions are executed when this key layer data is received and meets the trigger conditions.
Example 1: Door/Window Sensor (Key Layer Only)
Condition: Key layer door/window sensor condition is set to close
| # | Received Data | Result |
|---|---|---|
| 1 | Door/window sensor: open |
- |
| 2 | Door/window sensor: close |
← Trigger executed |
| 3 | Door/window sensor: open |
- |
| 4 | Door/window sensor: close |
← Trigger executed |
Example 2: Door/Window Sensor + Temperature Sensor (Threshold ON)
Conditions:
- Key layer: Door/window sensor = close
- Layer: Temperature sensor ≥ 20° (Use threshold-based trigger: ON)
| # | Received Data | Result |
|---|---|---|
| 1 | Door/window sensor: open |
- |
| 2 | Door/window sensor: close |
No action (temp condition not met) |
| 3 | Temperature sensor: 20.0° |
- |
| 4 | Door/window sensor: open |
- |
| 5 | Temperature sensor: 19.8° |
- |
| 6 | Door/window sensor: close |
No action (temp below threshold) |
| 7 | Door/window sensor: open |
- |
| 8 | Temperature sensor: 20.1° |
- |
| 9 | Door/window sensor: close |
← Trigger executed |
| 10 | Temperature sensor: 20.2° |
- |
Important: The two sensor data packets need to be received within the set interval time.
Example 3: Door/Window Sensor + Temperature Sensor (Threshold OFF)
Conditions:
- Key layer: Door/window sensor = close
- Layer: Temperature sensor ≥ 20° (Use threshold-based trigger: OFF)
| # | Received Data | Result |
|---|---|---|
| 1 | Door/window sensor: open |
- |
| 2 | Door/window sensor: close |
No action (temp condition not met) |
| 3 | Temperature sensor: 20.0° |
- |
| 4 | Door/window sensor: open |
- |
| 5 | Temperature sensor: 20.1° |
- |
| 6 | Door/window sensor: close |
← Trigger executed |
| 7 | Door/window sensor: open |
- |
| 8 | Temperature sensor: 20.2° |
- |
| 9 | Door/window sensor: close |
← Trigger executed |
| 10 | Temperature sensor: 20.1° |
- |
Example 4: Three Sensors (AND Condition)
Conditions:
- Key layer: Door/window sensor = close
- Layer: Temperature sensor ≥ 20°
- Layer: Humidity sensor ≥ 30%
- Layer condition: AND
| # | Received Data | Result |
|---|---|---|
| 1 | Door/window sensor: open |
- |
| 2 | Door/window sensor: close |
No action |
| 3 | Temperature sensor: 20.0° |
- |
| 4 | Door/window sensor: open |
- |
| 5 | Temperature sensor: 20.1° |
- |
| 6 | Door/window sensor: close |
No action (humidity not met) |
| 7 | Door/window sensor: open |
- |
| 8 | Humidity sensor: 35% |
- |
| 9 | Door/window sensor: close |
← Trigger executed (both temp & humidity met) |
| 10 | Temperature sensor: 20.1° |
- |
Example 5: Three Sensors (OR Condition)
Conditions:
- Key layer: Door/window sensor = close
- Layer: Temperature sensor ≥ 20°
- Layer: Humidity sensor ≥ 30%
- Layer condition: OR
| # | Received Data | Result |
|---|---|---|
| 1 | Door/window sensor: open |
- |
| 2 | Door/window sensor: close |
No action |
| 3 | Temperature sensor: 20.0° |
- |
| 4 | Door/window sensor: open |
- |
| 5 | Temperature sensor: 20.1° |
- |
| 6 | Door/window sensor: close |
← Trigger executed (temp condition met) |
| 7 | Door/window sensor: open |
- |
| 8 | Humidity sensor: 35% |
- |
| 9 | Door/window sensor: close |
← Trigger executed (humidity condition met) |
| 10 | Temperature sensor: 20.1° |
- |
Expression Examples
When selecting Expression, the trigger execution condition is met when the condition is true.
Example 1: Temperature 25 degrees or higher
tv.Data >= 25
Example 2: Temperature between 20 and 25 degrees
tv.Data >= 20 && tv.Data <= 25
Example 3: IVAR face recognition receives FR_UNKNOWN
- Event Type: Any Event
- Expression:
tv.Data.common.type == "FR_UNKNOWN"
Example 4: IVAR face recognition detects no mask
- Event Type: Any Event
- Expression:
tv.Data.iod.mask == "NONE"
Example 5: Match arbitrary MQTT data
When receiving {"aircon": "off"} from MQTT:
- Event Type: Any Event
- Expression:
tv.Data.aircon == "off"
Tip: You can combine conditions. For example, trigger when aircon is "off" AND temperature is higher than 25 degrees Celsius.
Example 6: Using JSONPath with EnOcean Current Sensor
If EnOcean EEP D2-32-02 Current Sensor sends:
{"Current1": 2.5, "Current2": 0, "Current3": 0}
Trigger when Current3 is greater than 2:
JSONPath("$.Current3", tv.Data) > 2
Triggering Based on JSON Content
To check whether a JSON payload contains specific content, use the Contains function with JSONPath.
Example: Check if class_name contains a specific value
Check if class_name contains "gravio-chocolate" in this JSON structure:
{
    "detection": {
        "fruit-zone": {
            "events": [
                {
                    "class_id": [7],
                    "class_name": ["gravio-chocolate"]
                }
            ]
        }
    }
}
Method 1: Using Contains function
Contains(JSONPath("$..class_name[*]", tv.Data), "gravio-chocolate")
Note: This method could potentially double-match.
Method 2: Direct property access (more precise)
tv.Data.detection["fruit-zone"].events[0].class_name[0] == "gravio-chocolate"
Use the appropriate index within [] to target specific elements.
Key Layer and Additional Layer Validity Period
Example: CO2 + Motion Sensor Combination
To execute a trigger only when CO2 exceeds 1000ppm AND motion sensor detects presence:
Configuration:
- Key layer: CO2 sensor > 1000ppm
- Layer: Motion sensor = presence detected
Problem: Motion sensors don't send data when no one is present. If someone was present an hour ago but has left, comparing with the most recent value (data from an hour ago) would incorrectly indicate presence.
Solution:
Set the layer "Validity Period" to 60000 milliseconds (1 minute).
| Validity Period Setting | Behavior |
|---|---|
60000ms (1 minute) |
Trigger executes only when motion detected within the last minute |
0ms |
No expiration, conditions judged based on most recent value (default) |
This ensures the trigger won't execute when CO2 exceeds 1000ppm if no one has been detected recently.
3. Timer Triggers
3.1 Creating a Timer Trigger
After setting up actions, create a timer trigger.
To create a timer trigger, click the "+" icon in the top right.
The following dialog will appear:
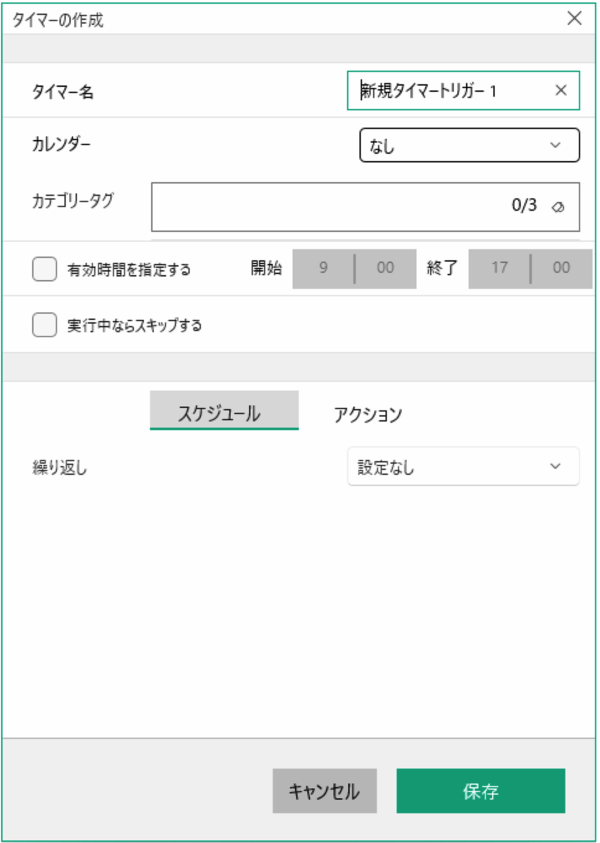
Enter a name in the timer name field.
- Select a Calendar. Calendars are available when using Coordinator.
- Check Specify active hours and set start and end times to make this trigger condition active only during those hours.
- When Skip if running is selected, new trigger conditions are not executed if a trigger is already running.
3.2 Schedule Settings

Select the repeat condition. - Interval executes every specified number of minutes. - Hourly executes at specified start time (minutes, seconds) every hour. - Daily executes at specified start time (hours, minutes, seconds) every day. - Weekly executes at specified start time (hours, minutes, seconds) on specified days of the week. - Monthly executes at specified start time (hours, minutes, seconds) on specified days of the month. - Custom allows detailed execution settings using cron specification.
The custom expression uses five space-separated fields to represent sets of occurrences.
| Field | Required | Allowed Values | Special Characters |
|---|---|---|---|
| Second | Required | 0-59 | * / , - |
| Minute | Required | 0-59 | * / , - |
| Hour | Required | 0-23 | * / , - |
| Day | Required | 1-31 | * / , – ? |
| Month | Required | 1-12 or JAN-DEC | * / , - |
| Day of Week | Required | 0-6 or SUN-SAT | * / , – ? |
Example: Once a year on January 1st at 0:00:00 "0 0 0 1 1 *"
3.3 Timer Trigger Actions
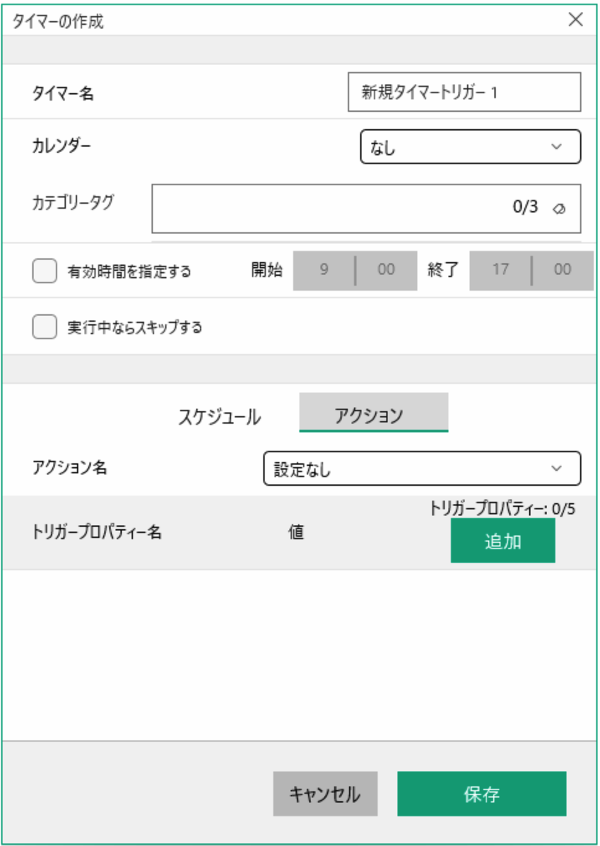
In the Actions tab, select the action to execute.
You can also specify multiple trigger properties (up to 5) as arguments for action execution.
Trigger properties include three predefined properties and custom property names:
- tp.KeyAreaName: Sets the selected area name
- tp.KeyLayerName: Sets the first key layer name specified in conditions
- tp.TriggerName: Sets the executing trigger name
In addition to these three, you can specify custom property names and values that can be referenced within actions.
3.4 Enabling the Timer Trigger
Don't forget to enable the new trigger by switching the toggle to green.
4. Trigger Variables and Properties
In device/timer triggers, you can pass trigger properties and trigger variables as arguments when executing actions.
4.1 Trigger Variables
Trigger variables are tv. variables passed to actions in triggers driven by sensor data reception events.
tv.Data: Sets the received data.
4.2 Trigger Properties
Trigger properties (tp.) can be defined in the trigger settings dialog, and even when calling the same action, you can change behavior using conditions based on tp. values.
Trigger properties include three predefined properties and custom property names:
- tp.KeyAreaName: Sets the selected area name
- tp.KeyLayerName: Sets the first key layer name specified in conditions
- tp.TriggerName: Sets the executing trigger name